Deprecated
The TSCM VM Appliance based WAF integration has been deprecated. Please use our AWS WAFv2 Cloud Integration as it offers the fastest and most reliable integration with AWS WAFv2. For those who are concerned about sharing AWS credentials, rest assured this can be managed by creating an IAM Role for managing your Web ACL.
Overview
This document describes how to integrate ThreatSTOP’s IP Defense service on an AWS Web Application Firewall (WAFv2) via web automation. This integration requires a TSCM Virtual Machine (VM) stood up in any environment with access to AWS API Endpoints and our servers (more details below). Once configured the TSCM will routinely update the WAF ACL refreshing based on the policy you select. It will also collect logs for upstream analysis and data reporting. The WAFv2 may be applied to either a Cloud Front or a Regional Load Balancer.
Compatibility
| Manufacturer | Version | Supported |
|---|---|---|
| AWS | WAFv2 | Yes |
| AWS | WAF-Classic | Yes † |
- † - This document covers the WAFv2, please choose WAF-Classic documentation if you are using Classic.
WAFv2 Integration types
| Integration Type | Documentation | Requires Virtual Machine | Notes |
|---|---|---|---|
| TSCM (CLI) | WAFv2 | Yes | Configuration done through ThreatSTOP Centralized Manager (TSCM) VM Command line interface (CLI), AWS Identity Access ID & Secret stored on VM only |
| TSCM with web automation | WAFv2 | Yes | Configuration done through ThreatSTOP Admin portal, AWS Identity Access ID & Secret stored on VM only |
| Cloud | WAFv2 | No | Configuration done through ThreatSTOP Admin portal, Supports both Identity and Role based access stored in Admin portal |
Current Version
| Current Version | Released |
|---|---|
| 1.06 | 01-10-2020 |
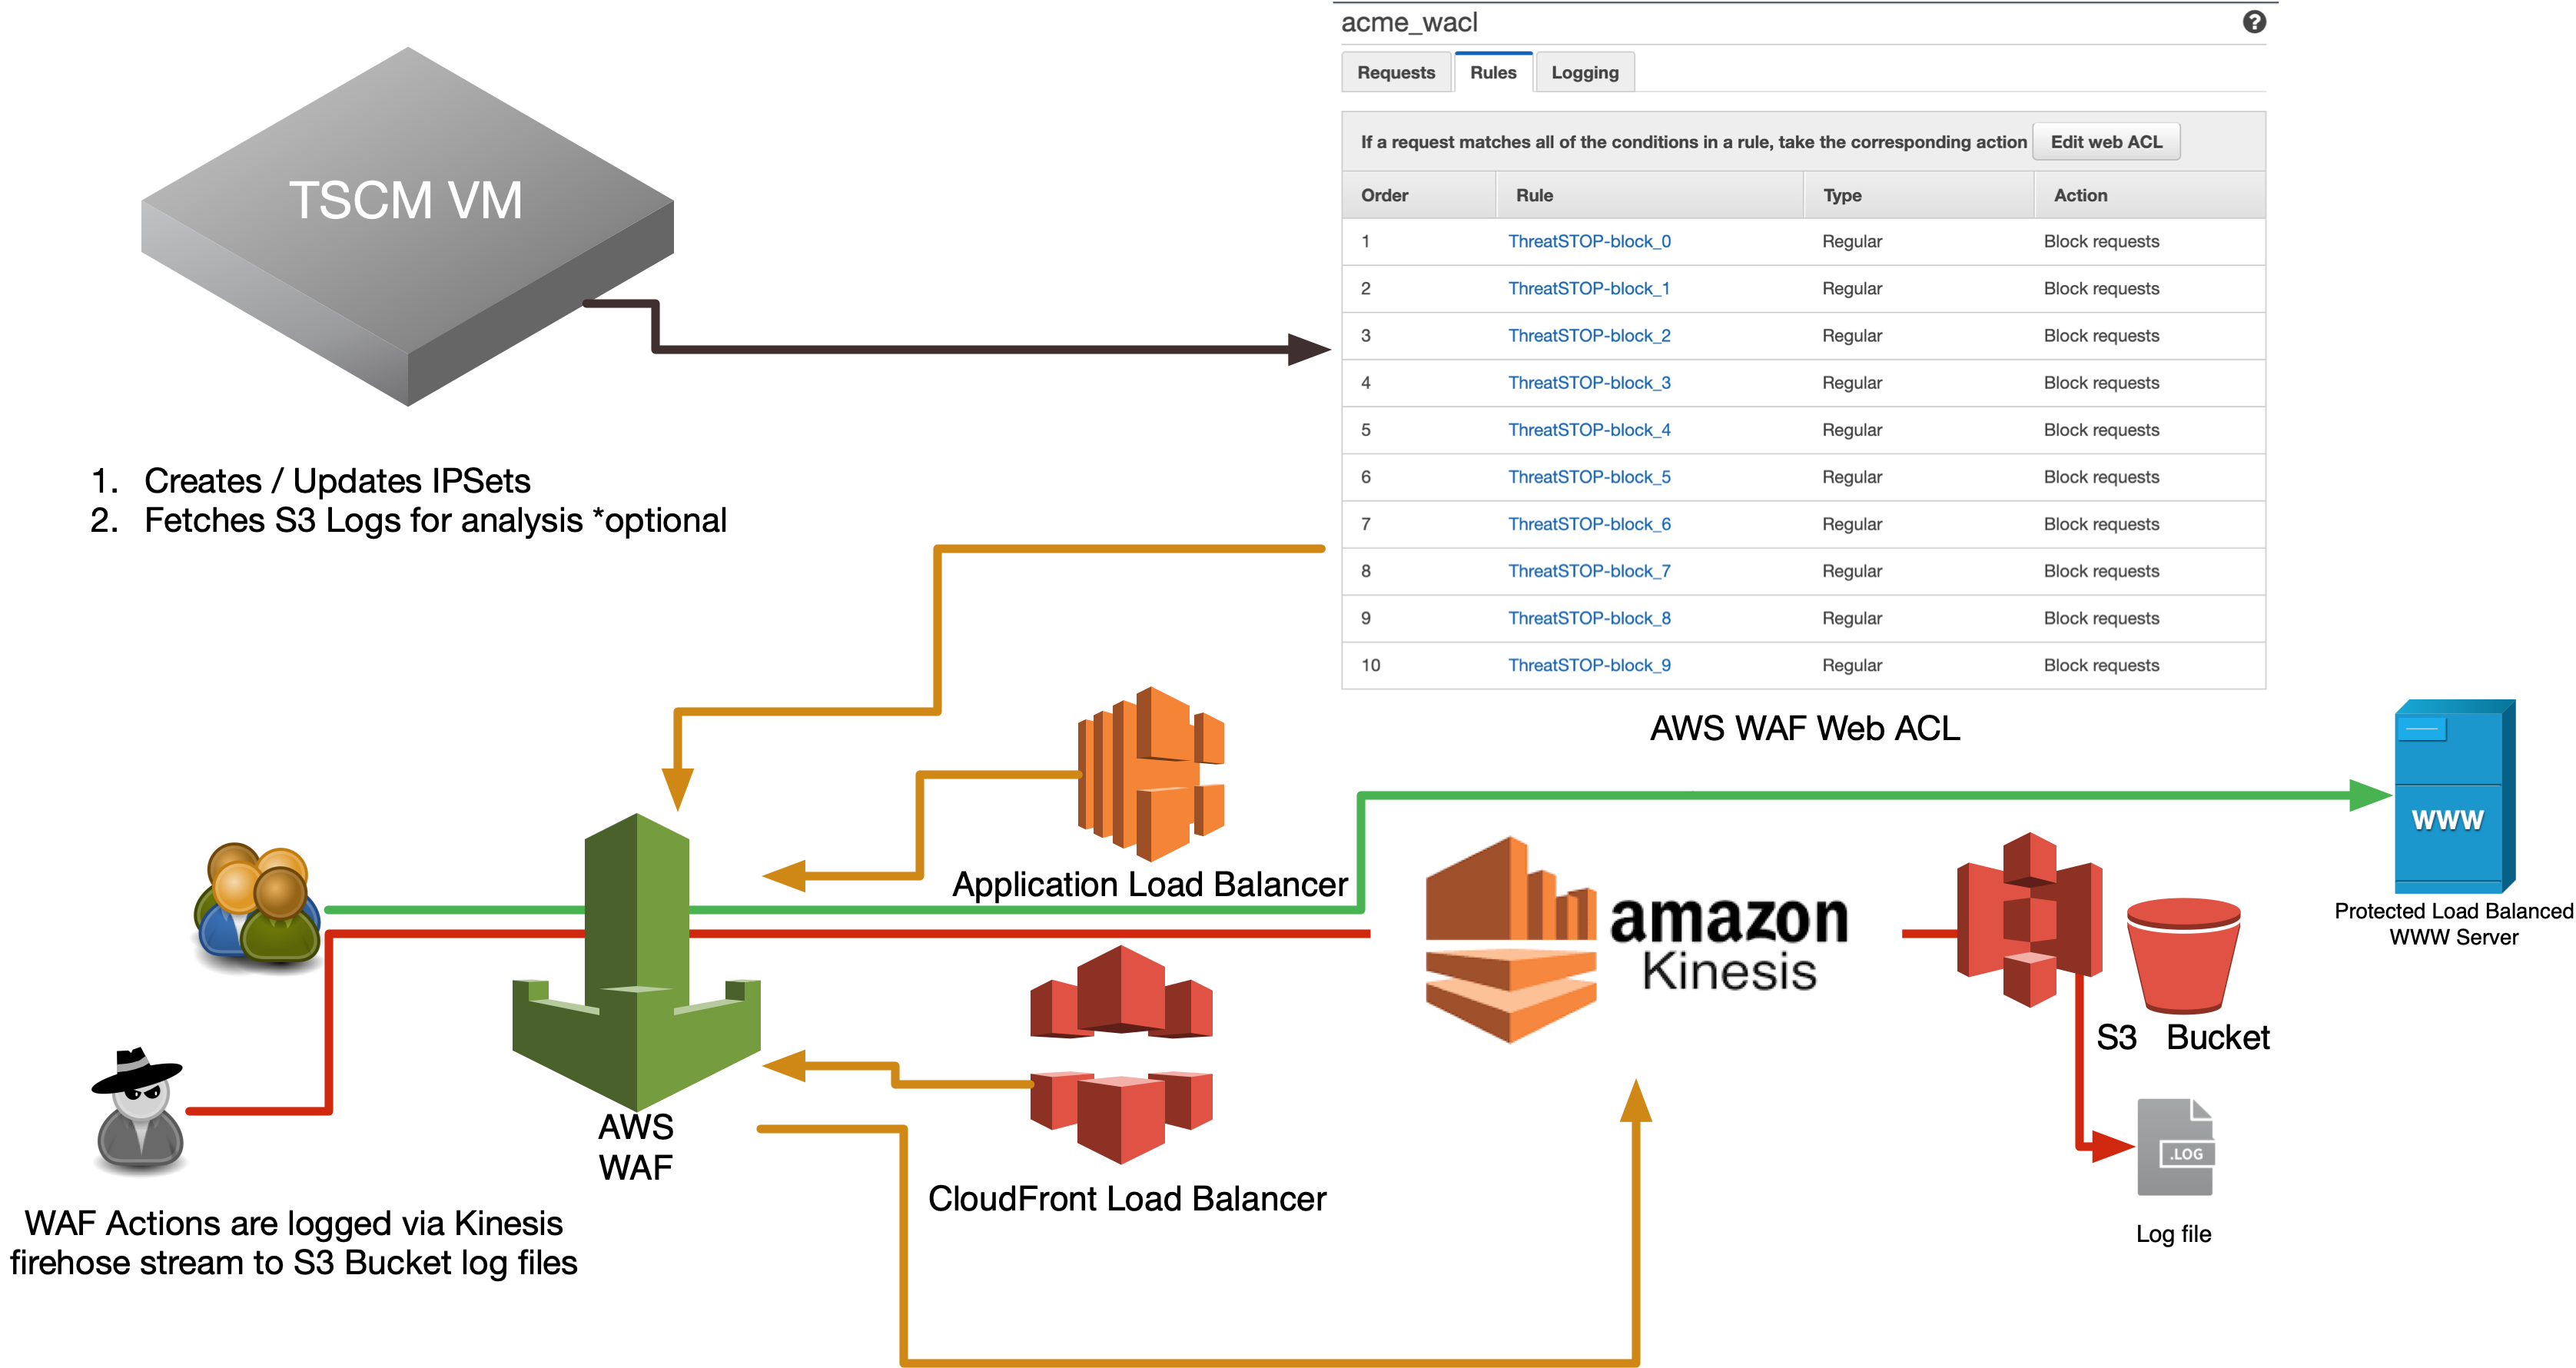
ThreatSTOP Data Flow Diagram
Install Methods
TSCM Install via Web Automation
Installing directly on your device via Web Automation, covered by this document. This allows you to configure settings on our web interface and have them automatically update on the WAF after initial installation. This method works by initiating a pairing command on the device to link up to our services. From that point forward your device will stay in sync with configuration updates you make on the portal. For more information regarding Web Automation here.
TSCM CLI Install
Installing via CLI setup wizard on a TSCM virtual machine (VM), which is covered on the CLI integration documentation.
Quick settings
Quick settings are provided below for expert installers who have already read through the documentation and understand what they are doing.
tsadmin add --type auto --device_id=[Device ID] --auto_key=[Device Key]
Installation considerations
- At the time this document was written, AWS WAF v2 limits Web ACLs to 100 rules. Each Rule can have multiple predicates (IPSet Match Groups) using the OR operator. Each IPSet is capable of supporting 10,000 IP Addresses/CIDRs.
- Any managed rule(s) for things like SQL Injection Protection, or other custom rules will not be touched so long as they are named differently than the ThreatSTOP rule naming convention.
- We support multiple actions for our “block” list. The default “BLOCK” of course blocks the request, while “COUNT” allows the request but logs the event. This is useful for validating a policy will not enforce filtering.
- If you plan on supporting more than a single WAF, please keep in mind you must pick unique prefix per AWS region.
- As the name implies, Web Application Firewalls (WAF) only protect endpoints against inbound port 80/443 traffic. If you need total network protection please contact our Sales department for assitance selecting the right product for your specific environment.
- Unlike other devices on ThreatSTOP’s platform, the AWS WAF devices don’t have a max policy size as this is directly correlated to the # of block/allow IPSets you assign to the device. For instance if you take the defaults and assign 30 block IPSets and 1 allow, this is effectively setting a 300k block max policy size and 10k allow.
Installation Parameters
If you have already created a device entry in the portal, and are familiar with the installation procedure, you can use the parameters below if you access this document from the Portal Device page and click on docs.
| Setting | Value |
|---|---|
| Device ID | Retrieved from the device settings page |
| Device Key | Retrieved from the device settings page |
Setup Command
tsadmin add --type auto --device_id=[Device ID] --auto_key=[Device Key]
Prerequisites
- Current active ThreatSTOP account
- AWS WAFv2 device added via the ThreatSTOP admin portal
- AWS IAM Access ID & Access Secret setup with full access to WAFv2 objects, and read-only access to your S3 Log Bucket.
- AWS Web ACL created. This ACL does not have to be assigned, but must exist prior to setup. The name should be alphanumeric only without spaces or special characters aside from (‘-‘, ‘_’, ‘.’).
- S3 Bucket created for Kinesis Data Firehose logging
Connectivity
To retrieve its configuration and policy, and to upload log data, the firewall needs the following connectivity:
- AWS API (Outbound TCP/443) from TSCM VM
- URL(s): See this reference document
- Outbound TCP port 443
- DNS over TCP
- Hostname: ts-dns.threatstop.com
- IP Address Range: 192.124.129.0/24
- Outbound TCP port 53 or 5353
- DNS over TLS - Configuration service
- Hostname: ts-ctp.threatstop.com
- IP Range: 204.68.97.208/28
- Outbound TCP port 5353
- HTTPS - Log service
- Hostname: logs.threatstop.com
- IP range: 204.68.99.208/28
- Outbound TCP port 443
- Direct Connection or via Proxy
- NTP - Time service
- Hostname: ntp.ubuntu.com
- Outbound UDP port 123
Setup
Step 1 - Portal device configuration
During this step, you will create a device entry on the Admin Portal. You will select a device type (AWS > WAFv2) and enter the configuration settings.
To create a WAF device entry:
- Log into the Admin Portal with your ThreatSTOP account
- Browse to the Device page and click Add Device
- Select the device manufacturer and model:
- Type: IP Defense
- Manufacturer: AWS
- Model: WAFv2
- Integration type: TSCM with web automation
-
Nickname: this is a mnemonic name used to identify the device. It can be set to any string (A-Z, 0-9, - and _). If you create multiple device entries, each entry must have a unique nickname. The Nickname will be used to identify the firewall and in the Reporting user interface.
-
Policy: select a pre-defined policy or a customized policy. It must be an IP Defense Policy.
-
IP Type: Access to the ThreatSTOP services is controlled in part using an ACL allowing the device IP address to connect. If your device has a static public IP address (the most common case), select static. If your device has a dynamic public IP address address, the ThreatSTOP services can lookup the IP address using a DNS fully-qualified name (FQDN).
-
Public IP address: In static mode, this is the public IP address of the device. It is possible to configure multiple device entries with the same public IP address.
-
Domain name: In Dynamic mode, this is a DNS FQDN which must be kept up-to-date as an A record pointing to the device’s dynamic IP address.
-
Note: An optional field to store a note of your choice about the device - location, identifiers, model…
-
Maximum Policy Size: Option limit on the number of entries in the policy. If the policy becomes larger than this setting, the device will truncate it down to the Maximum Policy Size.
Advanced Settings (optional)
- DNS Port: The device uses TCP Port 53 (outbound connections) to retrieve policy data. If this port is blocked or filtered (for example, networks using a DNS Application Layer Gateway), use this setting to switch to TCP Port 5353.
Device Specific Settings
-
AWS Access ID: AWS Access ID for accessing the API
-
AWS Access Secret: AWS Access Secret for accessing the API
-
AWS Region: AWS Region your WAF is in i.e. us-west-2. If you are using a CloudFront WAF this setting must be set to us-east-1 per Amazon’s documentation.
-
AWS Scope: AWS Scope should be set to REGIONAL unless you are installing a CloudFront WAF.
-
Allow IPSet limit: AWS WAF # of allow IPSets to create. Each IPSet has a 10,000 IP addresses/CIDR capactiy. (Max. 100 rules between block & allow).
-
Block IPSet limit: AWS WAF # of block IPSets to create. Each IPSet has a 10,000 IP addresses/CIDR capactiy. (Max. 100 rules between block & allow).
-
Web ACL Action: Web ACL action block rules will perform (BLOCK, COUNT). Count will not block, but log the hit. Default value: [BLOCK]
-
Web ACL Name: AWS WAF Web ACL name
-
Prefix: The AWS IPSet and Rule name prefix. I.e. “TS” creates IPSet object named “TS_bIPSet_0” or Rule name “TS_ThreatSTOP-block_0” along with complementary allow IPSets/Rules if used. Valid Chars (a-z, A-Z, 0-9) Default value: [TS]
- S3 Bucket Name + Prefix: S3 Bucket + path used for storing firewall hits via Kinesis firehose stream E.g. “AcmeWafLogs/US-West-ALB1”. In this example “AcmeWafLogs” is the S3 Bucket and “US-West-ALB1” is a directory under it where logs will be saved.
Upon saving the form, a device entry will be created in ThreatSTOP’s cloud.
Step 2 - Download software
After creating the device entry, verify you have the ts-awswafv2 module installed as shown below.
- Using ssh, login as threatstop to your TSCM VM and type the following commands
# first we will check to see if ts-awswafv2 module is installed
tsadmin version --all
threatstop@tsclient$ tsadmin version --all
  [INFO ] : ThreatSTOP Versions:
  Module               Version
  -------------------- ----------
    TSCM-Core          1.51-08
    ts-asa             3.42
    ts-awswaf          1.06
# If you get an Error or don't see ts-awswafv2 listed in the output, we will have to download the software from our public repo
threatstop@tsclient$ sudo apt-get update && sudo apt-get upgrade -y && sudo apt-get install -y ts-awswafv2
# to verify run the previous command and look for the new module name.
Step 3 - Create AWS WAF Web ACL
You may skip this step if you have already created a web ACL, otherwise direct your browser to https://console.aws.amazon.com/wafv2/home#/webacls.
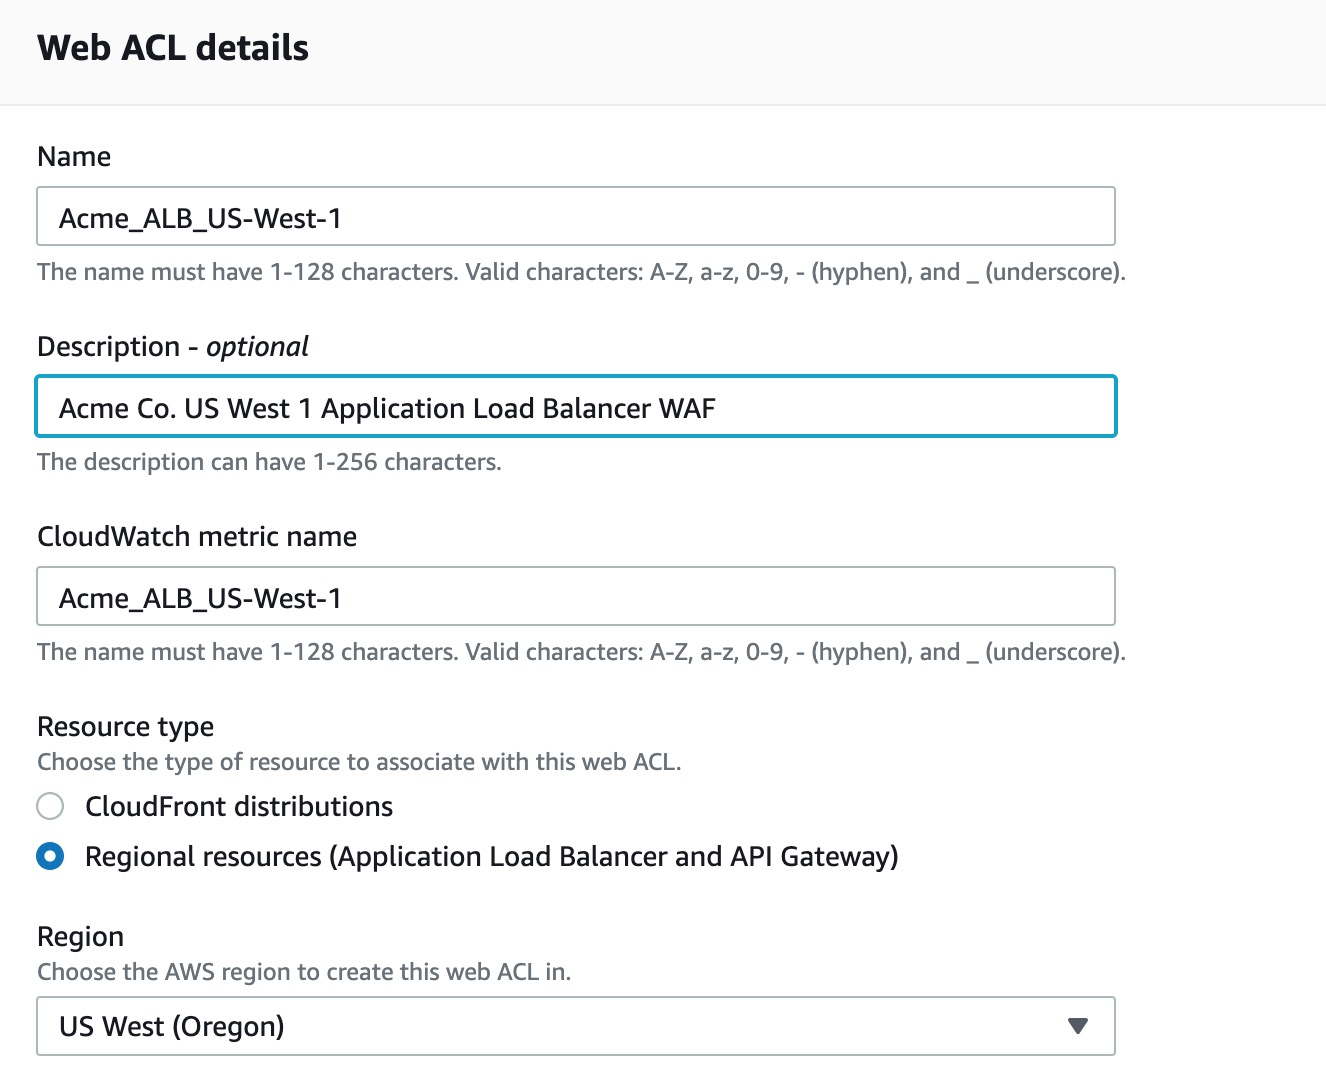
- Click ‘Create web ACL’ and choose a friendly name containing only A-Z, a-z, 0-9, _, - characters.
- Region should be set to whatever region your Application Load Balancer, API Gateway or CloudFront is on.

You do not have to choose to add any rules in the phase. We just require the ACL is created first prior to installing the ThreatSTOP integration.
Step 4 - Setup S3 Kinesis Data Firehose Logging
This step is highly recommended if for upstream analysis and data reporting functionality. If logging is not to be used skip this step. You can setup the data retention policy to whatever suits your needs. We fetch the data typically within 15 minutes.
- Log into AWS Console and go to setup Kinesis Data Firehose section.
- If you are setting up a Cloud Front WAF, you must setup the firehose delivery in the ‘us-east-1’ region.
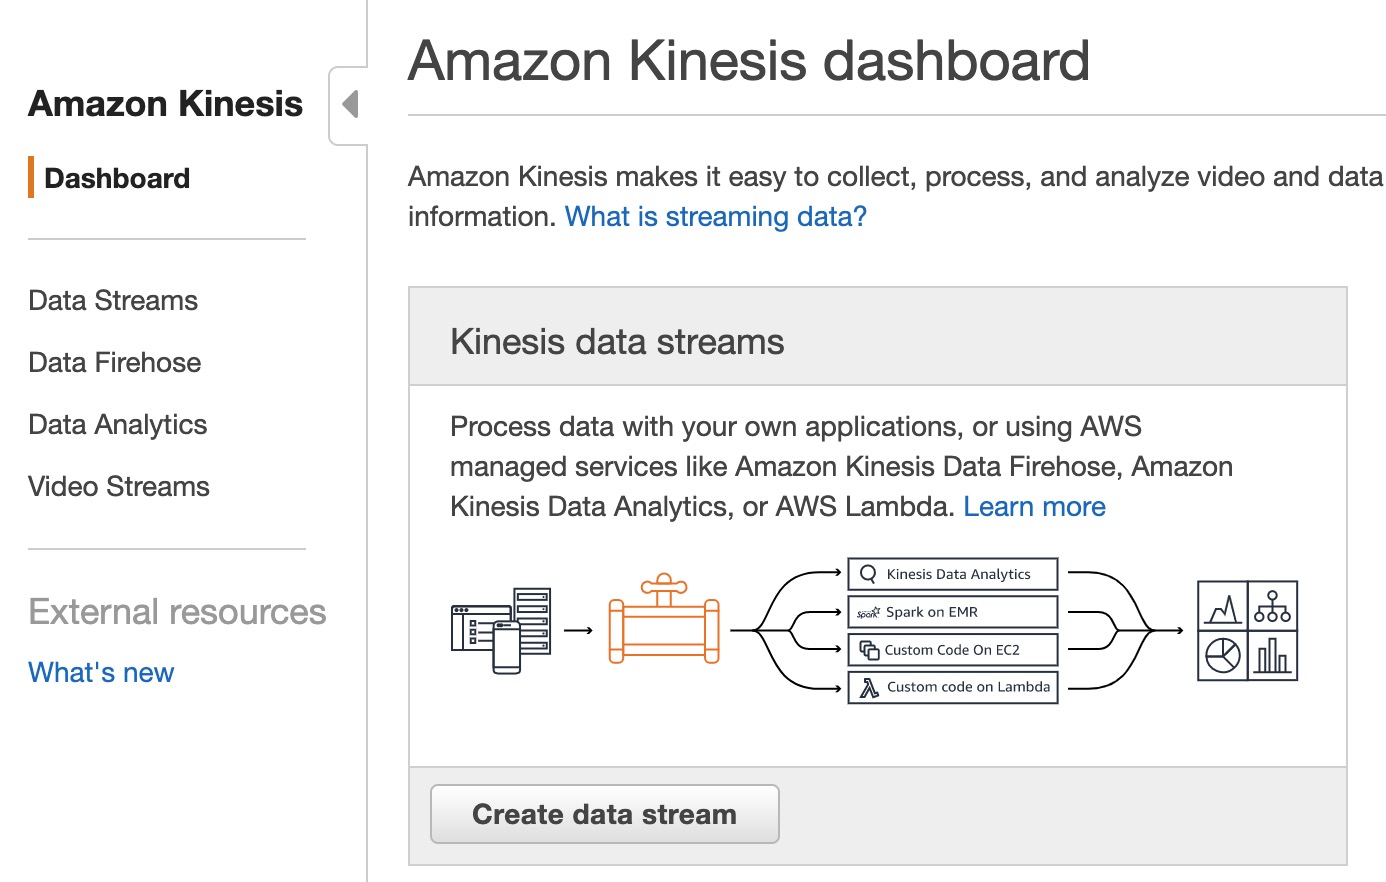
- Delivery stream name Per AWS, this must begin with ‘aws-waf-logs-‘ in order to be able to choose for as a WAF data stream.
- Source should be set to “Direct PUT or other sources”
- Data transformation is not necessary and should be Disabled
- Convert record format is not necessary and should be Disabled
- Destination should be set to ‘Amazon S3’
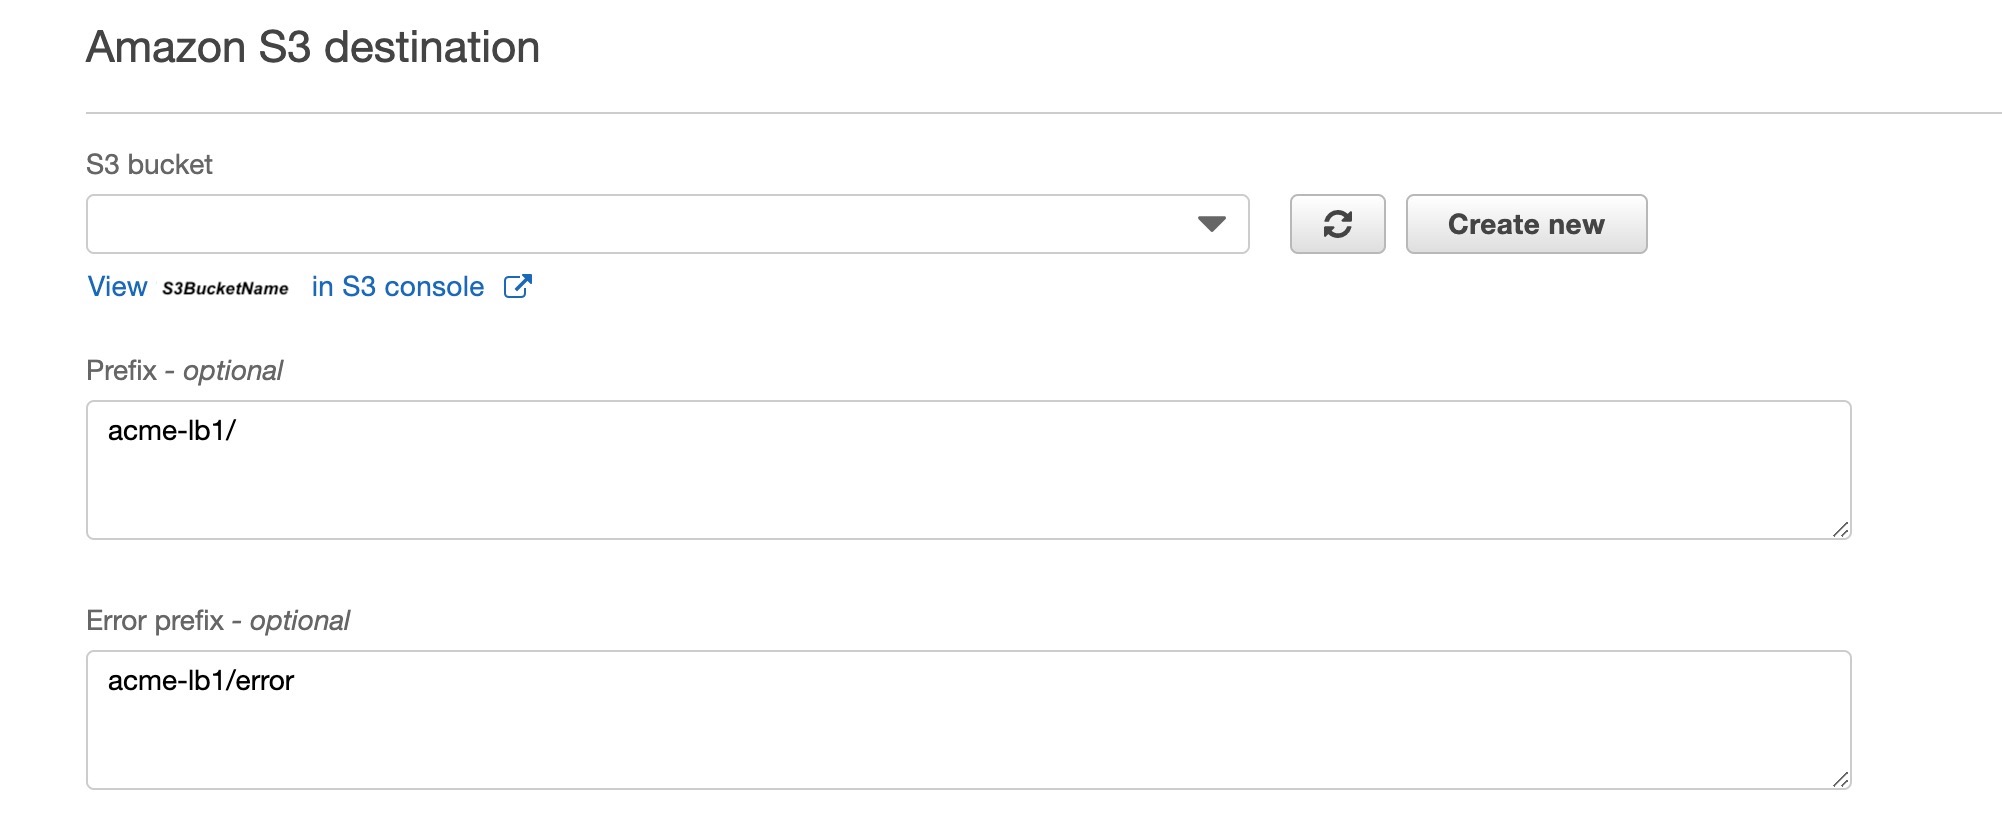
- S3 Destination should be set to the S3 Bucket you intend to store the logs in. If you intend to log multiple WAFs to the same Bucket it is best to create a subdirectory via the “View
in S3 Console" link.
AcmeWafLogs/acme-lb1/2019/12/25/13/aws-waf-logs....- Prefix This optional setting directs the data stream how to name the logs. If you created a subdirectory in the step prior, you add that in as a prefix. This is demonstrated in the screenshot above. Note: Remember to add the trailing slash.
- Buffer size This can be kept at 5MB.
- Buffer interval This can be set to every 60 seconds.
- S3 compression This should be disabled
-
S3 encryption This should be disabled
- When selecting an IAM Role for the firehose setup, you will need to either choose a pre-existing role that has sufficient privileges to write the logs to the selected S3 bucket, or create a new role via the menu.
Step 5 - Create IAM AWS Credentials
We save credential setup for the end as we’ll have to apply authorization to objects created in prior steps.
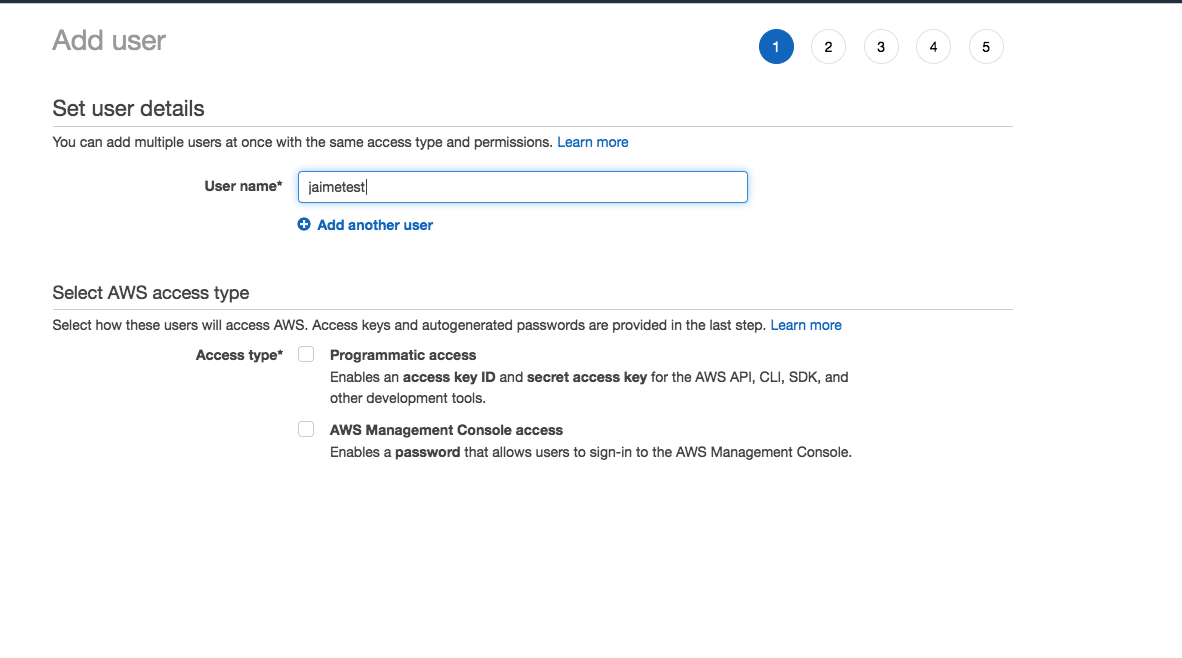
Direct your browser to AWS Identity and Access Management console, select ‘Users’ on the left and click “Add User”. If prompted for a choice between Programmatic access or AWS Management Console access, choose Programmatic access. Please make note of Access ID and Access Secret as they will be required during setup.
It is a good idea to create an account with only the specific access required to perform the operation necessary in your AWS environment. The account should have the following predefined permissions AmazonS3ReadOnlyAccess and a custom policy for granting WAFv2 Full Access. At the time this document was written the AWS managed policy AWSWAFFullAccess only grants WAFv2 privileges. You may need to create a custom policy to add the WAFv2 privileges outlined below. Ensure the S3 read-only access applies to the bucket you are sending logs to.
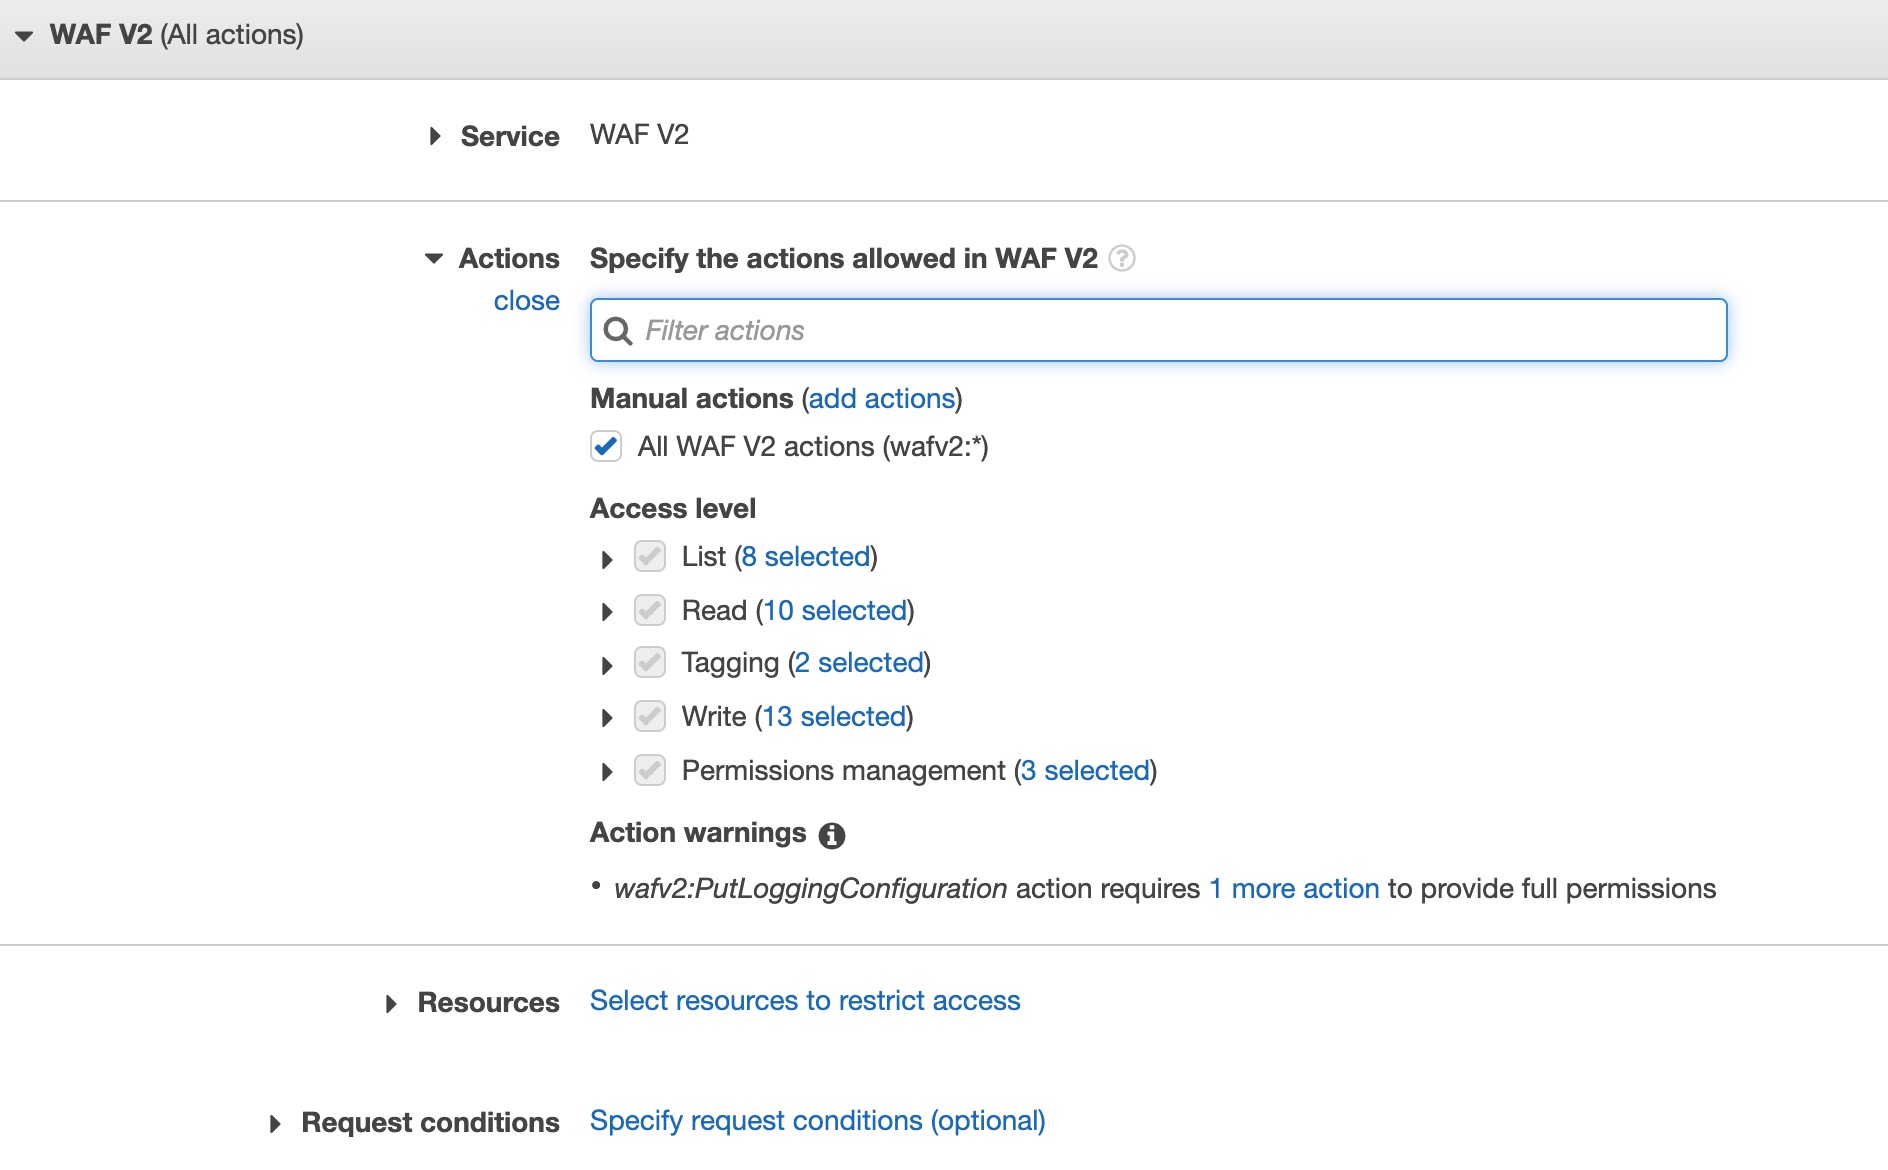
IAM Permission Policy
{
    "Version": "2012-10-17",
    "Statement": [
        {
            "Sid": "VisualEditor0",
            "Effect": "Allow",
            "Action": [
                "wafv2:ListWebACLs",
                "wafv2:ListResourcesForWebACL",
                "wafv2:ListRuleGroups",
                "wafv2:ListIPSets",
                "wafv2:GetWebACL",
                "wafv2:GetRuleGroup",
                "wafv2:GetIPSet",
                "wafv2:CheckCapacity",
                "wafv2:UntagResource",
                "wafv2:TagResource",
                "wafv2:UpdateWebACL",
                "wafv2:DeleteIPSet",
                "wafv2:UpdateIPSet",
                "wafv2:CreateIPSet",
                "wafv2:UpdateRuleGroup",
                "wafv2:GetLoggingConfiguration",
                "wafv2:PutLoggingConfiguration",
                "s3:ListBucket",
                "s3:GetObject",
                "s3:ListAllMyBuckets"
            ],
            "Resource": "*"
        }
    ]
}
Step 6 - TSCM Configuration
Next we will add the AWS WAF as a device on the TSCM VM. This will setup automatic Web ACL (Rule IPSet) updates based on the policy you selected in Step 1. This will also collect S3 logs for upstream analysis and data reporting in our Admin Portal.
- Run the following pairing command to launch the AWS WAF setup:
tsadmin add --type auto --device_id=[Device ID] --auto_key=[Device Key]
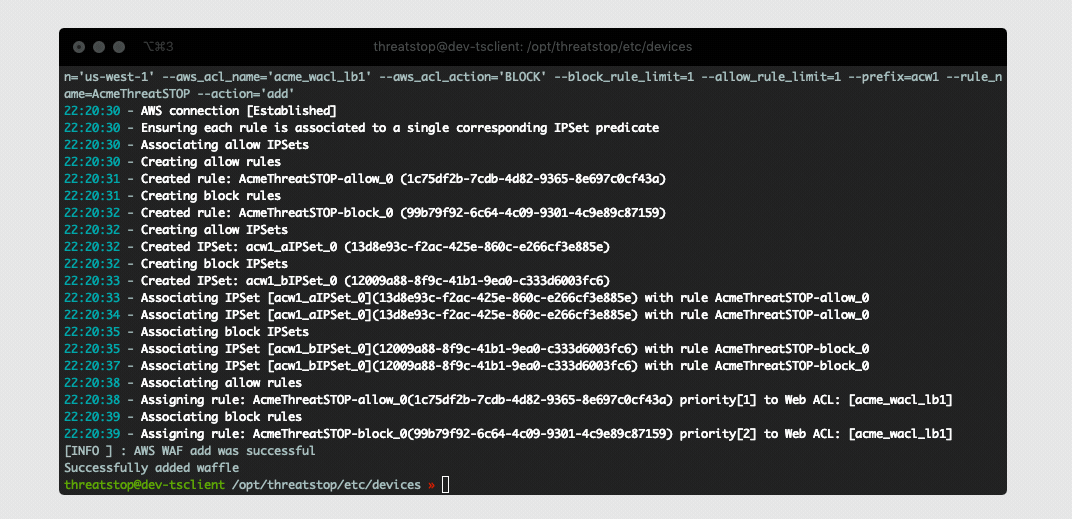
The software will fetch all configured settings, install automated jobs in the crontab to perform updates, upload logs (if enabled), and send optionally send telemetry. It will also verify the required AWS WAF Rules, IPSet groups exist and associated correctly. In the event pre-existing IPSet objects are encountered during setup you will be prompted to confirm you would like to overwrite them prior to installation. This ensures we don’t have duplicate IPSets creating a race condition during updates.
After the device is added you will see some output while it creates all the required WAF objects and associates them to your Web ACL. Once this completes you can attempt to load your policy by running tsadmin update <device name> (This normally happens automatically in the background at least once an hour).
Step 7 - Testing Configuration
There are several ways of testing the WAF is properly blocking and logging web traffic. A few are listed below as examples.
- Create an EC2 instance with an Elastic Public IP. Add the Public IP address to your policy, or directly to one of the IPSet groups and attempt to GET the webpage. The attempt should be logged via to the S3 Bucket configured.
- Add the Public IP address of your network to an ALLOW IPSet and setup the a rule to apply it. This should log the ALLOW to the same S3 log bucket.
Logging and Reporting
If log upload is enabled, the firewall will now upload logs every 15 minutes, as long as there were WAF Actions performed by the policy since the last upload. The logs can be analyzed in the IP Defense Reports 15 minutes after they’ve been uploaded.
- To manually run log send process run
tsadmin logs.
Logs are stored in /var/log/threatstop/devices/<device name>/syslog
Configuration changes
Changing the policy
- Update the policy assigned to the device in the Admin Portal
- Wait 15 minutes for the changes to propagate to ThreatSTOP’s policy service
- Run
tsadmin configure <device name>commands to set the updated block and allow policy names.
View the networks contains in the current policy
- Login into WAF Web ACL console
- Set the Filter to the AWS region your WAF resides in.
- Select the Web ACL name, go to the ‘Rules’ tab, and select a rule to see its members.
Additional information
- A good overview of how Elastic Load Balancers work.
Troubleshooting
- Failed to install
- If you recently created the AWS Access ID or assigned permissions to an existing ID, it takes a few minutes for the settings to propogate in AWS. Allow 2-5min before retrying.
- If you are receiving invalid token errors, make sure you system time is in sync. AWS’s authentication relies on system time sync with only a +- 5min deviation.
- Failed to retrieve policy error message
- If you receive this error message while configuring the ThreatSTOP software, check the connectivity to the ThreatSTOP DNS service described above.
- If this is a new policy or device, wait 15 minutes for the configuration to propagate.
- If the issue persists, please contact ThreatSTOP support.
To get a list of configured settings run:
tsadmin show <device name>
To get a full list of available command line parameters on the command line type:
tsadmin add --type awswafv2 --help
Version Changelog
| Version | Release Date | Notes |
|---|---|---|
| 1.00 | 2020-01-20 | Initial WAFv2 support |
Uninstalling ThreatSTOP
- To uninstall the ThreatSTOP integration:
- Login into TSCM via Secure SHell
- Run
tsadmin remove <device name> - You can reinstall the software by re-running the setup procedure