Overview
This document will guide you through the installation of ThreatSTOP’s IP Defense iptables linux integration on an Azure provisioned Ubuntu virtual machine.
- Step 1. Create and login to ThreatSTOP account to copy License / API Key
- Step 2. Return to Azure and create new “ThreatSTOP IP Firewall” device from the marketplace offerings
- Fill out Azure VM provisioning form providing machine type, storage, network, license, etc. Wait for device to provision
- Step 3. Secure SSH & log in to deployed Azure ThreatSTOP IP Firewall to test functionality
- Step 4. Log into ThreatSTOP Admin portal to update policy, device settings & repeat testing
Step 1. ThreatSTOP Account Setup
The first thing you will need is a ThreatSTOP account, (sign-up here). After submitting your information and verifying your account via email you’ll be able to login and retreive your License aka API Key.

Click “Copy” button to add it to your clipboard, you will need it during the Azure side of the account creation process.
Step 2. Azure Portal Setup
There are five blades (pages of the form) of information required prior to provisioning the new virtual machine.
Virtual machine selection
- Login to your Azure portal at https://portal.azure.com.
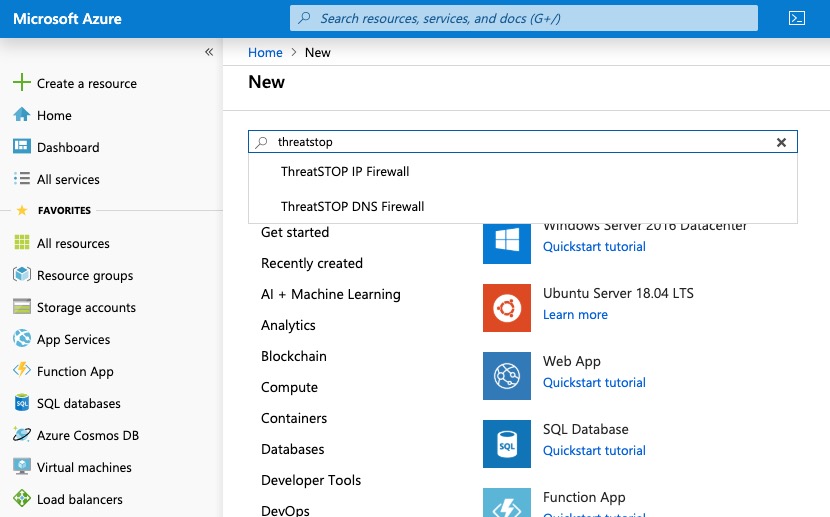
- Click “Create a resource” on the upper left column.
- Search for ThreatSTOP.
-
Click on ThreatSTOP IP Firewall in the search results.
-
Click Create. You will be led to a form to create your new IP Firewall.
Provisioning an IP Firewall
Basics
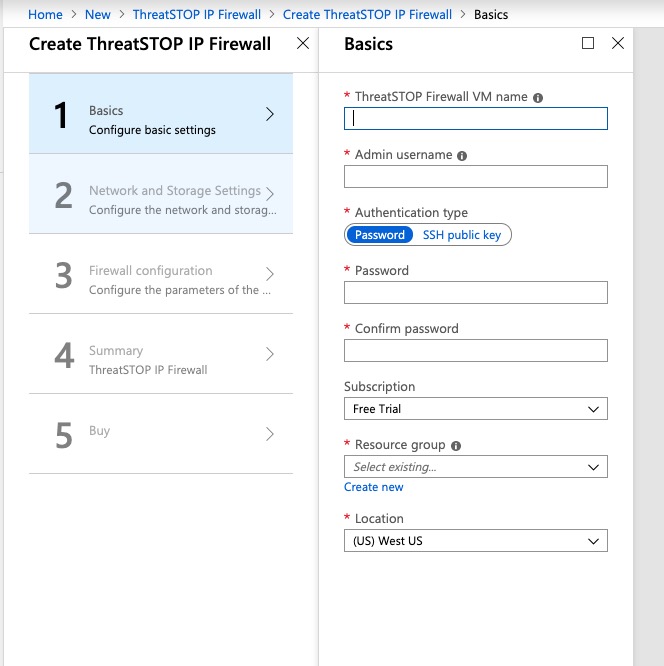
- Name your ThreatSTOP IP Firewall
- Provide an admin username
- Select an authentication type: Password or SSH public key
- Provide a password or SSH public key
- Select a subscription model
- Create a new resource group and provide a name
- Select a datacenter location for your virtual environment
- Click [OK]
Network and Storage Settings
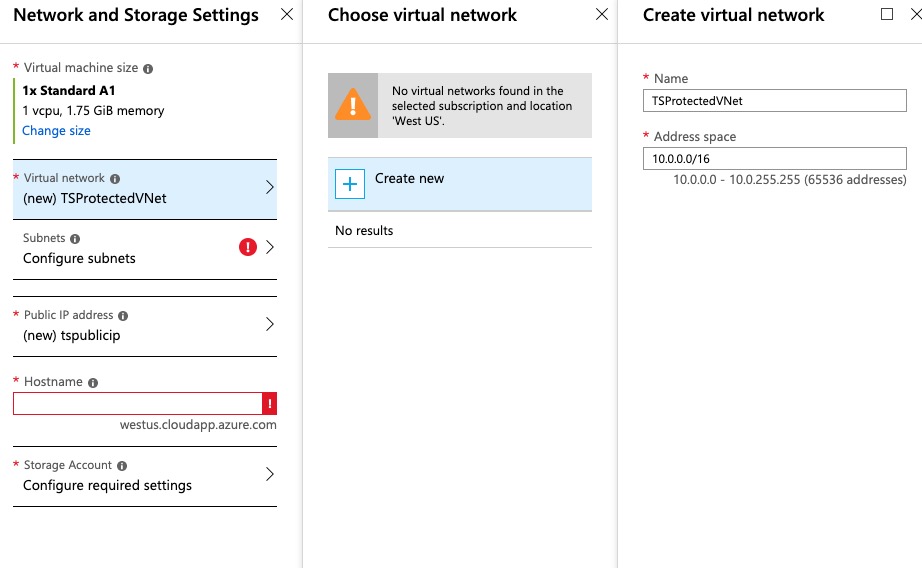
- Select your virtual machine size
- Create a virtual network, or select one that exists in the datacenter to which the network is being deployed.
- Create a subnet. A new sub-net will need to be created prior to deployment for the IP firewall if one does not already exist. For testing purposes you may wish to deploy a new virtual net alongside an existing vnet, and then roll the servers into the existing vnet if they meet approval.
- Create a new public address
- Provide a DNS prefix / hostname.
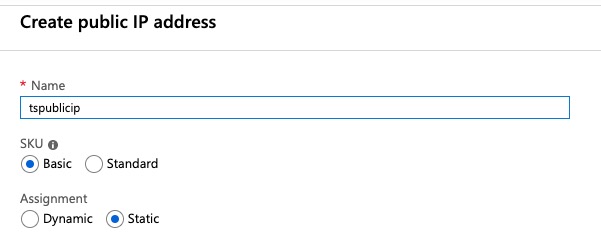
- Configure a storage account.
Firewall Configuration
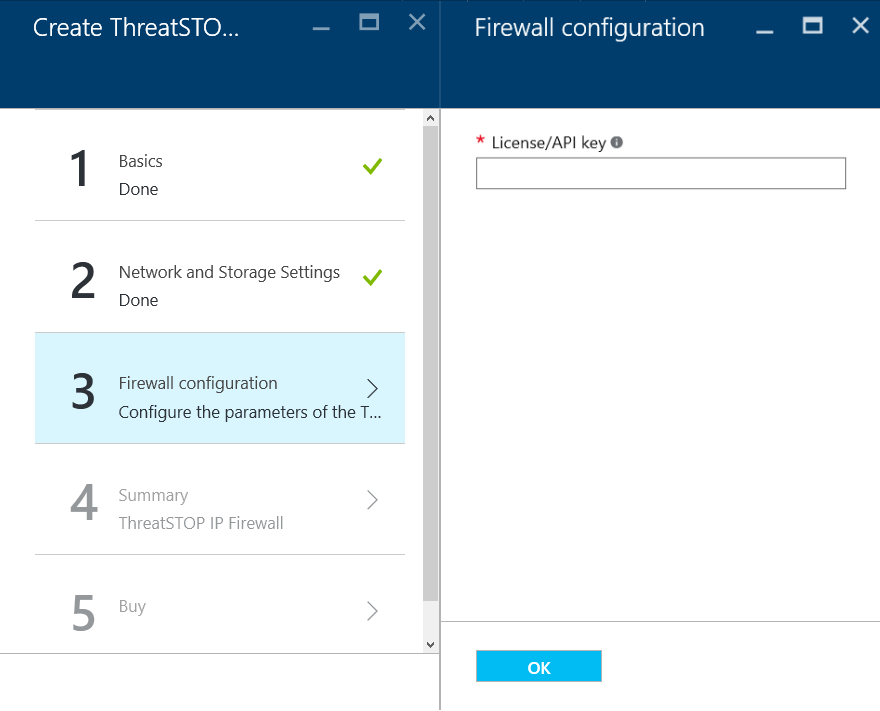
- Enter the License/API key you copied in ThreatSTOP Account Setup above.
- Click OK.
Summary
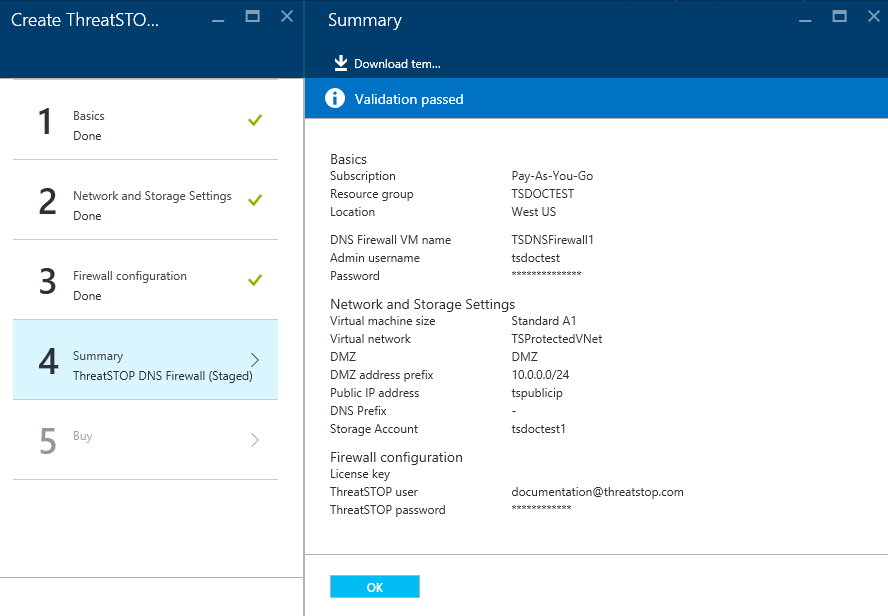
- Verify that everything looks correct and click OK.
Buy

- Review the Terms of Use and Privacy Policy then click Purchase. This step will bill your Azure account per your agreed terms just like any other VM. ThreatSTOP will not bill through Azure as we setup terms directly with you after the trial period is over.
This will begin deploying the ThreatSTOP IP Firewall into your Azure instance, including creating a Resource Group, firewall VM, and adding your new device to your ThreatSTOP account. You can verify that the deployment to your account was successful by logging into https://www.threatstop.com and looking for a device named azure_ip_X where x is 12 digit number and has its Manufacturer / Model set to Microsoft / Azure IP Firewall.
If this appears then the deployment was successful and you can move on to Testing the IP Firewall or Final Subnet Configuration.
Step 3. Securing network access & verifying functionality
Connecting to the Firewall via SSH
After your resource group has been successfully deployed, you will be able to login to your IP Firewall using SSH. To find the IP address to login:
- Open the resource group by clicking on its icon in the Azure Dashboard.
- Click on the icon for your Virtual Network. This will open the Virtual network blade. The connected devices will list the IP address for your IP Firewall device. This can be used with your favorite SSH program to access the server. The username and password provided during Azure marketplace offering creation will allow login to the server.
Securing the SSH Login Method
After initial setup has been completed it’s recommended to modify the SSH Login method to only be available from computers inside your network. To do this create an inbound security rule in the NSG with the following rules:
Rule 1
- Name: AllowAccessToSSH
- Priority: 100
- Source: CIDR block
- Source IP Address range: [enter the CIDR of your management device, e.g. 192.0.2.0, this will need to be a fixed address to allow the data from the management system to pass through to the firewall]
- Protocol: TCP
- Source Port Range: 22
- Destination: [enter the CIDR of the firewall device, eg. 10.0.1.14]
- Destination Port Range: 22
- Action: Allow
Rule 2
- Name: RestrictAccessToSSH
- Priority: 130
- Source: Any
- Protocol: Any
- Source Port Range: *
- Destination: CIDR block
- Destination Port Range: [enter the CIDR of the firewall device, eg. 10.0.1.14]
- Action: Deny
Verifying IP Firewall functionality
Before deploying the IP Firewall into your live environment, it is advisable to test that the firewall is performing as expected. One way of doing this is to deploy a temporary VM into the Clients subnet, connect to both it and the firewall, and monitor for traffic flowing across the firewall.
- In Azure deploy a new Ubuntu VM into the same resource group as the IP firewall. For our example we are going to use the existing TSProtectedVnet but make sure the client VM is assigned to the Clients subnet.
- The default settings are OK with two exceptions:
- Choose none for Public IP address as this will be a private subnet.
- Choose none for Network Security Group (NSG) for simplicity.
- Click on OK to bring up the Summary of the VM device.
- Click on OK again begin deploying the test VM.
- While the client VM is being deployed, it’s safe to add it into the routing table.To do this:
- Open the Resource Group you just created.
- Click on the Route Table created by the solution template
- Click on Subnets.
- Click + Associate.
- Choose the Virtual Network.
- Select TSProtectedVNet.
- Choose Subnet.
- Associate it with the Clients subnet.
- Click OK.
- To test, open up two SSH sessions to the firewall’s public IP. In one window ssh into the private IP of the client vm (the firewall is a jump box to the client):
- Run the following command on the firewall:
sudo tcpdump -i eth0 proto ICMP -n # If you don't have tcpdump installed, install it by running: sudo apt-get install -y tcpdump - On the client vm, ping bing.com or similar and watch for the packets passing through the firewall. If you get a response on the client and also see packets flowing, the setup is complete. The examples below show a test ping for reference of what you should see:
Test One
Here we will test to make sure traffic is flowing through the firewall. We will first start a tcpdump session and examine packets being sent to a known good site (bing.com in this example). Server
admin@TSIPFirewall1:~$ sudo tcpdump -i eth0 proto ICMP -n
tcpdump: verbose output suppressed, use -v or -vv for full protocol decode
listening on eth0, link-type EN10MB (Ethernet), capture size 65535 bytes
00:25:04.569136 IP 10.7.0.4 > 204.79.197.200: ICMP echo request, id 6065, seq 1, length 64
00:25:04.569762 IP 204.79.197.200 > 10.7.0.4: ICMP echo reply, id 6065, seq 1, length 64
00:25:05.571144 IP 10.7.0.4 > 204.79.197.200: ICMP echo request, id 6065, seq 2, length 64
00:25:05.572268 IP 204.79.197.200 > 10.7.0.4: ICMP echo reply, id 6065, seq 2, length 64
Client
```bash
admin@TSIPFirewall1:~$ ping bing.com
PING bing.com (204.79.197.200) 56(84) bytes of data.
64 bytes from a-0001.a-msedge.net (204.79.197.200): icmp_seq=1 ttl=121 time=0.637 ms
64 bytes from a-0001.a-msedge.net (204.79.197.200): icmp_seq=2 ttl=121 time=1.14 ms
64 bytes from a-0001.a-msedge.net (204.79.197.200): icmp_seq=3 ttl=121 time=0.645 ms
64 bytes from a-0001.a-msedge.net (204.79.197.200): icmp_seq=4 ttl=121 time=0.839 ms

 ^C
--- bing.com ping statistics ---
4 packets transmitted, 4 received, 0% packet loss, time 11002ms
rtt min/avg/max/mdev = 0.591/0.780/1.596/0.289 ms
```
Test Two
Here we will test to make sure traffic is being dropped at the firewall. We will first start a tcpdump session and examine packets being sent to a known blocked site (bad.threatstop.com in this example as a safe to test blocked IOC). We’ll also take the opportunity to verify the logs reflect what we just blocked.
Server
admin@TSIPFirewall1:~$ sudo tcpdump -i eth0 proto ICMP -n
tcpdump: verbose output suppressed, use -v or -vv for full protocol decode
listening on eth0, link-type EN10MB (Ethernet), capture size 65535 bytes
00:26:02.636465 IP 10.7.0.4 > 64.87.3.133: ICMP echo request, id 6072, seq 1, length 64
00:26:02.648962 IP 64.87.3.133 > 10.7.0.4: ICMP echo reply, id 6072, seq 1, length 64
00:26:03.637502 IP 10.7.0.4 > 64.87.3.133: ICMP echo request, id 6072, seq 2, length 64
00:26:03.652238 IP 64.87.3.133 > 10.7.0.4: ICMP echo reply, id 6072, seq 2, length 64
Client
```
tsadmin@acmeipfw1:~$ ping bad.threatstop.com
PING bad.threatstop.com (64.87.3.133) 56(84) bytes of data.
ping: sendmsg: Operation not permitted
ping: sendmsg: Operation not permitted
^C
--- bad.threatstop.com ping statistics ---
2 packets transmitted, 0 received, 100% packet loss, time 1031ms

# testing the log was written ok
tsadmin@acmeipfw1:~$ ls -l /var/log/threatstop/threatstop.log
-rw-r--r-- 1 root adm 392 Aug 28 01:28 /var/log/threatstop/threatstop.log
tsadmin@acmeipfw1:~$ sudo cat /var/log/threatstop/threatstop.log
Aug 28 01:28:46 acmeipfw1 kernel: [ 1806.463962] ThreatSTOP-TSblock IN= OUT=eth0 SRC=10.0.0.4 DST=64.87.3.133 LEN=84 TOS=0x00 PREC=0x00 TTL=64 ID=32743 DF PROTO=ICMP TYPE=8 CODE=0 ID=19868 SEQ=1
Aug 28 01:28:47 acmeipfw1 kernel: [ 1807.495827] ThreatSTOP-TSblock IN= OUT=eth0 SRC=10.0.0.4 DST=64.87.3.133 LEN=84 TOS=0x00 PREC=0x00 TTL=64 ID=32784 DF PROTO=ICMP TYPE=8 CODE=0 ID=19868 SEQ=2
```
Final Subnet Configuration
If testing proved successful, you may associate your clients subnet with the route table created during deployment.
Caution: These instructions are a simulation of the steps you will perform to go live in a production environment.
- Click on the Route Table created by the solution template and associate it with your production subnet.
- Click OK to finalize deployment of the IP Firewall.
Step 4. Updating firewall policy and settings

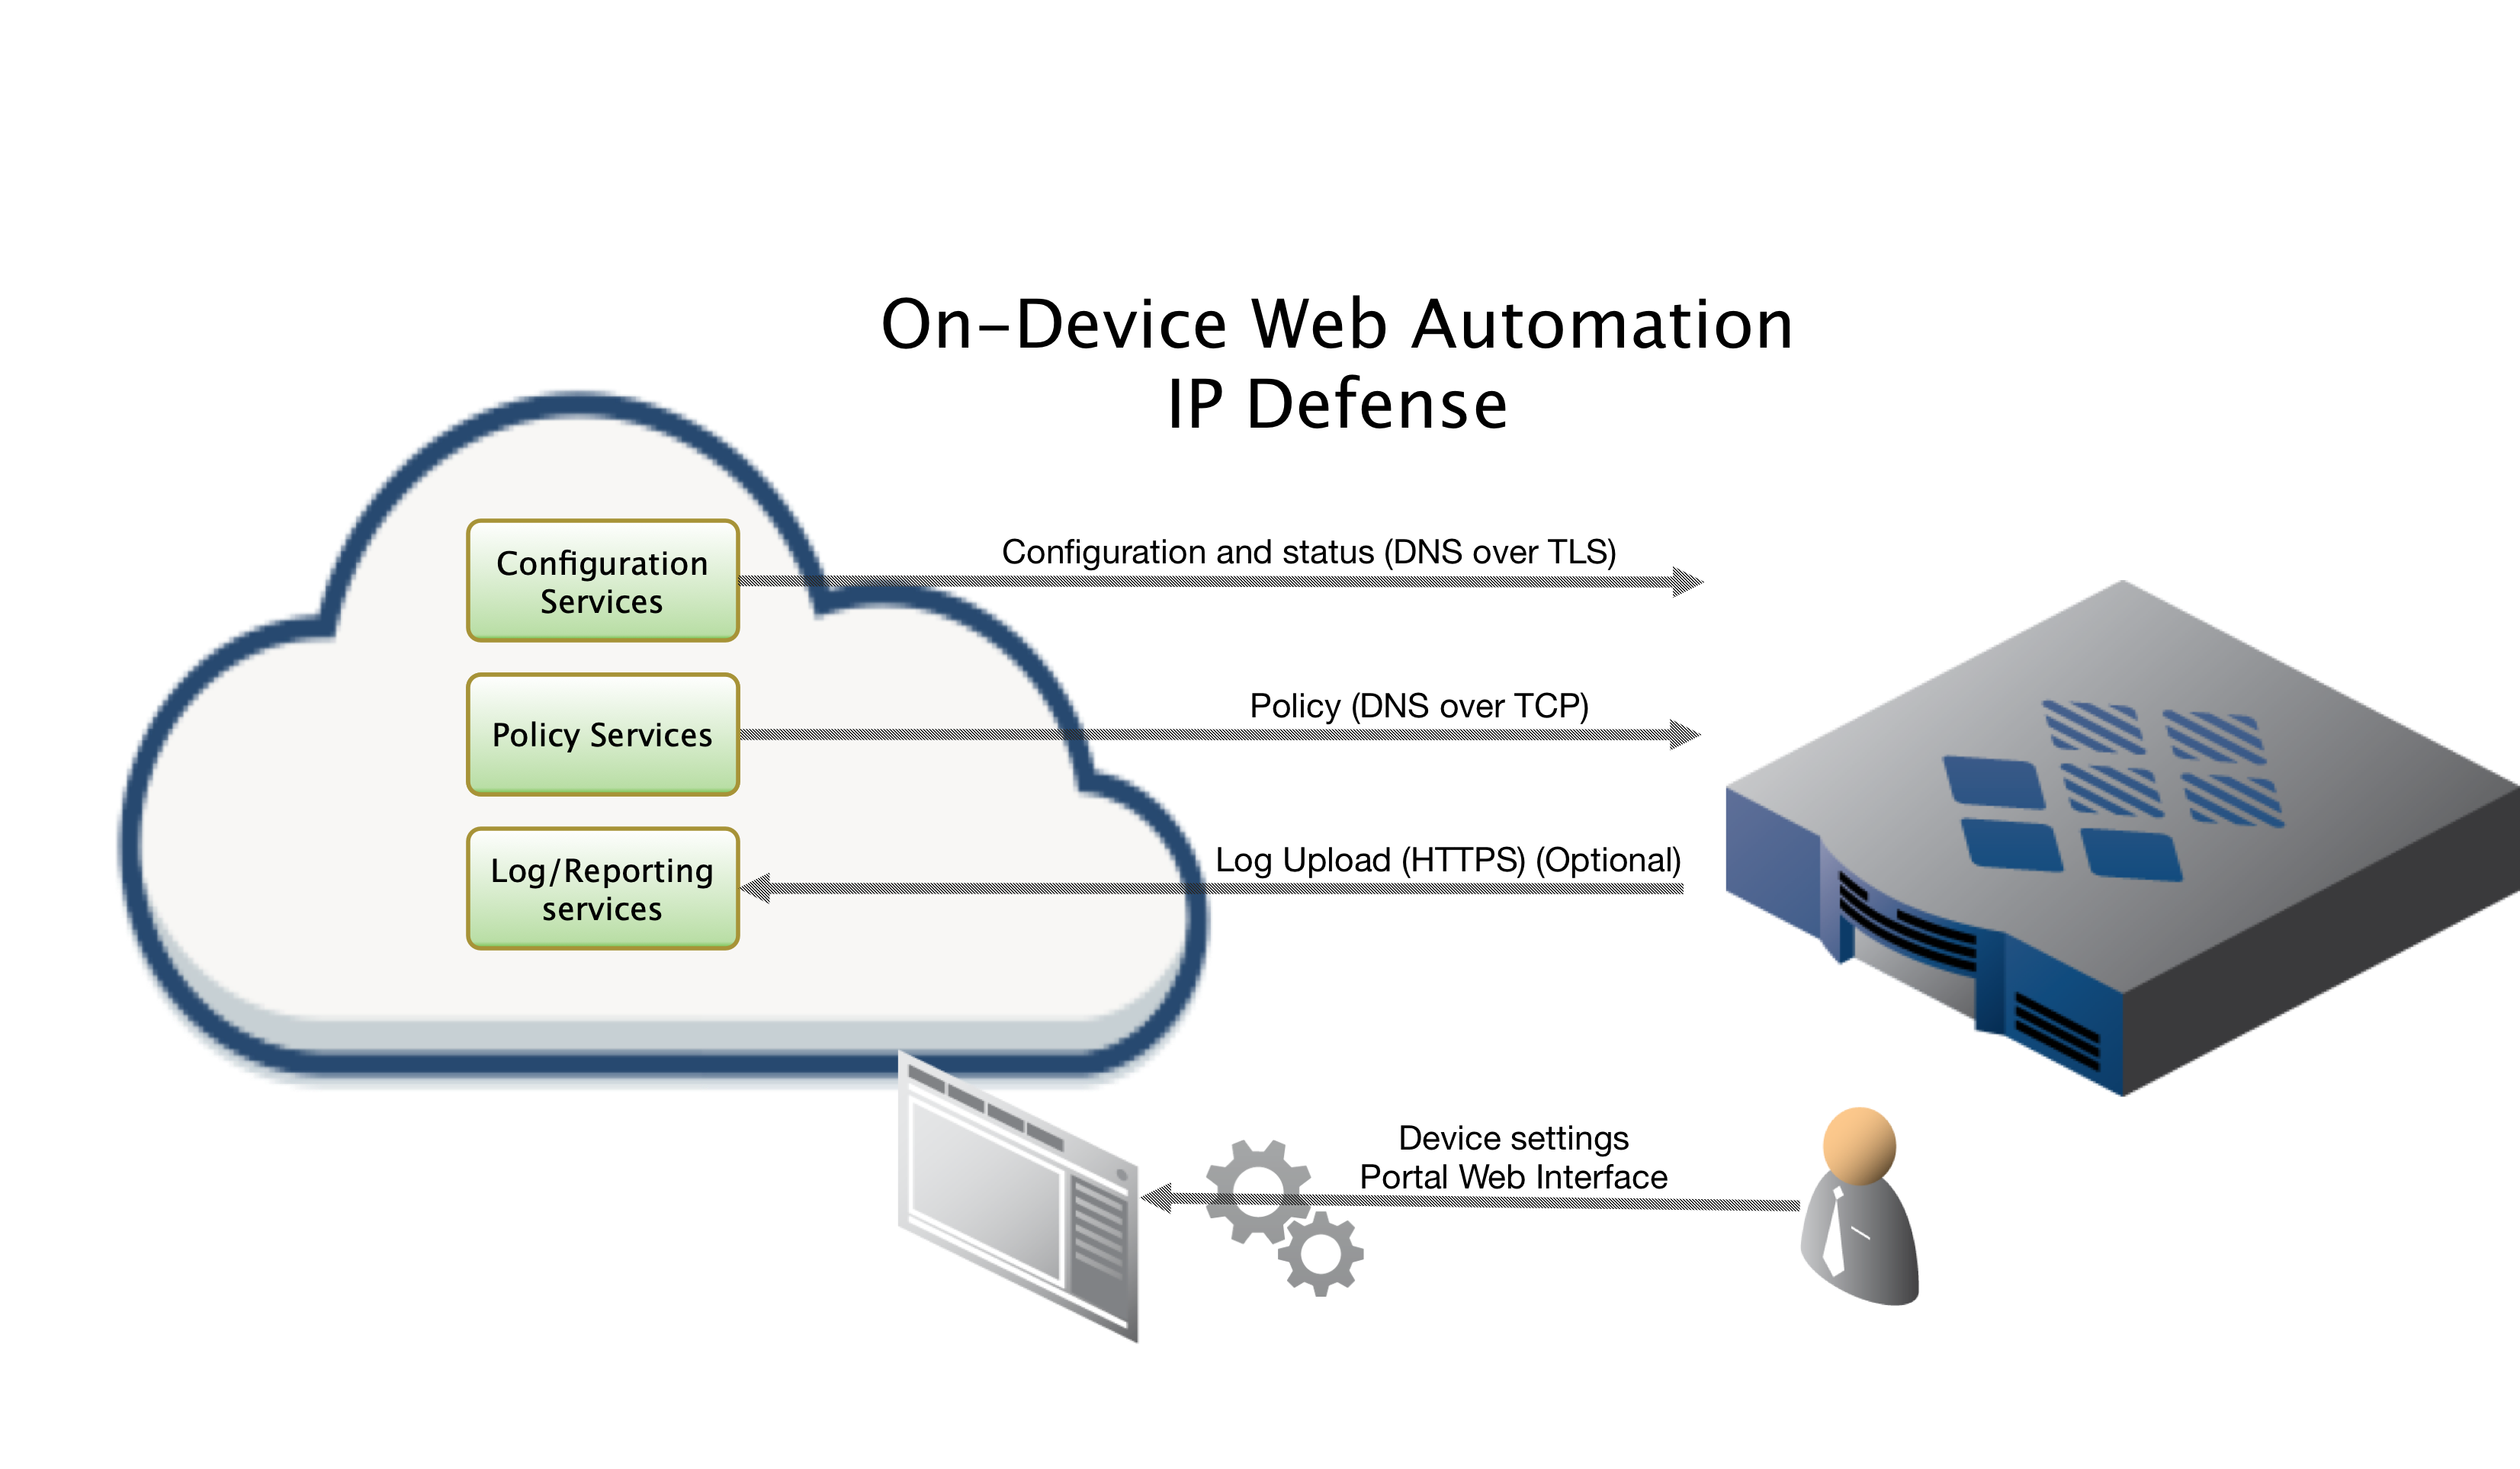
ThreatSTOP uses a proprietary mechanism to remotely configure and deploy updated settings a customer sets on our admin portal for their deployed devices. This allows our customers to use a friendly web interface to easily configure fleets of devices without ever having to log into & apply settings on the individual device.
Your Azure Firewall is configured to take advantage of this functionality out of the box. Once the provisioning is completed and you’ve verified you have a working IP Firewall you can head over to the Admin Portal’s Devices list to edit the configuration of the newly provisioned virtual machine(s).

Troubleshooting
If your VM did not provision properly you can retry to provision the server by running the executable shell script in your root accounts home directory named “retry_tsadmin_add.sh”.
 # retry_tsadmin_add.sh should be in $PATH /usr/local/bin/retry_tsadmin_add.sh
admin@TSIPFirewall1:~$ retry_tsadmin_add.sh
Note: The API key can be found in your ThreatSTOP account, in one of two locations:
- My Account: Generated keys will be listed at the bottom of the screen, or new keys can be created. For Azure keys, allow full permissions or deployment errors can occur.
- Dashboard: Generated keys will appear at the bottom of the Dashboard.