Overview
This document will guide you through the installation of ThreatSTOP’s DNS Firewall using Bind 9 & linux on an Azure provisioned Ubuntu virtual machine.
- Step 1. Create and login to ThreatSTOP account to copy License / API Key
- Step 2. Return to Azure and create new “ThreatSTOP DNS Firewall” device from the marketplace offerings
- Fill out Azure VM provisioning form providing machine type, storage, network, license, etc. Wait for device to provision
- Step 3. Secure SSH & log in to deployed Azure ThreatSTOP DNS Firewall to test functionality
- Step 4. Log into ThreatSTOP Admin portal to update policy, device settings & repeat testing
Step 1. ThreatSTOP Account Setup
The first thing you will need is a ThreatSTOP account, (sign-up here). After submitting your information and verifying your account via email you’ll be able to login and retreive your License aka API Key.

Click “Copy” button to add it to your clipboard, you will need it during the Azure side of the account creation process.
Step 2. Azure Portal Setup
There are five blades (pages of the form) of information required prior to provisioning the new virtual machine.
Virtual machine selection
- Login to your Azure portal at https://portal.azure.com.
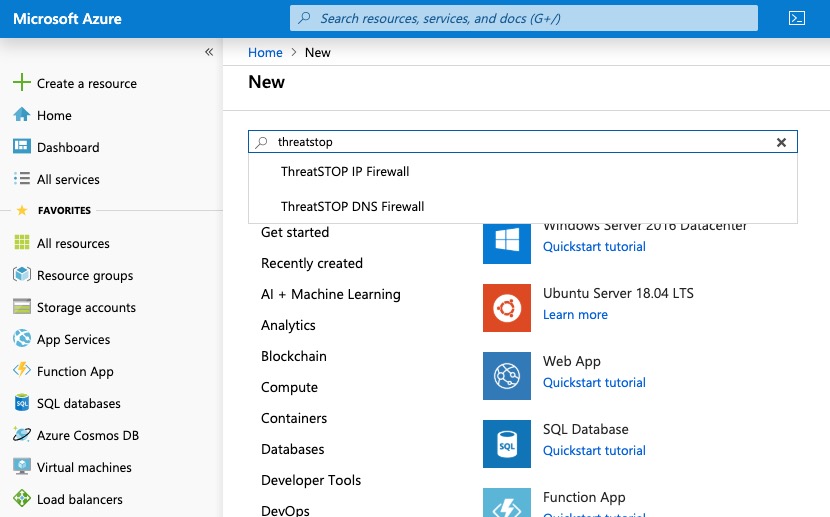
- Click “Create a resource” on the upper left column.
- Search for ThreatSTOP.
-
Click on ThreatSTOP DNS Firewall in the search results.
-
Click Create. You will be led to a form to create your new DNS Firewall.
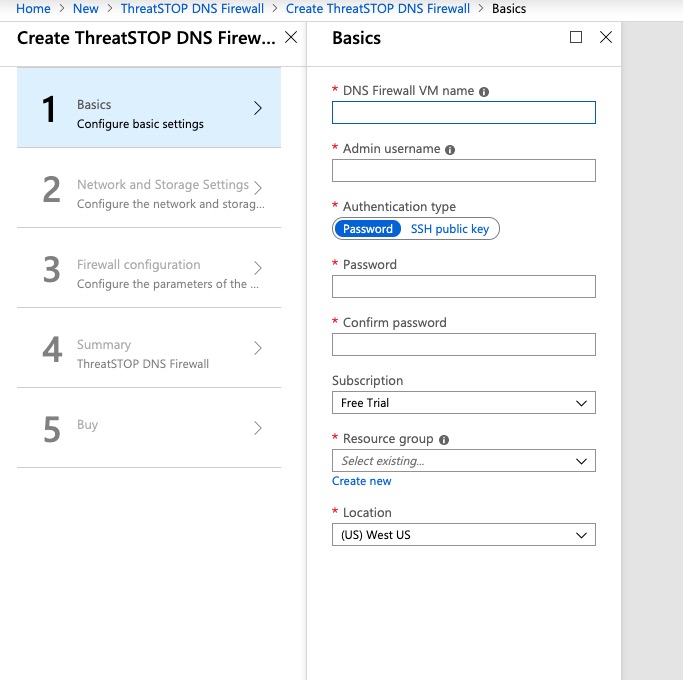
Basics blade
- Name DNS Firewall VM – choose a server name. We strongly recommend deploying at least two DNS firewalls (for redundancy) while taking into consideration datacenter location, supporting clients locations, etc…
- Admin username – this is the root username for the DNS firewall, e.g. “tsadmin” or “dnsadmin”, etc.
- Authentication Type - select Password or SSH public key
- Password – make this a complex password. You will use SSH to remote into your DNS firewall using this password.
- SSH public key - copy and paste an OpenSSH public key, which can be generated using ssh-keygen on Linux/OS X or PuttyGen on Windows
- Location – the Azure VM resource group location must match the resource group location of the Virtual Network (vnet). This is also because per Azure, you will be assigned a public IP and therefore can’t provision a west-coast US datacenter vnet with an east-coast public IP.
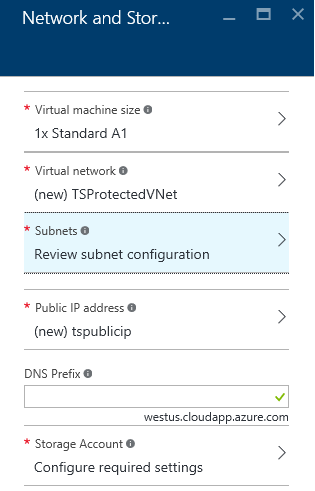
Network and Storage Settings

-
Virtual Machine Size – select a virtual machine size. Your ThreatSTOP advisor can help you select an appropriate VM size based on your predicted workload. Cost varies by machine size. Note: Azure A2 is our default deployment VM, A3 is also acceptable.
-
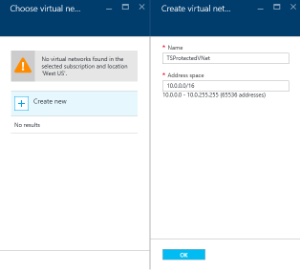
Virtual network – select the Azure virtual network on which you wish to add DNS firewall protection. If you create a new virtual network, you will also have to provide the address space in CIDR format, for example 10.1.0.0/16. For more information see: Azure vnet documentation (https://azure.microsoft.com/en-us/documentation/services/virtual-network/)
- Subnet - select or create the subnet where your DNS Firewall will reside. Best practices dictate that your DNS Firewall should be in a separate subnet (e.g. a DMZ) from the machines you wish to protect. You should select an existing subnet for the DNS Firewall. If you are using an existing virtual network and would like to create a new subnet for your DNS Firewall, you should create the subnet first through the Azure portal prior to installing this marketplace solution template.
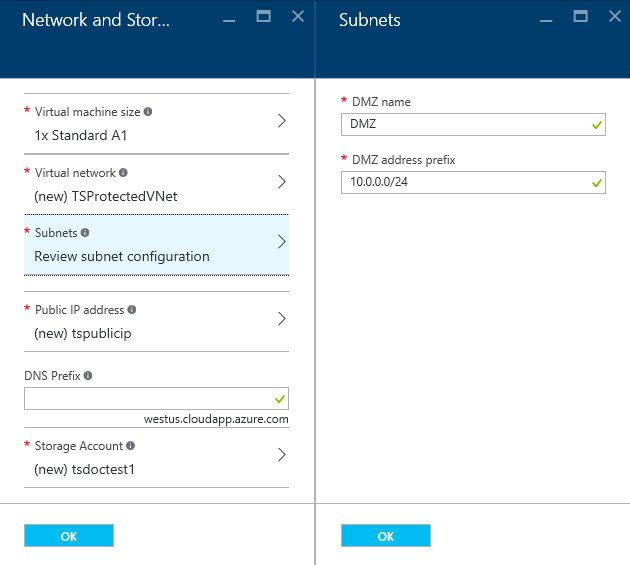
- Public IP address - name of the subnet that will provide the public IP address for your DNS firewall.

- DNS Prefix / Hostname - enter a custom prefix / hostname for the FQDN of the public ip address for the DNS firewall. It should be lowercase letters and numbers only, dashes allowed.
- Storage Account – select or create the storage account and storage type to hold the virtual machine. Because the DNS Firewall is not storing critical data, premium storage is not needed in most situations. For more information see: Azure storage documentation (https://azure.microsoft.com/en-us/documentation/services/storage/).

Firewall Configuration
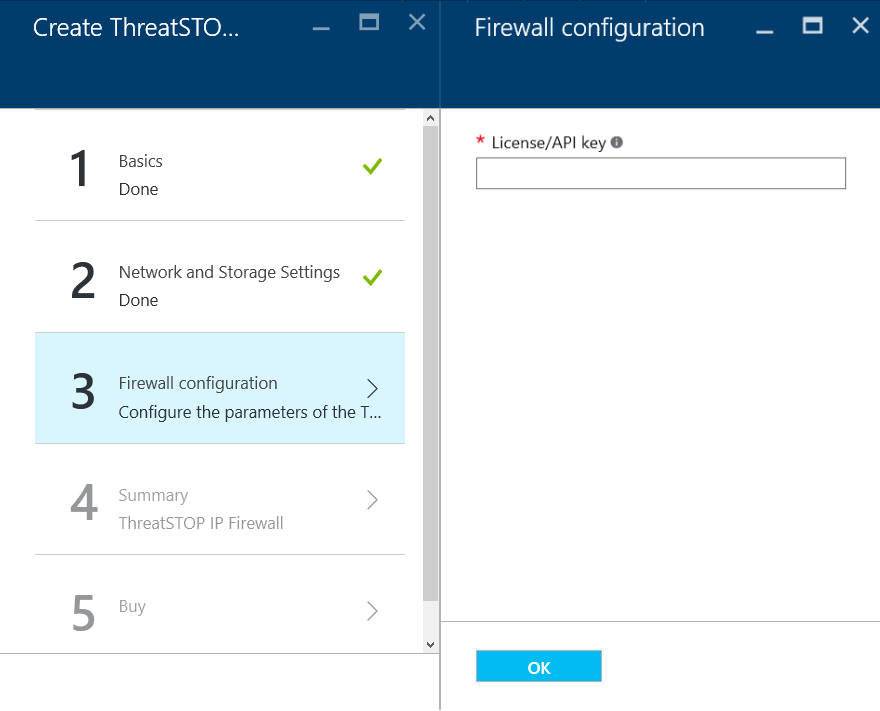
- License key – enter your ThreatSTOP license key. This is the API key you copied to the clipboard in ThreatSTOP Account Setup.
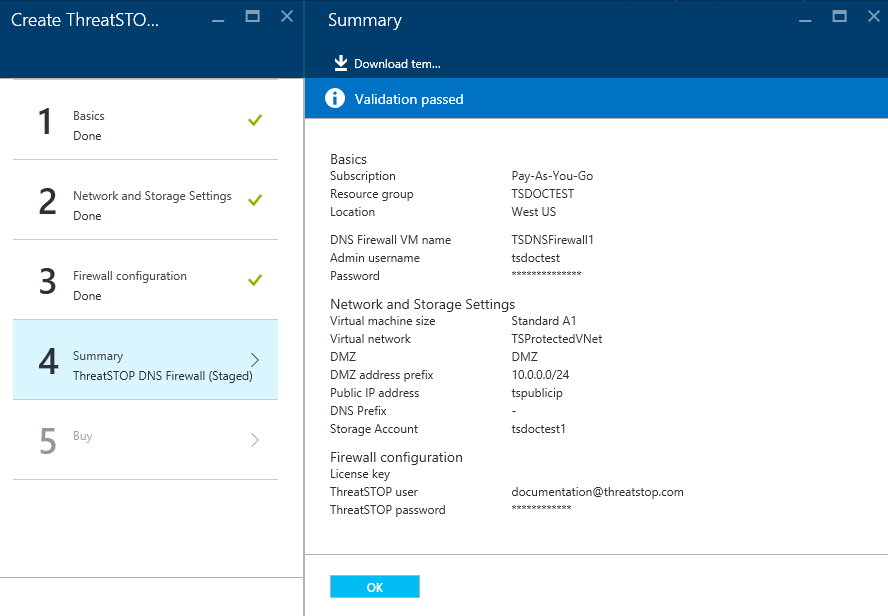
Summary
- review your deployment selections and click OK if no changes are needed.
Buy
- Review the Terms and Conditions, then click the Create button to start the deployment process. This process will take around 10 minutes to complete. This step will bill your Azure account per your agreed terms just like any other VM. ThreatSTOP will not bill through Azure as we setup terms directly with you after the trial period is over.

This will close the setup windows and an icon similar to the following will appear on your Azure Dashboard. Once this changes your Resource Group will be available, and you’ll be able to login to your new DNS firewall.
Deploying a Second ThreatSTOP DNS Firewall
To deploy a second ThreatSTOP DNS Firewall (for redundancy), follow the same steps above, ensuring that you:
- Enter a different name for your firewall, e.g. “TSDNSFirewall2”
- Select the same Resource Group as the first DNS Firewall
- Select the same Virtual Network
- Select the same Subnet
- Use the same license (API) key. ThreatSTOP DNS Firewall is licensed in pairs, so the same license key will work for up to two servers.
Note that your DNS Firewalls will be deployed into an Azure Availability Set named “TSAvailabilitySet”.
Step 3. Securing network access & verifying functionality
Connecting to the Firewall via SSH
After your resource group has been successfully deployed, you will be able to login to your DNS Firewall using SSH. To find the IP address to login:
- Open the resource group by clicking on its icon in the Azure Dashboard.
- Click on the icon for your Virtual Network. This will open the Virtual network blade. The connected devices will list the IP address for your DNS Firewall device. This can be used with your favorite SSH program to access the server. The username and password provided during Azure marketplace offering creation will allow login to the server.
Configuring your clients for ThreatSTOP protection
The client machines must be configured to use your new ThreatSTOP DNS Firewalls for DNS resolution. The easiest way to make this configuration is by changing the DNS settings for your virtual network:
- In the Azure portal, click on the resource group containing the client subnet.
- Click on the virtual network containing the client subnet.
- Click on DNS servers.
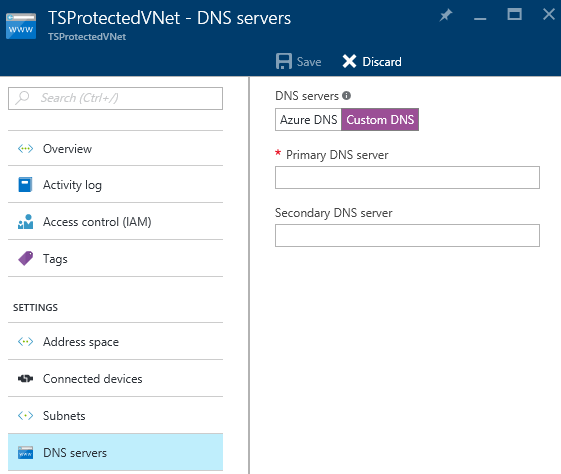
- Click on Custom DNS.
- Enter the internal IP address of your primary DNS firewall. For new virtual networks, for example, this address is 10.0.1.4. Please verify the IP address in your installation.
- If you have deployed a second DNS Firewall, enter its internal IP address as the Secondary DNS server.
- Click the Save button. You may need to restart or reload the network configuration on your client machines in order to use the new DNS settings. In Ubuntu, the command to reload the network configuration without having to restart your virtual machine is:
sudo ifdown eth0 && sudo ifup eth0
Add a Network Security Group to your client Subnet
Best practices include adding an Azure Network Security Group (NSG) to your client subnet so that DNS queries can only be made to the DNS Firewalls. You should only add a new NSG if your DNS Firewalls reside in a separate DMZ subnet and NOT in the same subnet as your protected clients. To add the Network Security Group to your client subnet:
- In your Azure portal open the Resource Group for your DNS Firewall, click on on the Add + button.
- Type “network” and select Network Security Group (NSG) when it appears as an option.
- Use the Resource Manager as your deployment model and click on Create.
- Enter a name for your NSG, e.g. “TSDNSClientNSG” and select the Resource Group containing your protected virtual network.
- Once deployment of the NSG is completed, select the new NSG.
- Click Outbound Security Rules
Add the two following Outbound rules:
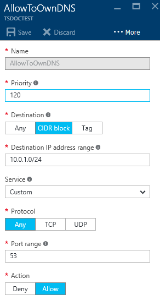
- Rule #1
- name: AllowToOwnDNS
- Priority: 120
- Destination IP address range: [enter the CIDR of your DNS Firewall DMZ, e.g. 10.0.1.0/24, or just the CIDR of your two firewalls, e.g. 10.0.1.4/31]. Note: This will be the same IP address or CIDR range as you use to login to the DNS Firewalls.
- Destination Port Range: 53
- Source: Any
- Protocol: Any
- Source Port Range: *
- Action: Allow
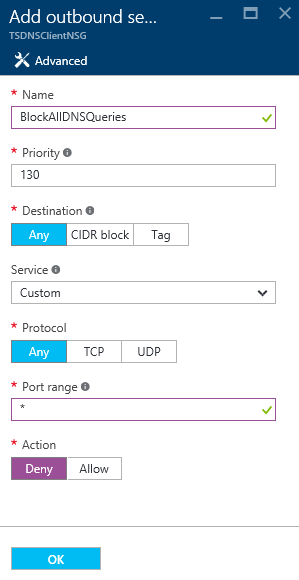
- Rule #2
- name: BlockAllDNSQueries
- Priority: 130
- Destination: Any
- Destination Port Range: 53
- Source: Any
- Protocol: Any
- Source Port Range: *
- Action: Deny
You may also want to click the Default rules button to add the Azure default outbound rules for Internet traffic. Rules are checked in the order of priority. Once a rule applies, no more rules are tested for matching.
You should also create inbound rules in the NSG to allow whatever inbound access you need to your client subnet. Typically, you would allow RDP and/or SSH traffic from a jumpbox or other network, plus any other ports needed for your network. By default, the DNS Firewall allows SSH access from the entire Internet. You may wish to restrict access by customizing your NSG following installation. The process to do this is explained in Securing the SSH Login Method. Assign the newly created NSG to your client subnet by selecting the subnet in the Azure portal, clicking on the Network security group button, selecting the newly created “TSDNSClientNSG” and clicking the Save button. No reboot is required at this time.
Securing the SSH Login Method
After initial setup has been completed it’s recommended to modify the SSH Login method to only be available from computers inside your network. To do this create an inbound security rule in the NSG with the following rules:
Rule 1
- Name: AllowAccessToSSH
- Priority: 100
- Source: CIDR block
- Source IP Address range: [enter the CIDR of your management device, e.g. 192.0.2.0, this will need to be a fixed address to allow the data from the management system to pass through to the DNS firewall]
- Protocol: TCP
- Source Port Range: 22
- Destination: [enter the CIDR of the firewall device, eg. 10.0.1.14]
- Destination Port Range: 22
- Action: Allow
Rule 2
- Name: RestrictAccessToSSH
- Priority: 130
- Source: Any
- Protocol: Any
- Source Port Range: *
- Destination: CIDR block
- Destination Port Range: [enter the CIDR of the firewall device, eg. 10.0.1.14]
- Action: Deny
Verifying DNS Firewall functionality
You can test the DNS RPZ policy is working correctly by verifying a known blocked address like bad.threatstop.com returns NXDOMAIN. This can be done directly on the Azure DNS Firewall itself first, then on any device set to use it as it’s DNS server. Below is an example of running with the DNS Utility dig.
DNS FIREWALL
dig @localhost bad.threatstop.com
;; ->>HEADER<<- opcode: QUERY, status: NXDOMAIN, id: 5611
;; flags: qr rd ra; QUERY: 1, ANSWER: 0, AUTHORITY: 0, ADDITIONAL: 2
CLIENT
dig @[DNS FW IP or Hostname] bad.threatstop.com
;; ->>HEADER<<- opcode: QUERY, status: NXDOMAIN, id: 5611
;; flags: qr rd ra; QUERY: 1, ANSWER: 0, AUTHORITY: 0, ADDITIONAL: 2
Below is an example using nslookup, found natively on Windows machines.
C:\Users> nslookup bad.threatstop.com [DNS FW IP or Hostname]
Server:     [Bind Server Hostname]
Address:    [Bind Server IP]#53

** server can't find bad.threatstop.com: NXDOMAIN
Looking up a non-restricted website like google.com should return its current IP. You can repeat this on any client using this device as a DNS server.
DNS FIREWALL
Now we can check to see if the event was logged correctly.
$ tail /var/log/threatstop/devices/<device name>/syslog
Sep 16 19:14:25 ubuntu-bionic named[22749]: 16-Sep-2019 19:14:25.508 rpz: info: client @0x7f6ec003bfe0 127.0.0.1#48422 (bad.threatstop.com): rpz QNAME NXDOMAIN rewrite bad.threatstop.com via bad.threatstop.com.basic-dnsfw.rpz.threatstop.local
Step 4. Updating firewall policy and settings

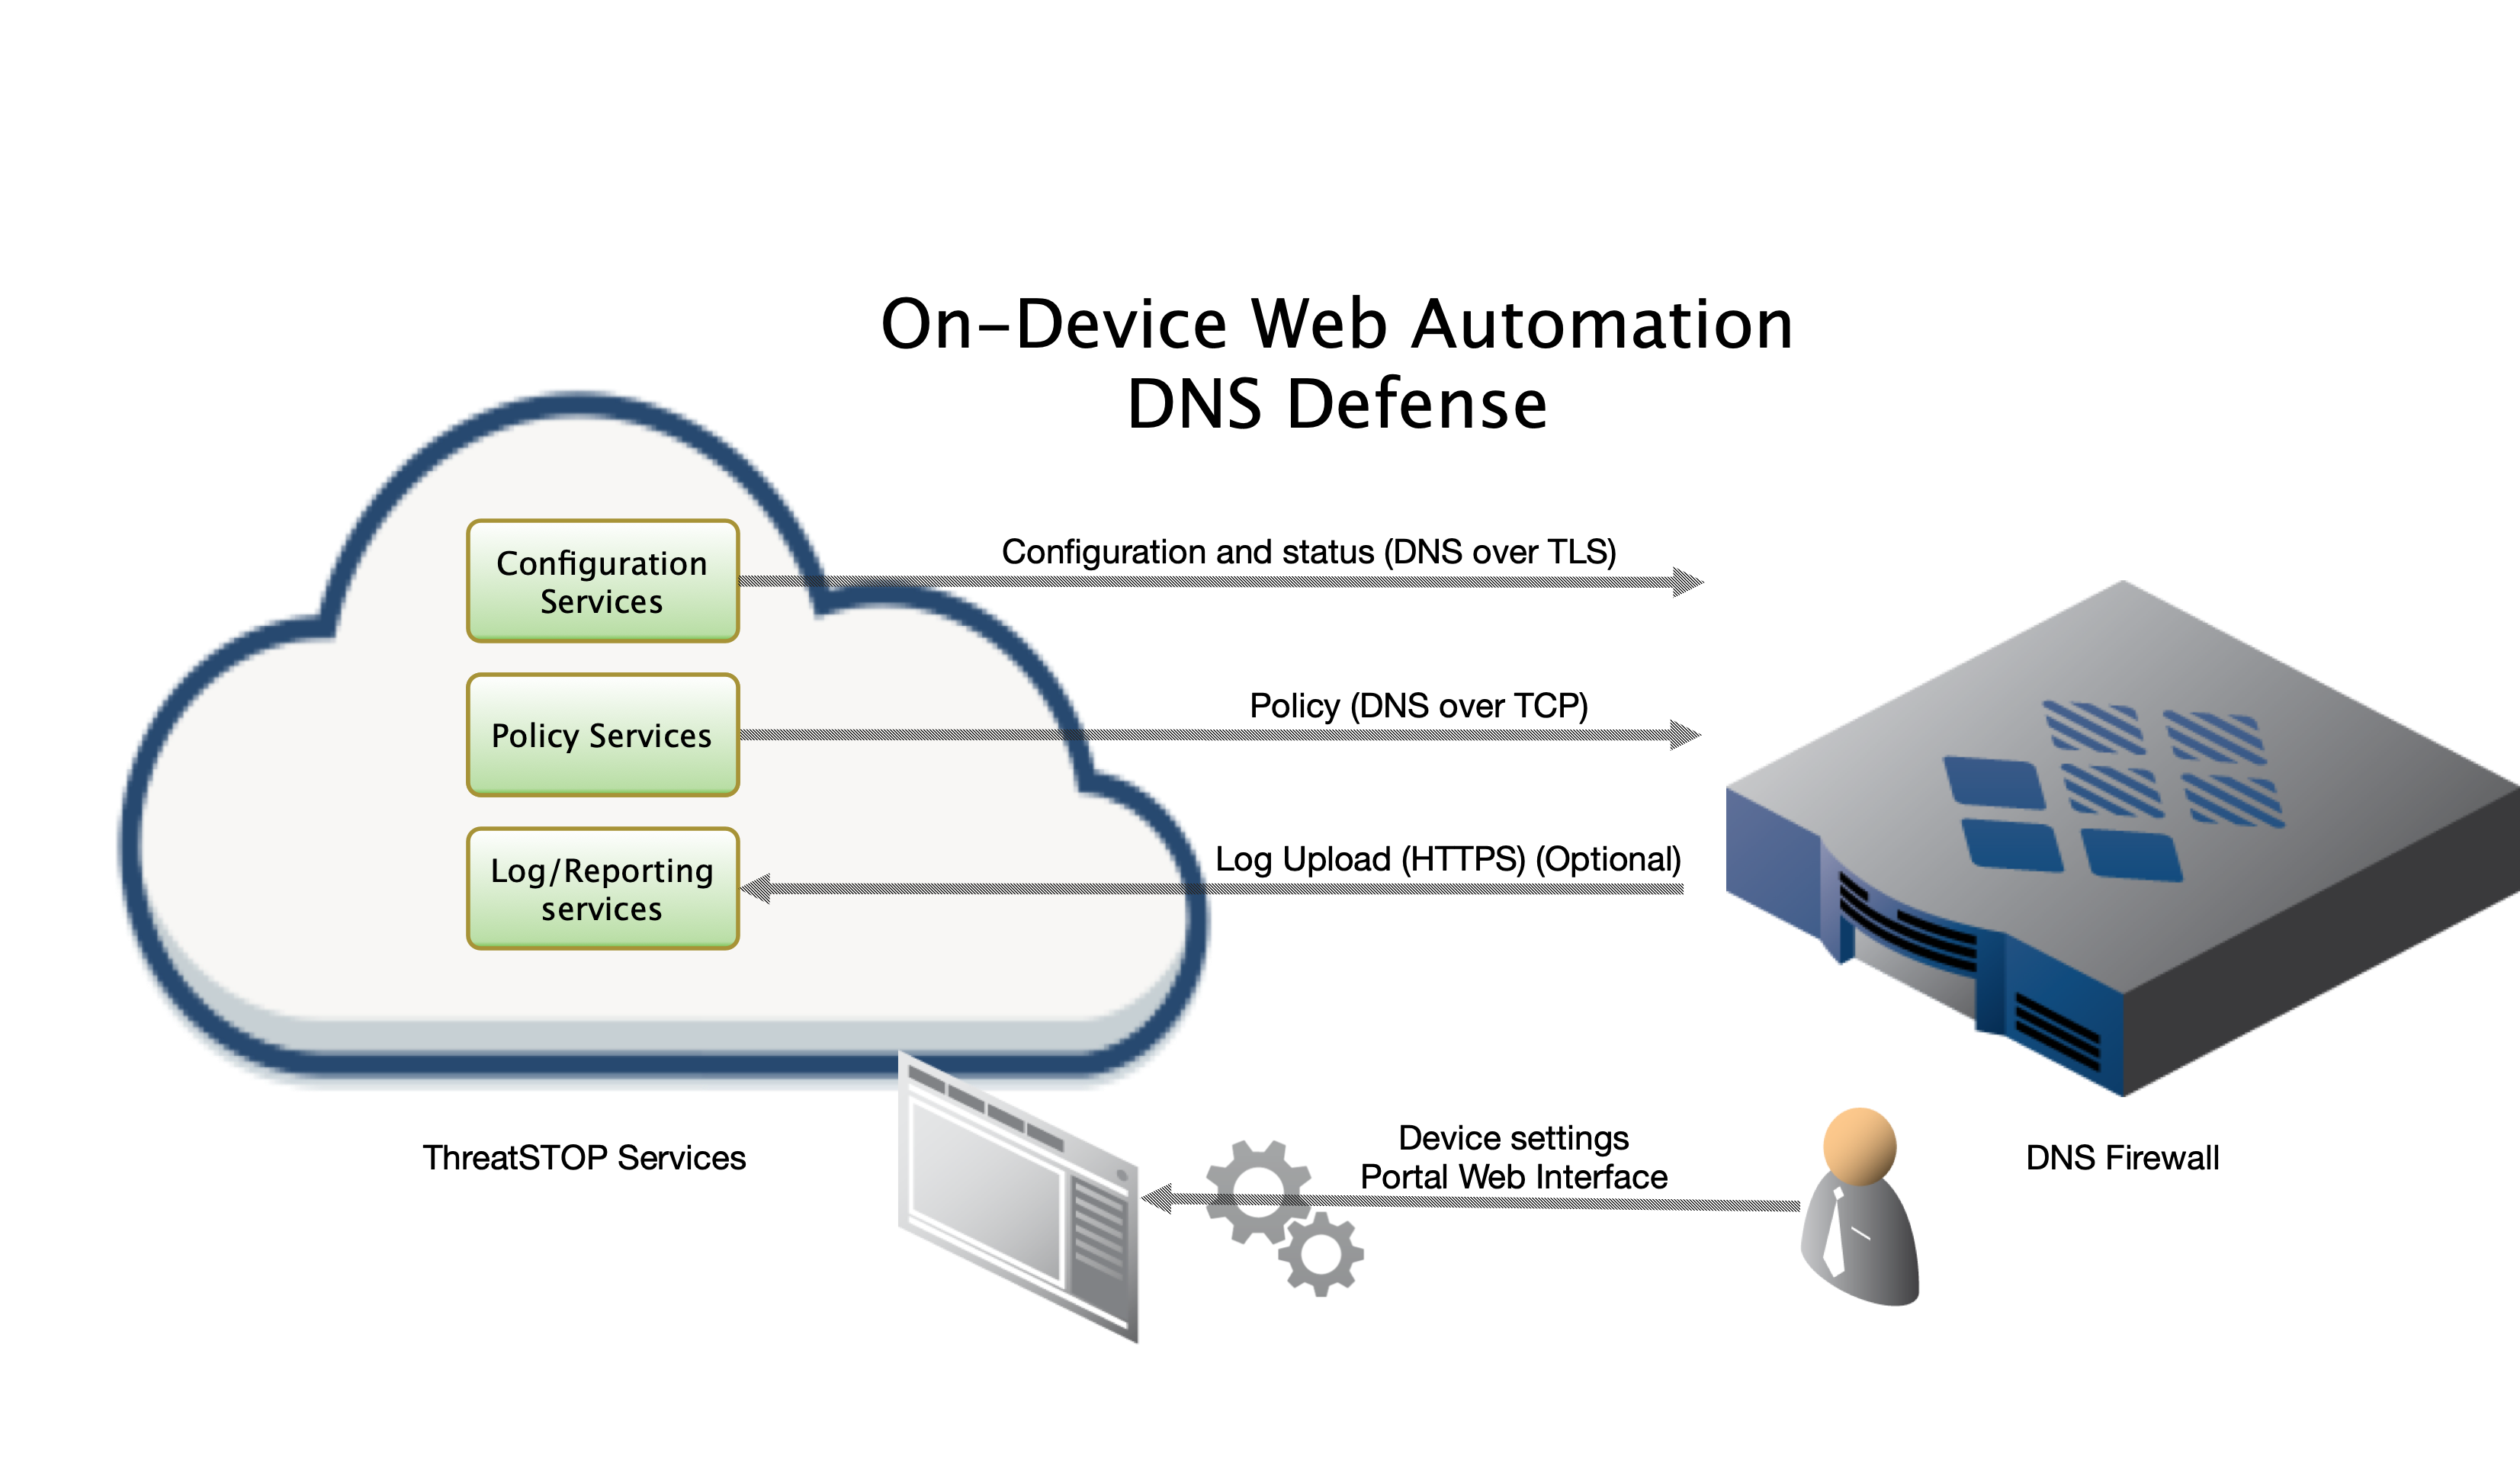
ThreatSTOP uses a proprietary mechanism to remotely configure and deploy updated settings a customer sets on our admin portal for their deployed devices. This allows our customers to use a friendly web interface to easily configure fleets of devices without ever having to log into & apply settings on the individual device.
Your Azure Firewall is configured to take advantage of this functionality out of the box. Once the provisioning is completed and you’ve verified you have a working DNS Firewall you can head over to the Admin Portal’s Devices list to edit the configuration of the newly provisioned virtual machine(s).

Protecting networks outside Azure
By default, the ThreatSTOP DNS Firewalls are configured to restrict DNS queries to your Azure virtual network. You may modify the configuration of your DNS Firewalls to allow queries from networks external to Azure.
- Modify the TSDNSNetworkSecurityGroup – this NSG is assigned to your DNS Firewall subnet and restricts inbound DNS traffic (port 53) to just the ThreatSTOP Masters at 67.207.213.0/24 and 192.124.129.0/24. These rules should not be modified. You may add additional rules to allow inbound DNS queries on port 53 from the networks of your choice.
- The DNS Firewalls use BIND and are configured with an ACL limiting recursive queries to the Azure virtual network. You must also modify the BIND by updating the “Bind Trusted ACL” field while editing the device in the Admin Portal. This setting once saved should take between 5-15 minutes to propagate down to the device.
Changing your ThreatSTOP DNS Policy
- Change the policy associated with the device using the ThreatSTOP Portal (edit the device configuration)
- Just like the access control list setting above this setting will propagate down to the device within 5-15min. The device will automatically switch to using the new policy.
Troubleshooting
If you receive an error, your new policy may not have finished propagating to the ThreatSTOP servers. You can test if this is the case by issuing a dig command to manually request the RPZ from ThreatSTOP’s RPZ server at 192.124.129.51:
dig @192.124.129.51 -t axfr -y [TSIG Key name retrieved from device settings] : [TSIG Key secret retrieved from device settings] [RPZ Zone name retrieved from device settings]
Note: The API key can be found in your ThreatSTOP account, in one of two locations:
- My Account: Generated keys will be listed at the bottom of the screen, or new keys can be created. For Azure keys, allow full permissions or deployment errors can occur.
- Dashboard: Generated keys will appear at the bottom of the Dashboard.
If your VM did not provision properly you can retry to provision the server by running the executable shell script in your root accounts home directory named “retry_tsadmin_add.sh”.
 # retry_tsadmin_add.sh should be in $PATH /usr/local/bin/retry_tsadmin_add.sh
admin@TSDNSFirewall1:~$ retry_tsadmin_add.sh
- If you don’t see a
retry_tsadmin_add.shcommand, this could mean the install failed before provisioning a device on our servers. You can manually re-run by doing the following: - Log into the Azure Virtual Machine (VM)
- Locate the provisioning script usually found in
/var/lib/waagent/Microsoft.OSTCExtensions.CustomScriptForLinux-1.5.4/download/0/TS_bind_bringup.pl - Re-run it with root permissions, supplying the API Key and Trusted DNS variables as shown below.
# Please note, the path where the Azure ThreatSTOP DNS provisioning script 'TS_bind_bringup.pl' may be different on your Virtual Machine (VM).
# You can verify the bringup scripts location by locating it like so:
sudo find / -type f -name "TS_bind_bringup.pl"
# The following command will run the provisioning process again. This will both create a device in your account and install it on this VM.
sudo /var/lib/waagent/Microsoft.OSTCExtensions.CustomScriptForLinux-1.5.4/download/0/TS_bind_bringup.pl "$(cat /opt/azure_threatstop/._API_KEY.txt)" "$(cat /opt/azure_threatstop/._TRUSTED_ACL.txt)"
To get a list of configured settings run:
tsadmin show
To get a full list of available command line parameters on the command line type:
tsadmin --help
If you are not able to download the policy, run the following:
admin@linux_server# wget -qO - http://logs.threatstop.com/cgi-bin/validip.pl
Your IP address: 1.2.3.4
Address is in the list of authorized hosts
This will tell you if your public IP has been allowed to access the policy. If you are unable to get a response it means you need to update the public IP on the devices section of the admin portal.