Overview
This document describes the integration procedure to provision a ThreatSTOP DNS Firewall using our Docker container. Our Docker container can be used stand alone via docker run, or in tandem when using docker-compose, Docker Swarm, or in a Kubernetes cluster (including EKS, the AWS Elastic Container Service for Kubernetes; and GKE, the Google Kubernetes Engine). You can run our DNS Firewall on anything that supports x64-based Docker containers.
This document is focused on the Docker setup using Docker Compose. If you are using Kubernetes, see this section.
To provision a ThreatSTOP DNS Firewall container, you will need to:
- Have a ThreatSTOP account (Create one here).
- Using the Admin Portal, configure the settings of the DNS Firewall and download the configuration file(s) containing pre-configured examples for your use.
- Install Docker if you don’t have Docker installed.
- Run
docker runordocker-composecommand to launch the Docker container.

Prerequisites
OS Compatibility
Tested Host Operating Systems
| Operating System | Notes |
|---|---|
| Ubuntu 18.04 | Host networking mode is supported |
| CentOS 7 | Use named volumes if SELinux is enforcing |
| RHEL 7 | Use named volumes if SELinux is enforcing |
| MacOS 10.14 | † Host networking mode not supported |
| Windows 10 | † Host networking mode not supported |
We don’t expect you would encounter issues on any other Operating System running Docker containers on x64 platform. If you do, please contact our support team.
Container Host Orchestration Engines
| Provider | Notes |
|---|---|
| Docker.io | Docker Server |
| Docker.io | docker-compose |
| Docker.io | Docker Swarm |
| Azure Kubernetes Service (AKS) | ** |
| Amazon Elastic Cloud Service (ECS) | ** See: † Deploying Docker Container doc |
| Amazon Elastic Container Service for Kubernetes (EKS) | ** |
| Google Kubernetes Engine (GKE) | ** |
| Kubernetes.io | Kubernetes including minikube |
** untested but expected to work.
† - port 53 UDP reserved by Amazon ECS.
ThreatSTOP DNS Firewall & logging Docker image versions
| Image | Base Operating System | OS Version (Container tag) | version |
|---|---|---|---|
| DNS Firewall (threatstop/dnsfw) | Alpine Linux | Edge | BIND 9.14.x |
| Logging (threatstop/ts-logger) | Alpine Linux | Edge |
Server Compatibility
| Resource | Policies up to 1M records | Policies with more than 1M records |
|---|---|---|
| RAM | 2 GB | 4 GB |
| Disk | 10 GB HDD | 10 GB HDD |
We recommend two CPU cores for a typical deployment. BIND requirements are documented here.
Software Compatibility
| Service/Application | Description |
|---|---|
| Time synchronized (NTP) | System time must be correct for authentication mechanisms and logging. |
| Container host server | Docker Enginer or Docker Desktop |
- If you intend to use this DNS Firewall to protect clients on the same network as the server it must be a linux based server for client addresses to be logged properly. See host network mode for more details.
Connectivity
Connectivity to the following IP addresses and ports is required:
| Service | Port | Direction | IP Address/CIDR Range | Protocol | Notes |
|---|---|---|---|---|---|
| DNS | 53/5353 | Outbound | 192.124.129.0/24 | UDP & TCP | |
| DNS notifications *optional | 53/5353 | Inbound | 192.124.129.0/24 | UDP | Used for DNS notify for faster policy updates (see doc for more details) |
| DNS over TLS | 5353 | Outbound | 204.68.97.208/28 ts-ctp.threatstop.com | TCP | Required only for web automation enabled devices |
| HTTPS | 443 | Outbound | 204.68.99.208/28 logs.threatstop.com | TCP | log upload service |
| NTP | 123 | Outbound | time.nist.gov (or your preferred NTP server) | UDP | time sync server |
Network Considerations
Networking varies depending on the type of container server you are running. However there are some general rules to keep in mind while planning the permanent networking installation settings for the DNS Firewall container.
- We highly recommend running this in
host networkingmode if it is intended to protect clients on the same network as the container host server. If you don’t run withhost networkingmode enabled, the DNS Firewall logs will reflect the Docker network NAT address instead of the actual client IP address. - It is possible to run multiple instances of the container for redundancy. This also allows you to upgrade one while allowing simultaneous queries to flow to the other DNS Firewall keeping your network protected.
Host Network Topology
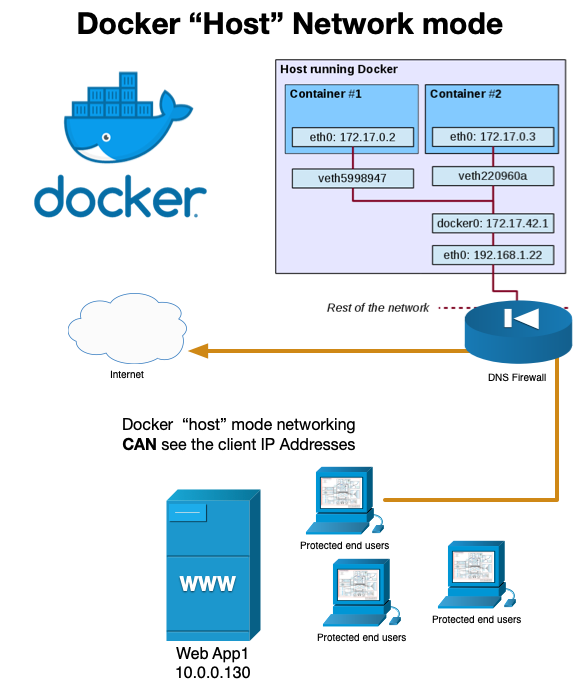
The following diagram shows the network topology of running host networking mode. Both Kubernetes and Docker implement this feature. We recommend this network mode over the default bridge container network mode when DNS clients will not be running in the Docker bridge network. In this case, using in the default bridge network mode, the DNS Firewall would log the NAT IP of the Docker Server instead of the client IP Address.
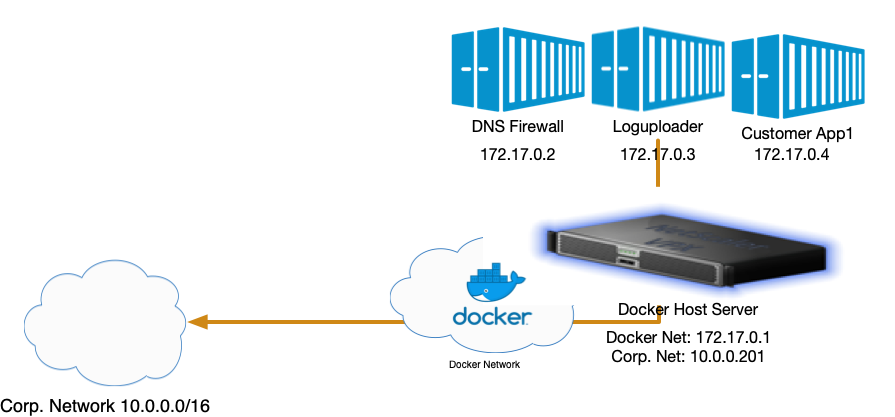
Internal Network Topology
There are valid reasons to not run host network mode. For instance, if you are protecting containers located inside the Docker bridge network, run without host networking mode enabled allows the containers to use the DNS Firewall as their DNS service.
Installation
Device Settings
You will need the following settings for the Docker container. These are here for reference, and are also provided in the download links after setting up the device.
Installation Settings
| Setting | Description |
|---|---|
| Master DNS Server IP Address | * Settings shown when accessing through Devices > Docs |
| Device ID | * Settings shown when accessing through Devices > Docs |
| Policy Zone Name | * Settings shown when accessing through Devices > Docs |
| TSIG Key Name | * Settings shown when accessing through Devices > Docs |
| TSIG Key Secret | * Settings shown when accessing through Devices > Docs |
ThreatSTOP Portal Device Configuration
| Setting | Description |
|---|---|
| Nickname | Name of the device used to identify it in the Portal & Reports |
| Policy | DNS RPZ Policy applied to the device |
| IP Type | Static or Dynamic Public IP address |
| IP Address | Public IP address or hostname if the IP Type is set to dynamic |
| BIND Mode | BIND mode of operation (Recursion or Forwarder only) |
| BIND Forwarders (if BIND mode set to forwarder only) | Space-separated DNS server IP addresses used to forward upstream queries i.e. 192.168.1.1 10.0.0.1 |
| BIND Trusted ACL | Access control list for restricting who can query the server. Space-separated list of Special Keywords, IP(s) or CIDR addresses i.e. 192.168.2.0/24 10.0.0.1. Special keywords (all, localhost, localnets) handled by BIND. |
The ThreatSTOP container image is available on Dockerhub and installed with the following command:
$ docker pull threatstop/dnsfw:latest
Quickstart
The quickstart is intended for customers who are proficiently familiar with the integration. If you have not configured this integration before, before please read the document in its entirety to ensure you don’t miss any important details.
- Create the Docker device entry in the Portal
- On the device settings page, download the docker-compose.yaml and tsig_key files. Copy them to the Docker server.
- Optionally, edit the docker-compose.yaml (change the root password, enable Webmin, disable logging)
- From the directory containing the docker-compose.yaml file, run
docker-compose up -d.
Setup
The following steps will walk you through adding the ThreatSTOP DNS Firewall container.
Step 1. ThreatSTOP Portal setup
- If you want to use a custom DNS Firewall policy, please read DNS Firewall Policies
- Create a new Device Entry: Click on Devices and then on Add Device.
- Type: DNS
- Manufacturer: ISC
- Model: BIND 9 (Docker)
- Select the DNS Firewall policy - either a pre-defined policy or a custom policy
Step 2. Instantiate Docker Image
To create the DNS Firewall container now that you have setup ThreatSTOP-side configuration:
- Download the Docker configuration files (Docker-Compose, Docker TSIG secret) to jump-start your configuration.
- Ensure the secrets exist and have the correct values. An example file hierarchy is shown below.
. ├── ROOT_PASSWORD ├── TSIG_KEY └── docker-compose.yaml - Run
docker-compose up -dto kickoff the container creation process. - Ensure you didn’t have any failures by checking the output. After the container provisioning step you should be able to run
tsadmin healthfrom the container to verify its health:docker exec dnsfw tsadmin health.
Step 3. Test installation
Change the DNS configuration of test machines to validate the DNS Firewall setup before changing the system-wide DNS configuration (e.g. DHCP or Active Directory server)
To validate the configuration, we will verify that:
- DNS Requests are filtered
- Blocks requests are logged, including the correct IP Address of the requesting client.
- Log upload is working
Verify that DNS requests are filtered
Log into a machine that should be protected. We are specifically looking for the NXDOMAIN response when attempting to resolve bad.threatstop.com (our testing domain added to each policy).
# Example of testing a linux-type client after SSH'ing into the client
user@client>$ dig @[DNSFW IP address or Hostname] bad.threatstop.com
;; ->>HEADER<<- opcode: QUERY, status: NXDOMAIN, id: 5611
;; flags: qr rd ra; QUERY: 1, ANSWER: 0, AUTHORITY: 0, ADDITIONAL: 2
Example of testing a Windows-type client after remote connecting to Powershell into client
PS C:\Users> nslookup bad.threatstop.com [Bind Server IP address or Hostname]
Server:     [Bind Server Hostname]
Address:    [Bind Server IP address]#53

** server can't find bad.threatstop.com: NXDOMAIN
Verify we are blocked requests are logged
On the container server, launch an interactive shell into the dnsfw device, e.g. docker exec -it dnsfw bash
cd /var/log/named
# Your DNS Firewall should be logging to a specific <device id>.log file located in /var/log/named
cat tdid_*.log
# now verify you have blocks along with correct client IP Addresses
08-May-2020 20:24:57.127 rpz: info: client @0x559714b76700 127.0.0.1#44998 (bad.threatstop.com): rpz QNAME NXDOMAIN rewrite bad.threatstop.com/A/IN via bad.threatstop.com.basic-dnsfw.rpz.threatstop.local
08-May-2020 20:34:22.138 rpz: info: client @0x55971506c540 10.0.1.35#43037 (bad.threatstop.com): rpz QNAME NXDOMAIN rewrite bad.threatstop.com/A/IN via bad.threatstop.com.basic-dnsfw.rpz.threatstop.local
Verify that logs are being uploaded
To verify the installation is uploading logs correctly you’ll have to exceed the log size threshold set in the logupload container. You can check our docker-compose yaml or equivalent for an environment setting like: LOGROTATE_SIZE: 5K.
We can manually exceed the size by running a command like the one below or simply by waiting until the log naturally exceeds the size.
# the following can be done via a protected client or directly in the container via an interactive shell
# If in the container you can query localhost @127.0.0.1
while true; do dig @127.0.0.1 bad.threatstop.com; done & sleep 5; kill $!
Next, please wait until the log upload process runs (which defaults to every 5 minutes). After the time has elapsed, you should see the log file has been rotated (i.e.g moved to tdid_xxxxx.log.1) and a log of the transaction created as shown below.
-rw-r--r--    1 root     root       14.7K May 12 18:04 logupload_tdid_xxxxxxxx.log
-rw-r--r--    1 root     root        1.5K May 12 18:04 logupload.log
At this point running tsadmin health should show all [PASS] marks. Congratulations, you’ve successfully completed the installation.
Customizing your container
We offer a variaty of ways to customize your container to suit your needs. If you need to add a custom local BIND configuration, you can create configuration files and use the NAMED_OPTIONS or NAMED_OPTIONS_FILE to mount a file into the container that is read at build time.
For example, you can have custom BIND settings in a file options.conf. To include that in the container, we’ll simply mount the file and set the env variable NAMED_OPTIONS_FILE to point to it. Below is an example showing an exerpt from a docker-compose file.
...
    environment:
      TSIG_KEY_FILE: /run/secrets/tsig_key
      NAMED_OPTIONS_FILE: /mnt/options.conf
    volumes:
      - /tmp/data:/data
      - /tmp/logs:/var/log/named
      # Local configuration can be done inside of these include files
      - ./options.conf:/mnt/options.conf
...
In this sample, a file from the host machine’s filesystem located at ./options.conf is mounted onto the container’s filesystem at /mnt/options.conf. The container configuration script will read the contents of that file during the creation process of the container and include it in the configuration.
Advanced customization
If you need to customize BIND configuration files directly and want to avoid having the containers startup processes overwrite them, you can simply add the environment variable CUSTOM_CONFIGS: "true".
Editing configuration files
- If you’ve enabled webmin, you can login and edit the configuration using their friendly web interface.
- You can mount the
/datavolume and edit the files directly outside of the container. The BIND configuration files are located in/data/bind/etc. -
You can include local configuration files using the
NAMED_OPTIONS,NAMED_RPZ, andNAMED_LOGGINGenvironment variables. Read the section above for more details. - Note You’ll have to restart the
namedprocess to re-read any configuration changes made.
BIND extra arguments
You can customize the launch command of BIND server by specifying arguments to named on the docker run command. For example, the following command prints the help menu of the named command:
# everything to the right of the image name gets sent to named
sudo docker run --name dnsfw -it --rm \
  --publish 53:53/tcp --publish 53:53/udp --publish 10000:10000/tcp \
  --volume /srv/docker/bind:/data \
  threatstop/dnsfw:latest -h
Environment Variables
We use environment variables to drive different functions in the creation of the container. Environment variables can be either set on the command line or in a docker-compose configuration file. For the command line, either specify them with docker run --env KEY=value or -e="KEY=value" . Important note: If using docker run, all env parameters must preceed the image name threatstop/dnsfw, parameters after will be sent to executed named process as positional parameters.
Environment variables can be set in the docker-compose.yaml file as shown below:
version: "3.1"

services:
  bind:
    network_mode: host
    container_name: dnsfw
    restart: always
    image: threatstop/dnsfw
    environment:
      KEY: value
      DNS_POLICY: Basic-DNSFW.rpz.threatstop.local
Below is a list of available environment variables and their function.
| Env Variable | Value Examples | Description | Notes | Default |
|---|---|---|---|---|
| ROOT_PASSWORD | <password> | Password to set for both root user and webmin ‘root’ user. Valid chars: lower case alphabetics digits 0 thru 9 punctuation marks | Not used unless WEBMIN_ENABLED=true | |
| NAMED_LOGS | Positive Integer 1-100 | Number of logs to keep if not rotated by logrotate or logupload container | If logupload container is used this will mainly apply to the named.log files | 20 |
| NAMED_LOG_SIZE | 1K, 5M | Maximum log file size threshold before logs are rotated | positive integer and disk size unit (K,M) between (1K - 20M) | 5M |
| BIND_MODE | 1 - recursion, 2 - forwarder | Sets Bind in either recursor mode (DNS server recursively looks up the domain authority), or forwarder mode (lookups are forwarded to another DNS server) | forwarder requires FORWARDER_IPS to be set. Value should be just the integer alone. | 1 |
| FORWARDER_IPS | 8.8.8.8; 1.1.1.1; 9.9.9.9; | DNS Server to forward non-authoritative requests to. | Only used when BIND_MODE=2, format should be <IP/CIDR> followed by a semi-colon | |
| MASTER_DNS_IP | 192.124.129.51 | IP Address of the master ThreatSTOP policy server. This will be supplied on the portal devices information page. | value should be an IP address | |
| MASTER_DNS_PORT | 53|5353 | Alternate port for upstream RPZ DNS transfers. Valid choices (53, 5353) | integer representing port number 53 or 5353 | 53 |
| TRUSTED_ACL | localhost; localnets; 192.168.2.0/24; 10.0.0.1; | Addresses allowed to query this DNS server. | Space + semi-colon separated special Bind keywords (all, localhost, localnets), IP address(es) or CIDR addresses | 127.0.0.1; localhost; localnets; |
| OVERWRITE_CONFIGS | true|false | Disregard any customizations done to any Bind configuration and overwrite them with newly generated configuration files. | false | |
| CUSTOM_CONFIGS | true|false | Skip attempting to generate any Bind configuration. This implies a valid configuration from a previous container already exists. Upgrading using this is not recommended as this will bypass upgrade logic. | true | |
| NAMED_OPTIONS | <valid Bind options block config> | Optional Bind configuration to be placed near end of named.conf.options | ||
| NAMED_RPZ | <valid Bind configuration> | Optional Bind configuration to be placed near end of named.conf.local | ||
| NAMED_LOGGING | <valid Bind logging block config> | Optional Bind configuration to be placed in the logging section of named.conf.local |
You can also read in each variable in the form of a file, look to the way we handle secrets below as an example.
version: "3.1"

services:
  bind:
    container_name: dnsfw
    image: threatstop/dnsfw-dev
    environment:
      TSIG_KEY_FILE: /run/secrets/tsig_key
      TSIG_KEY_NAME: threatstop-threa023
      TRUSTED_ACL: 'localhost; localnets; 68.7.58.214; 192.168.0.0/24;'
    ports:
     - 53:53/udp
     - 53:53/tcp
    secrets:
     - tsig_key
     - root_password
    volumes:
      - /tmp/data:/data
      - /tmp/logs:/var/log/named
secrets:
  tsig_key:
    file: ./TSIG_KEY
  root_password:
    file: ./ROOT_PASSWORD
This example shows setting TSIG_KEY from TSIG_KEY_FILE via a mounted file from the local host filesystem.
Persistence
For the BIND instance to preserve its state across container shutdown and startup, you should mount a volume at /data.
The Quickstart command already mounts a volume for persistence.
SELinux users must update the security context of the host mountpoint so that it works with Docker:
mkdir -p /srv/docker/bind
chcon -Rt svirt_sandbox_file_t /srv/docker/bind
Container Volumes
Container volumes vary depending on container host software. We will briefly talk about Docker specific volumes below, most of which should apply to other systems.
Docker volumes are defined in the docker-compose.yaml file or via the --volume arguments. There are two types to consider: Named Volumes and Mounted Volumes.
Named Volumes
Named volumes are created if they don’t exist. For example --volume logs:/var/log/named will create a Docker Named Volume called logs and mount it in the container at /var/log/named.
Mounted Volumes
Conversly, if you want to mount a directory and map it to a directory on the container you can just specify the absolute path on the left side of the :. For example --volume /tmp/logs:/var/log/named will create /tmp/logs if it doesn’t exist and mount in it in the container at /var/log/named. Keep in mind since this is the same filesystem if you are running SELinux, there may be some enforcement issues doing this. You will have to explicitly create and grant privileges accordingly to get this type of volume working correctly while SELinux is enforcing.
Maintenance
Safetly Handling Secrets
Handling secrets like TSIG_KEY and ROOT_PASSWORD varies depending on the container hosting flavor you choose to run the container in Docker Swarm, Kubernetes, etc… We highly recommend looking to a proper secrets manager for your container secrets solution. See this video for some background on the topic.
For compatibility reasons, we set the secrets as file mounts. While it is possible to pass these in as environment variables, we don’t recommend it past testing.
To verify that environment variables don’t contain sensitive data, run Docker inspect:
docker inspect dnsfw -f "{{json .Config.Env}}"
Upgrading
To upgrade to newer releases:
# 1. Download the updated Docker image:
docker pull threatstop/dnsfw:latest
# 2. Stop the currently running image:
docker stop dnsfw
# 3. Remove the stopped container
docker rm -v dnsfw
# 4. Start the updated image
docker run -name dnsfw -d \
    [OPTIONS] \
    threatstop/dnsfw:latest
Health Status
We’ve added a utility to quickly check the health status of your DNS Firewall container instance. This utility checks:
- If it can reach our internal servers
- If it successfully pulled down the policy
- If it is currently blocking
- If it is logging blocks
- If logupload is working
For checking the health of a running container, run:
docker exec dnsfw tsadmin health
Shell Access
For debugging and maintenance purposes you may want access the containers shell. If you are using Docker version 1.3.0 or higher you can access a running containers shell by starting bash using docker exec:
docker exec -it dnsfw bash
Disabling log upload
The ThreatSTOP DNS Firewall container can be used to upload its RPZ log to the ThreatSTOP service for analysis and reporting. If you prefer to not use the reporting features, you can disable log upload by commenting out the logrotate service in the docker-compose.yaml file. The features of the DNSfw container will not be affected and will continue to generate log files for local use.
Webmin
WeWebminbmin is a web-based interface for Unix system administration. It is optional (disabled by default) when configuring the ThreatSTOP DNS Firewall container, and provide a mechanism to manage BIND.
When Webmin is enabled (by setting the environment variable WEBMIN_ENABLED to true), it will be accessible with a web browser at https://localhost:10000. Login to Webmin with the username root and password threatstop. Specify --env ROOT_PASSWORD=secretpassword on the docker run command to set a password of your choosing for testing. For permanent installs you should be using mounted files to load sensitive settings see secrets handling for more details.
Note that the ROOT_PASSWORD parameter has no effect when the launch of Webmin is disabled.
Troubleshooting
Binding port 53 error
If you are having trouble running the DNS Firewall due to an error binding to port 53, check the following:
- Did you run the command as a superuser? Most Operating systems consider ports below 1024 “privileged” which require additional access. Try running in non-host mode and assigning to another high port e.g. 5353 to see if the issue persists.
- Recent Debian-based Operating systems such as Ubuntu (16.10+) ship with
systemd-resolved.servicewhich provides local applications with an interface to the DNS. This conflicts with ThreatSTOP’s DNS Firewall. We recommend disabling it completely to avoid the potential for applications to bypass DNS Firewall’s protection. - Verify the port is free for use.
netstat -an|grep ':53 '
#disable systemd-resolved; you might need to set the DNS server in /etc/resolv.conf (use 127.0.0.1 to use the DNS Firewall)
sudo systemctl disable systemd-resolved
sudo systemctl stop systemd-resolved
Depending on the system and version, you may also want to ensure the following line dns=default is in Network Manager configuration.
if [ -f /etc/NetworkManager/NetworkManager.conf ] && ! grep -q 'dns=' /etc/NetworkManager/NetworkManager.conf;then
  echo "dns=default"|sudo tee -a /etc/NetworkManager/NetworkManager.conf
  echo "removing resolv.conf symlink" && sudo rm /etc/resolv.conf
  echo "restarting networking stack" && sudo systemctl restart NetworkManager
else
  echo "  ** Not compatible with this system **"
fi
General
The built in script tsadmin health gives you a wealth of information in an easy to digest quick command. However some problems prevent you from getting the the stage where you can run it. You’ll find a few tips on troubleshooting those types of issues below.
Running the DNS Firewall container with the docker command
To use the container, we recommend using the docker-compose approach, which will include the log upload container. It is possible to run the DNS Firewall container independently:
sudo docker run --name dnsfw -d --restart=always \
  --publish=53:53/tcp --publish 53:53/udp --publish=10000:10000/tcp \
  --volume=logs:/var/log/named --volume=data:/data \
  --env='TSIG_KEY=SecretKeyGoesHere==' --env='TSIG_KEY_NAME=threatstop-keyname' \
  --env='MASTER_DNS_IP=192.124.129.51' --env='DEVICE_ID=tdid_abcd1234' \
  --env='DNS_POLICY=Basic-DNSFW.rpz.threatstop.local' --env='WEBMIN_ENABLED=true' \
  threatstop/dnsfw && docker run --name logupload -d --restart=always --volume=logs:/logs \
  --env='CRON_SCHEDULE="*/5 * * * *"' --env='LOGROTATE_SIZE=5K' threatstop/logupload
Trouble launching a container
The following will help you troubleshoot failures during container creation or boot up.
- Check the container server has network access to Docker hub.
- Check that your system time is correct and in sync with a public NTP server.
- Check
named.logBind logs located where ever you mounted your data volume. - Consider switching named foreground flags from default flag
-fto-gwhich outputs to STDERR/STDOUT. - Check container server logs (e.g.
docker logs dnsfw) for helpful errors. This type of logging requires theFOREGROUND_FLAG: -genv variable to function. IMPORTANT It is important to set the foreground flag back after troubleshooting is complete to avoid disabling the DNS Firewall RPZ logging. - Check container server logs for possible local issues
Configuration merge conflict errors
If you receive output telling you the container found merge conflict issues this basically means the configuration is in a state is different than the configuration it generated. Typically this happens when a user customizes the Bind configuration and sets the OVERWRITE_CONFIGS: "false" environment variable. See both CUSTOM_CONFIGS or OVERWRITE_CONFIGS environment variable details above for more information.
This is easy to remedy. First, as the help message shows, you’ll want to note those customizations to decide if they are something you want to keep or not. If you want to keep the current configuration consider setting the environment variable CUSTOM_CONFIGS:"true" to bypass attempting to generate new configuration files. If you don’t care about the changes add the environment variable OVERWRITE_CONFIGS: "true" to overwrite all configuration witout prompting. After setting one of the environment variables attempt to recreate the container.
SELinux file permission issues
If you’ve verified that enforcing SELinux is causing issues with the container, you can update the security context of the host mountpoint:
mkdir -p /srv/docker/bind
chcon -Rt svirt_sandbox_file_t /srv/docker/bind
Testing blocking domains
dig @[DNSFW IP Address or Hostname] bad.threatstop.com
;; ->>HEADER<<- opcode: QUERY, status: NXDOMAIN, id: 5611
;; flags: qr rd ra; QUERY: 1, ANSWER: 0, AUTHORITY: 0, ADDITIONAL: 2
Below is an example using nslookup, found natively on Windows machines.
C:\Users> nslookup bad.threatstop.com [Bind Server IP Address or Hostname]
Server:     [Bind Server Hostname]
Address:    [Bind Server IP Address]#53

** server can't find bad.threatstop.com: NXDOMAIN
Looking up a non-restricted website like google.com should return its current IP. You can repeat this on any client using this device as a DNS server.
-
Check that a log entry was added to
/var/log/named/[device id].log -
You can test connectivity to ThreatSTOP by running:
Testing network access to ThreatSTOP
$ curl https://logs.threatstop.com/cgi-bin/validip.pl
Your IP address: <IP address>
Address is in the list of authorized hosts
Testing Bind configuration syntax is valid
You can verify the BIND configuration has no syntax errors by running
named-checkconf
Kubernetes support
The DNS Firewall container can be used in a Kubernetes environment such as a Kubernetes cluster, minikube, EKS (the AWS Elastic Container Service) or GKE (the Google Kubernetes Engine).
The Device settings page provides link to download two files that can be used as a starting point for the Kubernetes configuration:
- a deployment file (deployment.yml). The environment variables for the dnsfw container settings are the same as described above.
- dnsfw_secrets.yml, which contains the protected settings (TSIG Key for your account to access the ThreatSTOP service and credentials for the contaner)
When creating a service definition or a load balancer for Kubernetes, keep in mind they all use NAT load balancing and will mask the IP address of the clients in the process. See the documentation about client IP address in the Networking section.