Overview
This document describes how to integrate ThreatSTOP’s Policy and Reporting services with a Palo Alto Networks PAN-OS device:
- Configuration of Dynamic Block Lists, Policy configuration and Log forwarding using the PAN-OS API
- Automated retrieval and updates of IP Defense policies from ThreatSTOP’s systems to the PAN-OS device.
- Automated collection and upload of log files from the PAN-OS Device to ThreatSTOP’s systems.
Integration types
ThreatSTOP Policies can be integrated with PAN-OS devices with different methods:
- HTTP integration: no appliance VM is required (documentation)
- TSCM CLI integration: requires an appliance VM, configured via CLI (documentation)
- TSCM with Web Automation integration: requires an appliance VM, configured via the ThreatSTOP Portal (this document)
The HTTP integration and TSCM integrations (CLI and Web Automation) differs as follows:
| Feature | Integration type | Description |
| Policy updates | HTTP integration | Directly from the ThreatSTOP cloud over HTTPs |
| TSCM integration | Relayed by TSCM | |
| Policy size | HTTP integration | Up to 8 External Dynamic Lists |
| TSCM integration | Up to 29 External Dynamic Lists | |
| Device configuration | HTTP integration | Manually |
| TSCM integration | Automated by TSCM using PAN-OS API | |
| Log Upload | HTTP integration | Daily |
| TSCM integration | Hourly |
System view
The integration is performed by a Linux-based virtual machine provided by ThreatSTOP, named ThreatSTOP Centralized Manager (TSCM). After its initial installation, the TSCM will retrieve the list of subnets matching the policy configured via the ThreatSTOP Admin portal and update the PAN-OS firewall using the PAN-OS XML API. Optionally, the firewall can be configured to send the connection log events to the TSCM via syslog and the TSCM will package and upload log files to ThreatSTOP’s Portal, for analysis and reporting.
Fig 1. : Network traffic between ThreatSTOP services, the TSCM and the PAN-OS Firewall. (click to expand)

Web Automation features
This document provides the steps when using the Web Automation features of ThreatSTOP. For the command line-based installation, please read this document instead. The Web Automation features are:
- Client configuration settings are managed on the ThreatSTOP portal, instead of using the TSCM command line.
- Changes to the policy selection are automatically propagated from the portal to the TSCM
- The TSCM reports problems applying policies or uploading logs to the ThreatSTOP Portal, providing more visibility into potentials system or network problems.
Compatibility
PAN-OS Compatibility
| Version | Supported |
|---|---|
| PAN-OS 6.x | Yes |
| PAN-OS 7.x | Yes |
| PAN-OS 8.x | Yes |
| PAN-OS 9.x | Yes |
| PAN-OS 10.x | Yes |
| PAN-OS 11.x | Yes |
-
Virtual Systems (VSYS) are supported
-
The Maximum Policy Size is the maximum number of ACLs that your device can support. It depends on the hardware and memory available on the device. It can be retrieved from the device using the CLI:
admin@PA-500> show system state | match cfg.general.max-address- The Maximum Policy Size is the number of address groups (cfg.general.max-address-group) multiplied by the number of addresses in a single address group (cfg.general.max-address-per-group).
- PAN Article on the topic.
Current version of TSCM
The current version of the TSCM OVA is 1.51. If your TSCM image is older, please download the latest version from the device configuration page in the Admin Portal. You can find out the TSCM version by running
$ tsadmin version
The current version of the PAN-OS module is 1.20-01 (included with TSCM 1.51)
Installation parameters for experienced users
If you have already created a device entry in the portal, and are familiar with the installation procedure, you can access the TSCM parameters below if you access this document from the Portal Device page.
| Setting | Value |
|---|---|
| Device ID | Retrieved from the device settings page |
| Device Key | Retrieved from the device settings page |
Link Command:
$ tsadmin add --type auto --device_id=[Device ID] --auto_key=[Device Key]
Prerequisites
System
The TSCM is delivered as an OVA or VHD image, built using Ubuntu 24.04 as the base Operating System. It is preconfigured with:
- 2 CPUs
- 2 GB of RAM
- 20 GB of disk space
You will need a Hypervisor such as vSphere, ESXi, Virtualbox or Hyper-V to deploy the image.
Connectivity
To retrieve its configuration and policy, and to upload log data, the TSCM needs the following connectivity:
- DNS over TCP - Policy service
- Hostname: ts-dns.threatstop.com
- IP Range: 192.124.129.0/24
- Outbound TCP port 53 or 5353
- DNS over TLS - Configuration service
- Hostname: ts-ctp.threatstop.com
- IP Range: 204.68.97.208/28
- Outbound TCP port 5353
- HTTPS - Log service
- Hostname: logs.threatstop.com
- IP range: 204.68.99.208/28
- Outbound TCP port 443
- Direct Connection or via Proxy
- NTP
- Hostname: ntp.ubuntu.com
- Outbound UDP port 123
It must also be able to communicate with the PAN-OS device:
- HTTP
- TCP Port 80
- From the PAN-OS device to the TSCM (ACL updates)
- HTTPs
- TCP Port 443
- From the TSCM to the PAN-OS firewall (Configuration)
- Syslog
- TCP or UDP Port 514
- From the PAN-OS firewall to the TSCM (Log forwarding)
PAN-OS credentials
To perform this installation, you need an account with API access on the PAN-OS firewall.
Setup
Integration ThreatSTOP with a PanOS device using Web Automation is performed in 4 steps:
- Configuring the device settings on the Admin Portal
- Downloading and loading the VM image
- Linking the TSCM to the device settings
- Apply ACLs and configure log forwarding on the firewall
Step 1: Portal
During this step, you will create a device entry on the Admin Portal. You will select a device type (PAN-OS PA Series) and enter the configuration settings. A minimum configuration only requires a handful of settings but optional, advanced options are also available.

To create a PAN-OS device entry:
- Log into the Admin Portal with your ThreatSTOP account
- Browse to the Device page and click Add Device
- Select the PAN-OS model:
- Type: IP Defense
- Manufacturer: Palo Alto Networks
- Model: PA Series
- Integration Type: TSCM with Web Automation
The Admin Portal will display a form to enter the device settings described below and the links to retrieve the TSCM image.
-
Nickname: this is a mnemonic name used to identify the device. It can be set to any string (A-Z, 0-9, - and _). If you create multiple device entries, each entry must have a unique nickname. The Nickname will be used to identify the device on the TSCM and in the Reporting user interface.
-
Policy: select a pre-defined policy or a customized policy. It must be an IP Defense Policy.
-
IP Type: Access to the ThreatSTOP services is controlled in part using an ACL allowing the device IP to connect. If your device has a static public IP address (the most common case), select static. If your device has a dynamic public IP address, the ThreatSTOP services can lookup the IP address using a DNS fully-qualified name (FQDN).
-
Public IP address: In static mode, this is the public IP address of the device. It is possible to configure multiple device entries with the same public IP address.
-
Domain name: In Dynamic mode, this is a DNS FQDN which must be kept up-to-date as an A record pointing to the device’s dynamic IP.
-
Internal IP address: This is the management address of the device. The TSCM will communicate with the PAN-OS via HTTP (XML API) using this IP address. Note: Authentication credentials are documented below.
-
Note: An optional field to store a note of your choice about the device - location, identifiers, model…
-
Trusted Zone: the list of networks for your internal (trusted) networks. If your PAN-OS configuration includes several zones, provide them as a comma-separated list. The default setting is Trusted.
-
Untrusted Zone: the list of networks for your internal (trusted) networks. If your PAN-OS configuration includes several zones, provide them as a comma-separated list. The default setting is Untrusted.
-
Maximum Dynamic Lists: the number of dynamic lists ThreatSTOP may use to distribute block / allow entries into. We use one list for allow and the remaining lists for block entries. You can adjust this setting to meet the available resources on your device. The following article states PAN-OS version 7.1+ has ability to create up to 30 dynamic lists. If you have a version older than this please assume you only have up to 9 dynamic lists. We use one list for allow and the remaining lists for block entries. If you have custom dynamic lists already generated, you will need to drop this number to account for the number of block and allow lists you currently have setup.
Note: The number of addresses in a dynamic block list is determined by the maximum number of IP addresses your firewall hardware supports. …The PA-5200 Series and the PA-7000 Series firewalls support a maximum of 150,000 total IP addresses; all other models support a maximum of 50,000 total IP addresses… ‡ Ref. To support PAN devices older than 7.0.x we automatically calculate the maximum number of IPs per dynamic list by fetching theshow system state | match cfg.general.max-addressoutput and using the max-address value minus 300 (reserved by PAN on older systems). If you are running a device that supports 50,000 IPs on PAN-OS >= 7.1, it doesn’t make sense to select more than 11 block lists (11 * 4700 = 51,700, which would fill up to 50,000 then stop and warn it couldn’t finish loading the rest of the addresses). To view the number of addresses supported by your device, see this article -
VSYS Name: enter the name of the virtual system (vsys) as it appears at the top of the screen when viewing your vsys. This is not the entry in the Name field of the device, but has the format vsysX (where X is a number) and should appear at the top of the screen when configuring the PAN-OS device. For a single firewall instance, this would be vsys1.
-
Syslog Profile: enter the name of a syslog profile to create a new profile for the TSCM. Use ‘none’ to avoid creating a new syslog profile.
-
Enable Log Upload: If enabled, the TSCM will send logs received from the device to the ThreatSTOP reporting system. This is the recommended setting. When disabled, logs for this device will not be available for reporting in the Portal.
-
Block Action: This option allows you to define what action will be taken (drop, or deny) for matching block entries.
Upon saving the form, a device entry will be created in ThreatSTOP’s cloud.
Advanced Settings
The TSCM supports the following advanced settings, which cover uncommon ASA configurations or network environments.
-
DNS Port: The TSCM uses TCP Port 53 (outbound connections) to retrieve policy data. If this port is blocked or filtered (for example, networks using a DNS Application Layer Gateway), use this setting to switch to TCP Port 5353.
-
Syslog IP address: Typically, logs will sent over syslog by the device itself. If logs are sent by another IP address (for example, after being processed by a SIEM, or in High-Availability configurations), that IP address should be configured in this field.
-
Enable policy updates: this setting can be used to temporarily disabled policy updates by the TSCM. This is not recommended but can be used if device configuration changes needed to be suspended.
-
Log file size: the TSCM will upload logs after 15 minutes and when the log file size is reached. For systems under very heavy network traffic with many blocked connections, lowering this value will cause logs to be uploaded more often.
-
High-Availability IP addresses: See the High-Availability section below
-
Log Upload Proxy: If your environment requires using a proxy to reach HTTPs URLs, you can specify the address of a proxy. The proxy must support HTTPs using the CONNECT protocol. The proxy address must be http://address:port, where address is either an IP address or a fully-qualified domain name. HTTPs proxies are not supported. If you provide a proxy URL, the TSCM configuration will also prompt you for an optional user and password during the TSCM installation. Provide them if the proxy requires authentication.
Step 2: Download and boot image
After creating the device entry, the next step is the download using FTP and installation of the TSCM image.
You can choose between the OVA format (ESXi/vSphere, VirtualBox, Xen…) and the VHD format (Microsoft Hyper-V).
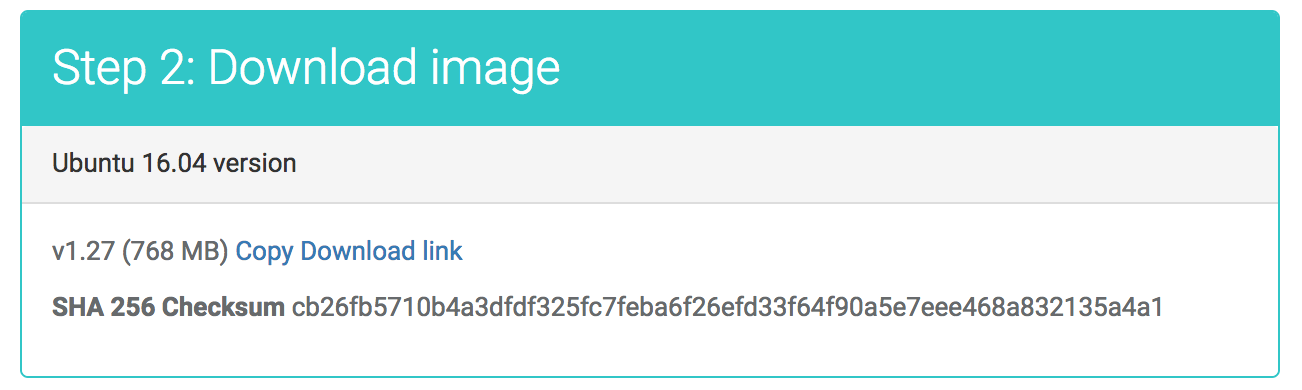
The download link is listed in the Step 2 section, as shown in this image.
- Click on the Copy Download Link to copy the link to your clipboard
- Use an ftp client of your choice, or a tool such as curl
- For your security: after downloading the file, we encourage you to validate its SHA 256 checksum. Compute it as shown below and compare it to the checksum in the Portal.
$ shasum -a 256 <filename>
You can import the OVA file in your Hypervisor to create the virtual machine and start it. If you are using Hyper-V, check out how to converting OVA files to VHD format.
Log into the TSCM
The TSCM virtual machine will use DHCP to obtain its IP address. If your Hypervisor doesn’t show the IP address assigned to the virtual machine, you can retrieve it from the console of the TSCM: it is displayed as part of the login prompt.
The virtual machine will be reachable using ssh:
- The default username is: threatstop
- The default password is: threatstop
Step 3: Link the TSCM to the Device entry
After booting the TSCM and logging in via ssh, the third setup step will link the virtual machine to the device entry created in Step 1.
The TSCM has a configuration utility named tsadmin. A reference for the utility is provided here but we will cover the full installation steps below.
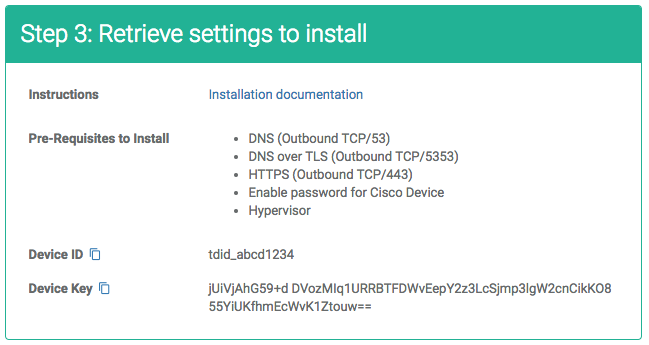
- Login with the threatstop account using ssh
- Obtain the Device ID and Device Key from the device configuration page. You can copy them to your clipboard by clicking the icon. The Device ID is the string tdid_ followed by 8 alpha-numerical characters.
- Run the following command:
$ tsadmin add --type auto --device_id=[Device ID] --auto_key=[Device Key]
-
The tsadmin command will first retrieve the device settings from the ThreatSTOP Portal. If the command fails, check the Troubleshooting section.
-
Once the configuration is retrieved, tsadmin will prompt for credentials for the firewall. They will be used to connect to the device but will not be stored outside of the TSCM image.
- a username
- a password
At this time, the TSCM has succesfully linked itself to the device entry, and validated its ability to reach the PAN-OS firewall.
Sample session:
$ tsadmin add --type auto --device_id=tdid_abcd1234 --auto_key=BTFDWvEepY2z3LcSjmp3lgW+jUiVjAIF6lYvd2cnCikKO855YiUKfhmEcWvK1Ztouw==
Web Automation - Retrieving configuration from ThreatSTOP Portal
Successfully added tstest
You can view the list of devices linked on the TSCM image:
$ tsadmin list
| Device name | Type       | Device ID     | Management IP | Log upload ID | Log  | Log uploads |
| tstest      | pan        | tdid_abcd1234 | 172.21.50.3   | tdid_abcd1234 | 100k | enabled     |
- From this point on, the TSCM will retrieve policy data (IP subnets) and configure them on the PAN devices, every hour.
- To force the initial update and proceed with testing, run the following command
$ tsadmin update <device name>
This will configure the PAN with the settings provided above, set the syslog source IP, establish the syslog server, setup log forwarding, create the EBLs and then setup the policies.
Configuration of the TSCM is now complete, but the policies uploaded to the TSCM will not be active at this point. You will need to login to the firewall and activate the policies.
Step 4: PAN-OS Configuration
The PAN-OS firewall will retrieve policy data from the TSCM over HTTP. To apploy the policies in the PAN-OS device, follow these steps:
ACL Configuration
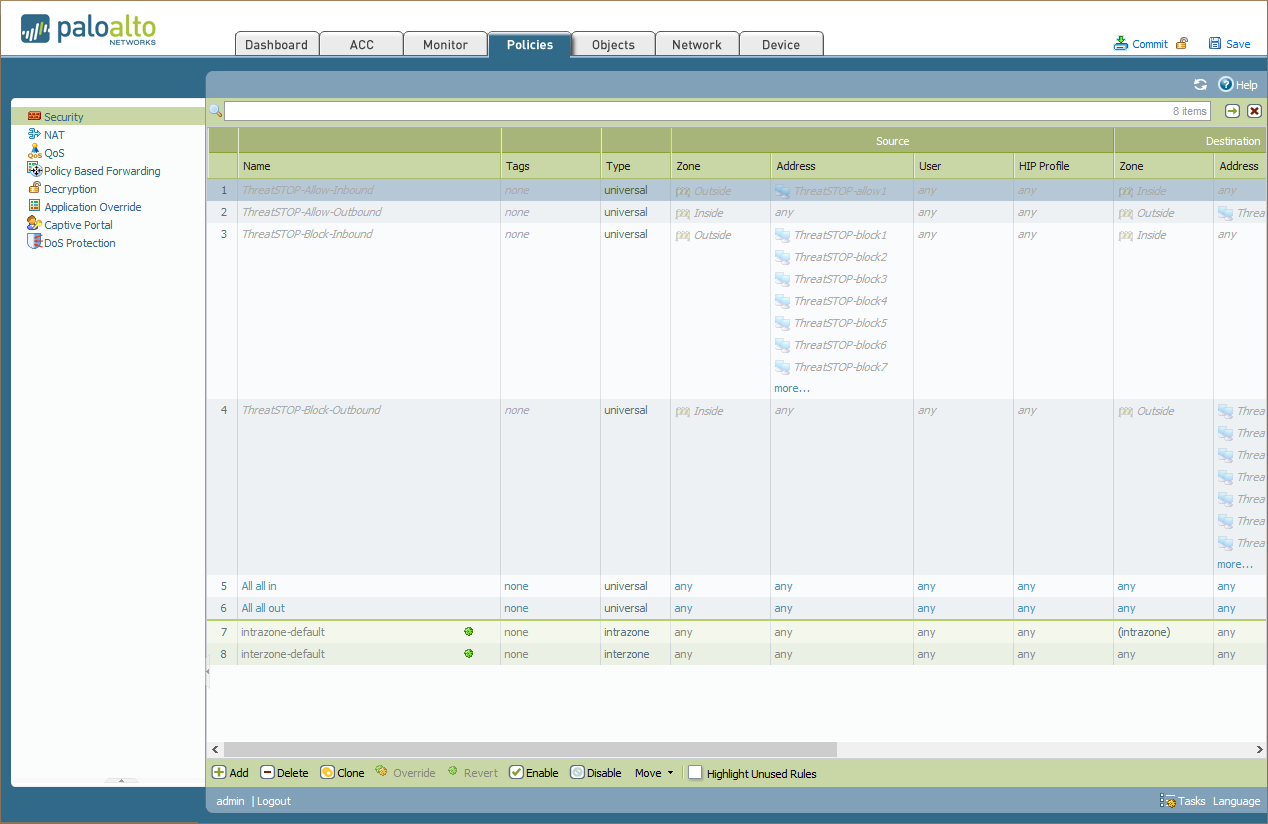
- Log into your PAN device through the web management interface.
- Click on Policies.
- You will see all of your rules established for your policy on this device, including four rules for ThreatSTOP:
- ThreatSTOP-Allow-Inbound
- ThreatSTOP-Allow-Outbound
- ThreatSTOP-Block-Inbound
- ThreatSTOP-Block-Outbound
- Place these rules where you want them in your policy. We recommend placing them at the top.
- After placing the rules in your desired location select all four rules, and click Enable at the bottom of the screen.
- Now click Commit at the top of the screen to enact the changes.
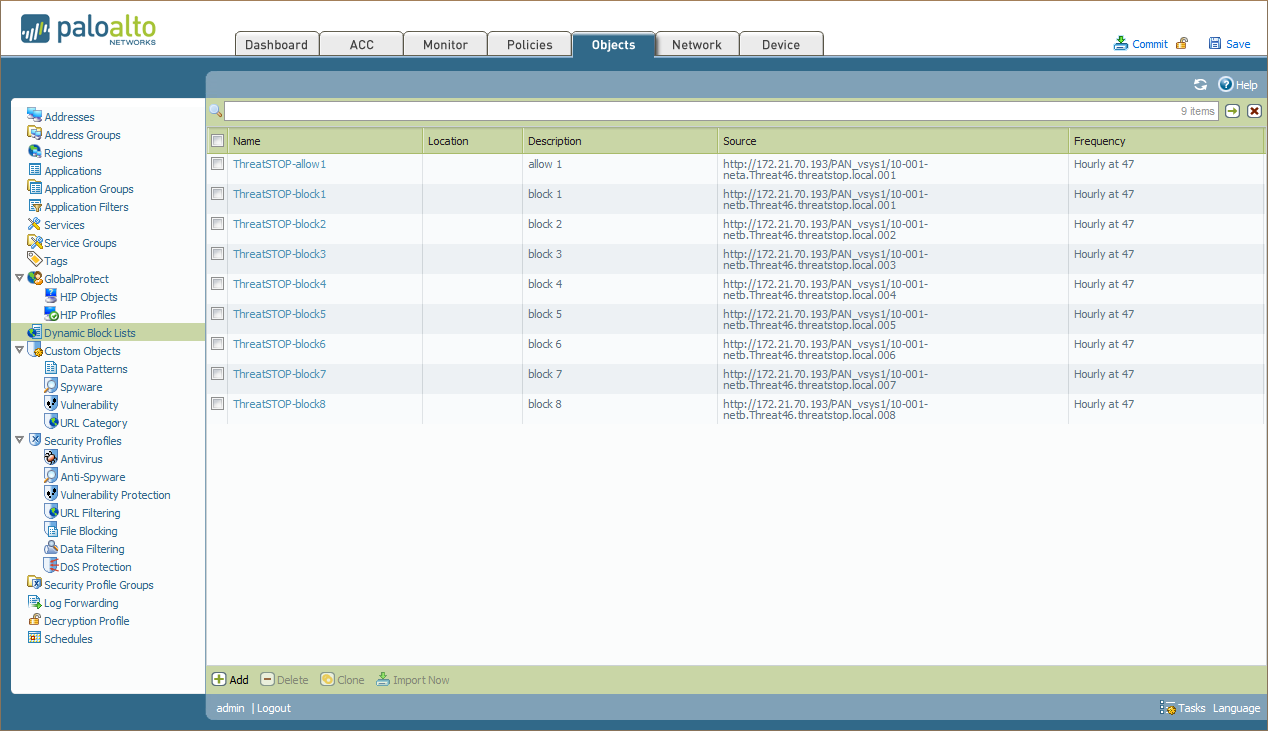
- To complete the installation, you can force the import of the policy data in the EBL.
- Click Objects.
- Click Dynamic Block Lists.
- Check the box next to the lists you want imported immediately.
- Click Import Now.
You can test that the policy is correctly applied by pinging bad.threatstop.com (64.87.3.133) through the device, a test IP included in all policies. The ping command should fail.
Log forwarding
You have the option of setting up log forwarding for your policies policies using syslog and Log forwarding. This will enable the reporting features for this device on the ThreatSTOP portal.
This procedure has two parts, one of ThreatSTOP and one for existing policies on the PAN.
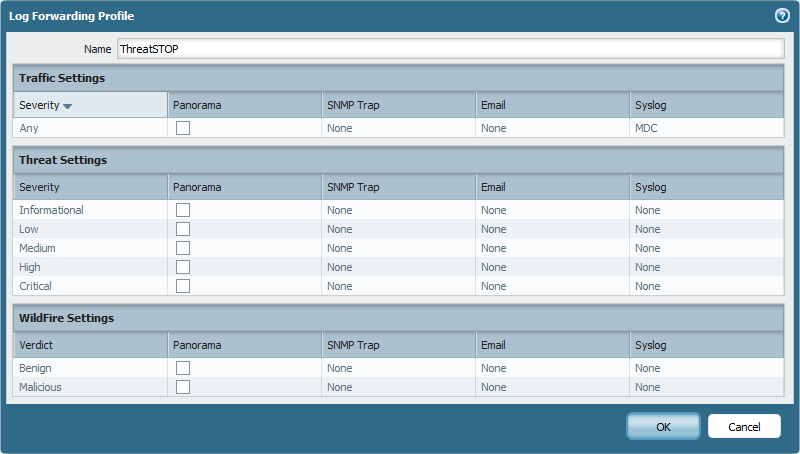
To turn on Log Forwarding to ThreatSTOP:
- Under Objects click Log Forwarding.
- Click on the syslog profile configured during the setup (default ThreatSTOP).
- Select any of the data you want to forward and click OK.
- Click on Commit
Logging and Reporting
If log upload is enabled, the TSCM will now upload logs every 15 minutes, as long as there were connections blocked by the policy since the last upload. The logs can be analyzed in the IP Defense Reports 15 minutes after they’ve been uploaded.
To check that the log upload feature is able to reach the server:
- After applying the ACLs, generate log entries by trying to reach our test address through the device. The command should fail to connect.
curl http://bad.threatstop.com - Run the following command on the TSCM to rotate and upload the log file
$ tsadmin logs
If the command doesn’t file a log file, it will exit immediately:
threatstop@tsclient:~$ tsadmin logs
[INFO ] : Starting log upload client
[INFO ] : Log upload client exited
- Log files are stored in /var/log/threatstop/devices/<device name>/syslog.
- If no log file is present, check the syslog forwarding configuration on the device and check that the ACL is applied.
Successful upload:
threatstop@tsclient:~$ tsadmin logs
[INFO ] : Starting log upload client
[INFO ] : [Uploader] Loading device configuration
[INFO ] : Processing logs for device [devicename]
[INFO ] : Starting ThreatSTOP logupload operation v2.00 at 24/05/2018 19:34:05
[INFO ] : Verifying log file [/var/log/threatstop/devices/asa135/syslog.1] stats
[INFO ] : Processing [/var/log/threatstop/devices/devicename/syslog.1] log file
[INFO ] : Start sending data
[INFO ] : Preparing connection data
[INFO ] : Connecting to https://logs.threatstop.com:443/logupload.pl
[INFO ] : Upload was successful [200 OK]
[INFO ] : Completed processing for device [asa135]
[INFO ] : Finish ThreatSTOP logupload operation at 24/05/2018 19:34:10 after 00:00:05
[INFO ] : Log upload client exited
If the command attempts to upload a log but fails, check the connectivity of the TSCM to ThreatSTOP’s log service, described in the connectivity section of this document.
Additional considerations
Support for multiple devices
High-Availability clusters
If your PAN-OS firewall is part of a High-Availability pair (Active/Active or Active/Passive), the TSCM can connect to each device to maintain the configuration. The devices must have the same set of credentials.
- Configure the management IP address of the backup system in the HA cluster in the ‘HA Device IP address’ field on the Portal
- Configure the same IP address as Syslog IP to allow the TSCM to receive logs from the backup node
- Repeat the configuration steps on the backup node to apply the Dynamic Lists and forward logs to the TSCM
Other operations
Current configuration
To view the current settings on the TSCM, run
$ tsadmin show <device name>
Configuration changes
-
After the initial configuration is completed, settings can be edited on the Admin Portal and will be reflected on the device within 5 minutes, including Policy configuration changes.
-
If you change the credentials on the PAN device, you will need to run tsadmin configure <device name> and update them on TSCM to allow the virtual machine to continue to connect.
Error reporting
The TSCM update process wil report failures such as:
- failure to download the policy
- failure to connect to the log upload service
Failures are reported on the Device List page of the portal.
Software updates
To update the TIP and retrieve new versions of the ThreatSTOP software, login as threatstop and run the following command:
$ sudo apt-get update && sudo apt-get -y dist-upgrade
Uninstall steps
- On the device, disable the ThreatSTOP Policy Rules. These rules reference the dynamic block lists and the log forwarding profile. Until they are removed, you will be unable to delete the configurations under Policies->Security. Check each of the four ThreatSTOP policy rules
-
Click Disable at the bottom of the policy rules window
- Log into the TSCM and run:
$ tsadmin remove <devicename>
This will remove the PANOS device and all ThreatSTOP Policy Rules, as well as the dynamic block lists and log forwarding profile.
- The last step is to delete the device entry on the Portal, using the Device List page. This step will caused the log data from the device to be unavailable in the Reporting interface of the Portal. If needed, you can recreate a new device entry for the same device, with the same or different settings. Note that the new entry will have a different Device ID for linking the TSCM.
Additional information
Troubleshooting
-
Failure to link the device: tsadmin add fails with this error: “Failed to connect to Web Automation services”. The common cause is a network connectivity problem using DNS over TLS (Outbound TCP connection to ts-ctp.threatstop.com on port 5353).
- Failure to link the device: tsadmin add fails with this error: “Failed to retrieve settings using Web Automation. There are three common causes:
- The Device ID or Device Key is not correct.
- The system time is not correct. The virtual machine run an NTP client which must be up-to-date. Check its status with the timedatectl command.
- The new device entry has not been activated yet. Wait 2-3 minutes and retry.
- Failure to retrieve policy: tsadmin add fails with this error: “block or allow list [name] could not be fetched from ThreatSTOP DNS servers.” There are two common causes:
- A network connectivity problem using DNS over TCP (Outbound connection to ts-dns.threatstop.com on Port 53).
- The policy is not available yet. It typically takes less than 15 minutes for new devices and new policies to be activated in the Policy Service.
-
If the network connectivity is ok, and 15 minutes have elapsed since the device entry was created, please contact ThreatSTOP Support at support@threatstop.com.
-
If tsadmin add fails to connect to the device, check the credentials (username, password).
- If you are receiving “Unable to fetch external dynamic list. Timeout was reached” error messages, check if you have an EDL or Palo Alto Network Services Service Route setup. This may be overriding the update fetching interface route. See this article for more details.
Version history
- TSCM
| Version | Release Date | Notes |
| 1.38 | 2018-10-09 | Support for proxy-based log uploads |
| 1.37 | 2018-10-04 | Added network configuration tool |
| 1.36 | 2018-05-08 | Support for advanced settings |
| 1.31 | 2018-03-25 | Fix for log upload script |
| 1.30 | 2018-02-06 | Support for Web Automation |
- PAN OS Module
| Version | Release Date | Notes |
| 1.16 | 2019-05-14 | Added configurable action options: Drop or Deny, added 29+ EBLs |
| 1.15 | 2018-05-08 | Support for advanced settings |
| 1.11 | 2018-01-12 | Added compatibility with TSCM 1.27 and above |