Overview
OKTA is an identity management platform. It provides a centralized platform to control access to your SAAS applications. The ThreatSTOP Admin Portal can be configured to authenticate users using OKTA instead of ThreatSTOP’s user database. This provides a mechanism to add and remove users from the ThreatSTOP Portal through OKTA. An OKTA account is required.
Enabling the OKTA/ThreatSTOP integration will:
- grant and remove access to the ThreatSTOP portal based on your OKTA configuration
- update your users’ permissions in the ThreatSTOP Portal automatically
- use OKTA to manage credentials and authentication requirements
- enable single sign-on into the ThreatSTOP Portal after authenticating into OKTA
The ThreatSTOP/OKTA integration is implemented by creating a SAML 2.0 Application in your OKTA account and enabling the integration in the ThreatSTOP Admin Portal.
Features
The ThreatSTOP/OKTA integration offers the following features:
-
Automatic user provisioning : User accounts will be automatically created in the ThreatSTOP Portal if OKTA is configured to grant access to the user. Accounts are provisionned during the initial login. Optionally, accounts can be be provisionned with SCIM.
-
Automatic role assignments: roles in the ThreatSTOP Portal will be assigned to users based on their OKTA groups. Roles assignments are cumulative: up to give OKTA groups can be mapped, resulting in multiple roles in the ThreatSTOP Portal. Changes to OKTA group-to-ThreatSTOP role mappings are updated when the user logs in.
-
Automatic user deprovisioning (optional): if OKTA is configured to notify the ThreatSTOP Portal when a user is deprovisioned, the ThreatSTOP Portal will remove the user from the organization. If this is not configured, the deprovisioned user will lose access to the Portal (the OKTA system will not grant them access) but will remain listed in the list of existing user accounts in the ThreatSTOP Portal. Automated deprovisioning is implemented using SCIM.
-
Fallback to ThreatSTOP credentials: this optional features allow to list accounts that will continue to be able to authenticate using ThreatSTOP’s database for credentials. This allows these users to access the ThreatSTOP portal even if the OKTA and ThreatSTOP subsystems are unable to communicate, or if a configuration error breaks the integration (e.g. invalid settings, invalid group mappings…)
Configuration
Process overview
The setup is performed with four steps:
- Creating a new OKTA application.
- Assigning OKTA users and groups to the OKTA application.
- Configuration the integration in the ThreatSTOP Portal.
- Testing.
Creating a new OKTA Application
To configure the OKTA application:
- log into the ThreatSTOP Portal with an administrator account.
- Browse to Organization settings and click on OKTA Integration.
- On the OKTA Integration settings page, retrieve the Single Sign-On URL and Audience URI (SP Entity ID).
Before continuing in the ThreatSTOP Portal, log into your OKTA Account using an administrator account.
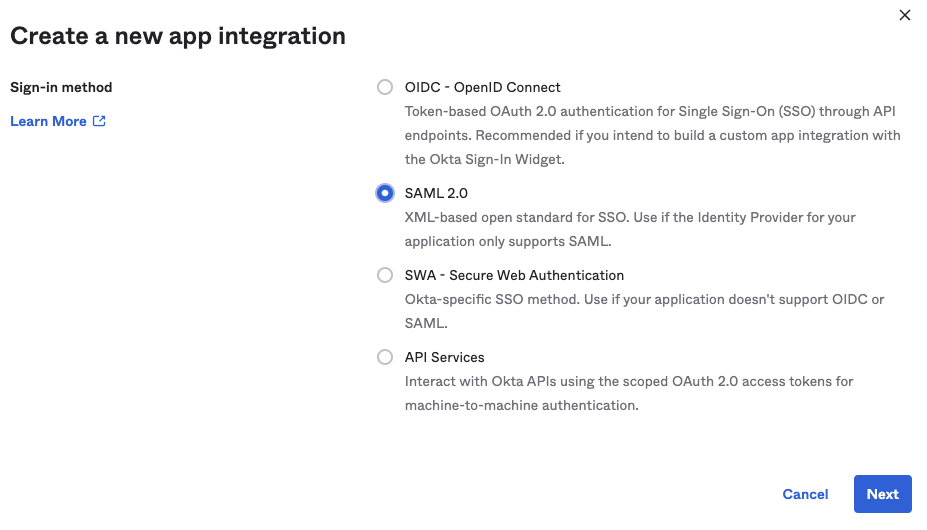
- Browse to Applications and click Create App Integration.
- Select SAML 2.0 and click Next
- Pick a name for the application, e.g. ThreatSTOP Portal and click Next.
- Enter the Single sign-on URL retrieved from the ThreatSTOP OKTA settings.
- Enter the Audience URI (SP Entity ID) retrieved from the ThreatSTOP OKTA settings.
- Under Group Attribute Statements, select the groups that will be exposed to the ThreatSTOP Portal (see Group configuration below).
- Keep the default for the other settings.
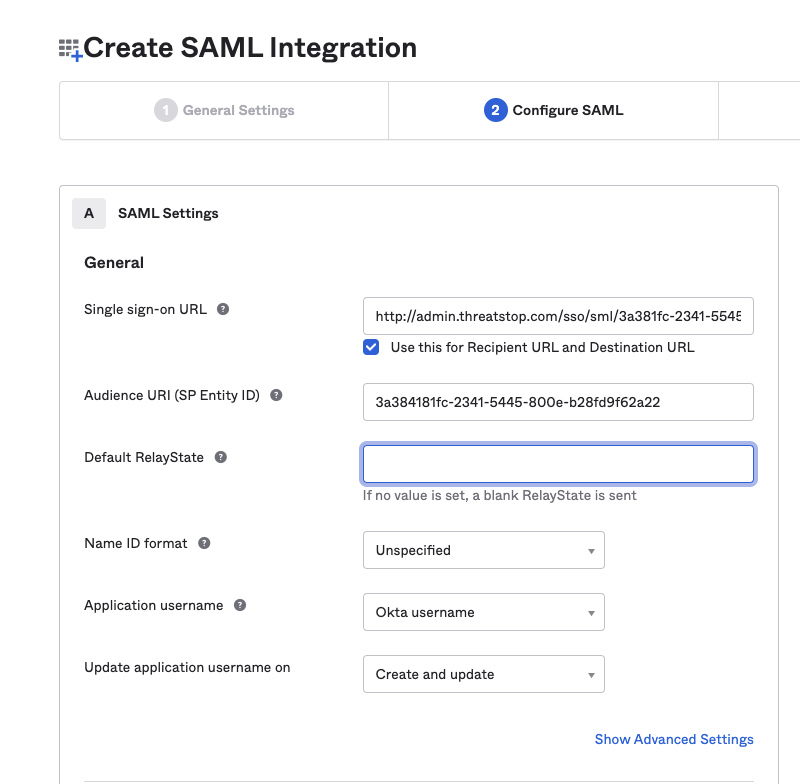
- Click Finish.
- The application will be configured with your default OKTA Authentication Policy. You can change the policy on the Sign-On tab. Please refer to the OKTA Authentication Policy reference.
- On the Sign On tab for the new SAML application, click on View SAML setup instuctions. Under the Optional header, copy the IDP Metadata (XML Data).
Group configuration
Permissions in the ThreatSTOP are managed by assigning roles to users. Roles are groups of permissions. If a user is given multiple roles, permissions are combined. Role configuration is described here.
To manage role assignment in OKTA, a user should be added to one or multiple groups. You can use existing OKTA groups or create new groups. Groups are created in the OKTA Portal under Directory > Groups. After setting up groups, users should be assigned to these groups. You can either edit the group and select Assign People to select multiple users, or find a user under Directory > People, click on the user, select the Group tabs and add one or multiple groups.
OKTA groups will be mapped to ThreatSTOP roles in the next step.
ThreatSTOP Portal
SAML Settings
Back in the ThreatSTOP Portal, the integration is ready to be enabled and groups configured.
- Log into the ThreatSTOP Portal with an administrator account.
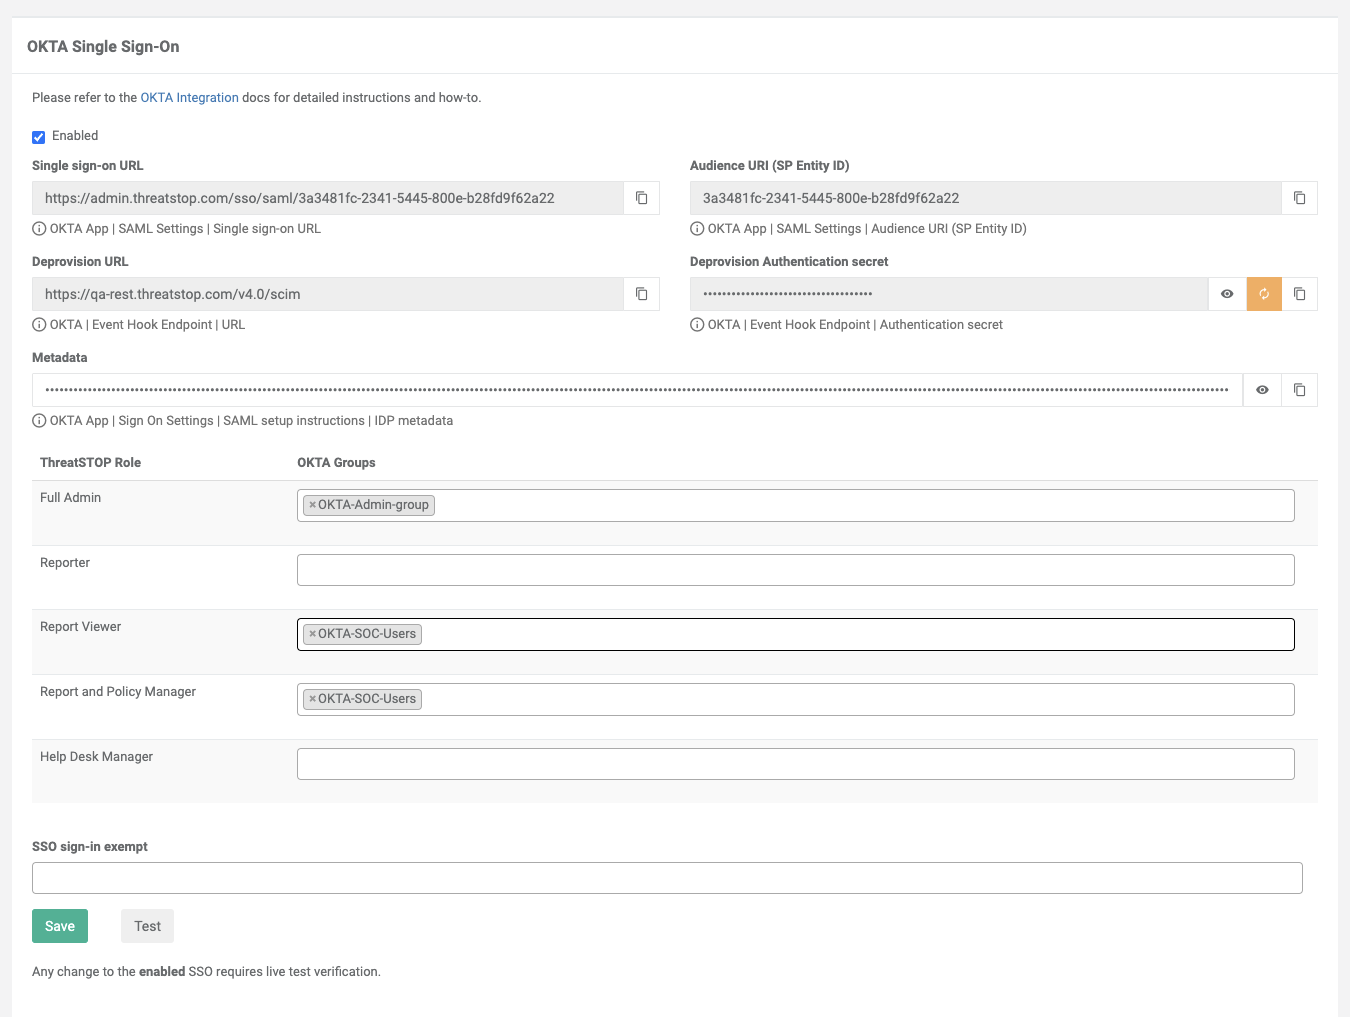
- Browse to Organization settings and click on OKTA Integration.
- Click the Enabled checkbox.
- Copy-paste the IDP Metadata retrieved earlier in the OKTA portal.
ThreatSTOP Roles
Under ThreatSTOP roles, you will find the list of default and custom roles.
- Mapping an OKTA group is done by entering its name in the text field for the ThreatSTOP role.
- Multiple OKTA groups can be mapped to the same ThreatSTOP role.
- If an OKTA group is mapped to multiple roles, the user will be granted the cumulative permissions for the selected roles.
- If a ThreatSTOP role has no OKTA group associated with it, no OKTA user will be granted the corresponding role.
- There must be at least one group mapped to the Full Admin role to ensure continuous access to the ThreatSTOP Portal.
The ThreatSTOP Portal will enforce that the user configuration the OKTA integration has the Full Admin role and will not allow enabling the configuration if it is not.
SSO Exempt list (Authentication fallback)
You can use this field to list users (by their email address) that will be allowed to login with ThreatSTOP credentials, i.e. bypassing the OKTA requirement. At least one user with the Full Admin role should be listed to ensure continued access, in case the ThreatSTOP/OKTA integration is unable to authenticate users due to either a system/network issue, or invalid configuration change.
If your organization already has users configured, they will be listed in the SSO Exempt list. If you want to enforce that these users login with OKTA, remove them from the list. You can remove all users except the account being used to configure the integration.
Saving the configuration
- Next, perform a test of the configuration:
- Click on the Test and Save button.
- Enter the user name (email address) to validate.
- Follow the OKTA authentication workflow.
- The Portal will display the result of the authentication check, and the groups that were retrieved and mapped roles.
- If the authentication succeeds and the user’s groups are listed as expected, click Save and proceed to the next step.
- If the authentication does not succeed, review the SAML Settings.
- If the authentication succeeds but the ThreatSTOP roles are not as expected, review the group membership in OKTA and group mappings in the ThreatSTOP role.
Automatic user provisioning and deprovisioning with SCIM
Both automatic user provisiong and deprovisioning are optional features. To enable either of these features, the OKTA application must be configured as follows:
- In the ThreatSTOP Portal, open the OKTA settings
- Retrieve the Deprovisioning Authentication secret
- In the OKTA Portal, browse to the ThreatSTOP application and click on the Provisioning tab
- Edit the OKTA application in the OKTA console (General > App Settings > Edit). This setting is not available during the initial app creation.
- Check Enable SCIM provisioning and save
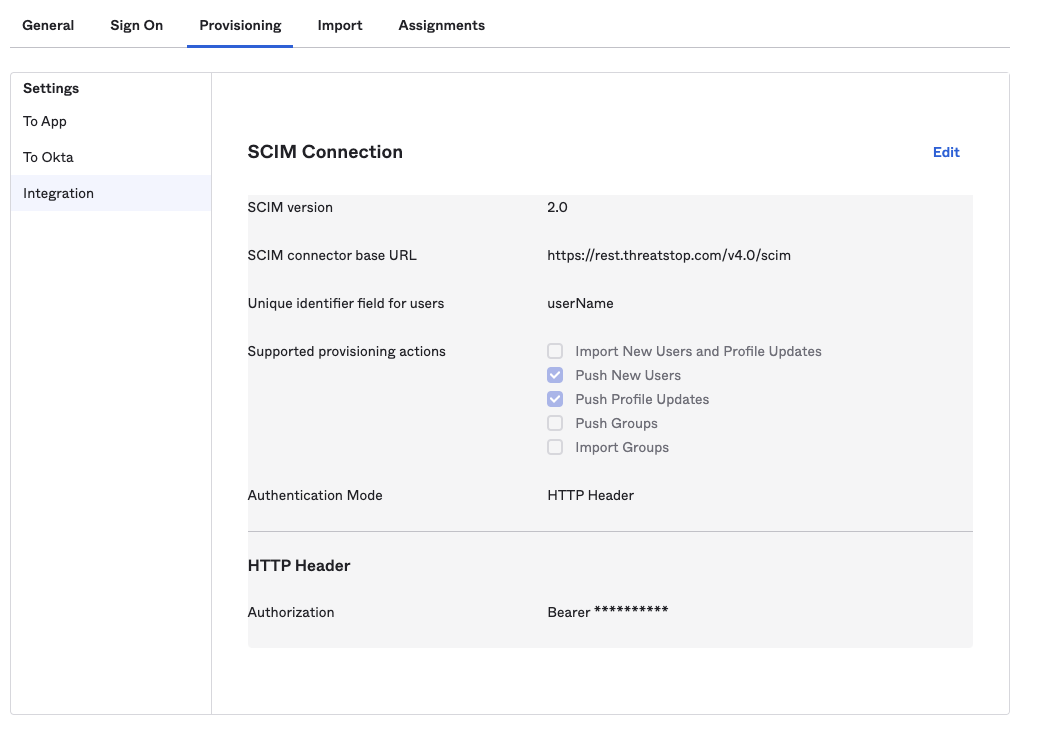
- Select Integration and enter the settings:
- SCIM connector base URL: https://rest.threatstop.com/v4.0/scim
- Unique Identifier field for users: userName (i.e. email address of the OKTA account).
- Supported provisioning actions: Push New Users and Push Profile Updates.
- Authentication Mode: HTTP Header.
- HTTP Header: enter the Deprovisioning Authentication secret retrieved above.
- Click Test Connector Configuration to validate the settings.
Automatic provisioning
Once SCIM has been configured, you can enable automatic provisioning. When enabled, OKTA will notify the ThreatSTOP system when a user is given access to the ThreatSTOP Portal. The ThreatSTOP Portal will dispatch an email to the user to ask them to confirm that they want to access to the ThreatSTOP Portal and that they are the legitimate owner of the email address. If automatic provisioning is not enabled, the confirmation email will be dispatched when the user first logs in (see End User Experience below).
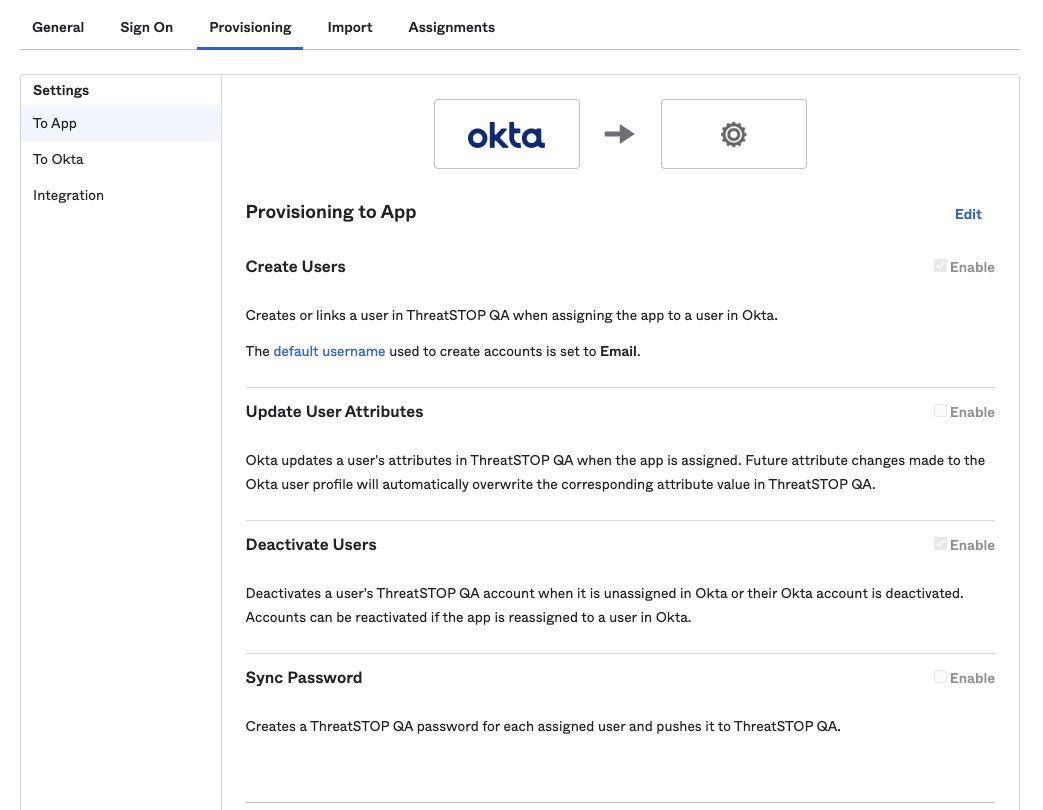
To enable automatic provisioning:
- Click on the Provisioning tab of the application in the OKTA portal.
- Select To App and click Edit.
- Set the Enable checkbox for Create Users.
- Click Save.
Automatic deprovisioning
When a user is removed from OKTA (i.e. either suspended, unassigned, deactivated or deleted), they will not be able to authenticate in the ThreatSTOP Portal using the OKTA integration. No additional configuration is required to remove their access unless they are listed in the list of users extempt from SSO enforcement.
However, the user account will remain listed in the ThreatSTOP Portal. It can be removed manually on the roles management page.
Optionally, you can configure OKTA to automatically remove the user account from the organization.
To enable automatic deprovisioning:
- Click on the Provisioning tab of the application in the OKTA portal
- Select To App and click Edit
- Set the Enable checkbox for Deactivate Users
- Click Save
If the user is re-enabled in OKTA, they will be able to authenticate again as a new user would.
Key rotation for SCIM

You can rotate the API key used for automated provisioning and deprovisioning:
- In the ThreatSTOP Portal, browse to Org Settings > OKTA Settings.
- Click the rotate icon locate to the right of the Deprovisioning Authentication secret.
- Confirm that you want to proceed. If you do, deprovisioning messages will be rejected until the API key is updated in the OKTA console.
- In the OKTA console, browse to the ThreatSTOP application.
- Click on the Provisioning tab and click Edit.
- Update the HTTP header field by pasting the new secret.
- Save the changes.
End user experience
When an organization has enabled the ThreatSTOP/OKTA integration, users can login using the ThreatSTOP login page or using the OKTA Single Sign-On feature. If their role has been updated, the change will be reflected in the ThreatSTOP Portal in the new session.
ThreatSTOP Login page
- On the Admin Portal login page, users can click the Login with OKTA button
- Alternatively, users can go to the SSO Login Page directly.
- If the user is already logged into OKTA, they will be logged into the ThreatSTOP Admin Portal directly, without having to enter their credentials.
- If the user is not already logged into OKTA, they will be prompted for their username. If this is their first time logging in, they will need to enter the name of the ThreatSTOP Organization to enable Single Sign-on. Otherwise, they will be directly redirected to the OKTA login page.
- After submitting the credentials and additional requirements (e.g. two-factor auth) required by the OKTA policy, the user will be logged into the ThreatSTOP Portal. ** If this is the first time accessing the ThreatSTOP Portal, the ThreatSTOP system will send an email to the user to confirm that they are the legitimate owner of the email address. ** If the user has roles in multiple ThreatSTOP organizations, the ThreatSTOP Portal will prompt them for the organization they want to access before redirecting them to the OKTA login page, following the OKTA workflow for that organization.
OKTA Dashboard
- Users can configured their OKTA dashboard to include shortcuts to applications. OKTA Administrators can also configure the dashboard for their users to include the application shortcut.
- If a user logs into OKTA first, they can click on the ThreatSTOP shortcut on their dashboard. This will logged them into the ThreatSTOP Portal directly. ** If this is the first time accessing the ThreatSTOP Portal, the ThreatSTOP system will send an email to the user to confirm that they are the legitimate owner of the email address.
Account switching
Account switching is the feature of the ThreatSTOP portal that allows changing the organization they are configuring without requiring them to authenticate again. If an organization enables the OKTA integration, switching into the organization will trigger the OKTA authentication process, so as to validate that the user is currently enabled in OKTA.
Password reset
Users managed by OKTA can’t change or reset their passwords in the ThreatSTOP Portal, unless they are listed in the list of users with Fallback access.