Netfilter’s iptables & ipset
This document goes over ThreatSTOP IP Defense integration via Netfilter’s iptables & ipset on a Linux based machine running Debian, or Debian based varients like Ubuntu support.
While it is technically possible to use just iptables, we find it’s orders of magnitude more efficient to use ipset to manage large blocklists.
Current Version
| Current Version | Released |
|---|---|
| 5.03-01 | Jan 8th, 2024 |
How to check your version
With installs after v5.00 you can use native package manager commands to find installed version.
admin@linux_server:~$ tsadmin version
05.00-01
If your installation is below v5.00 you will see a No such file or directory response.
Quick settings
curl -fsSL https://debian.threatstop.com/GPG-KEY.asc | sudo apt-key add -
echo "deb https://debian.threatstop.com/ThreatSTOP/ xenial main # xenial #" | sudo tee /etc/apt/sources.list.d/threatstop.list
sudo apt-get update
sudo apt-get -y install ts-iptables
$ tsadmin add --type auto --device_id=[Device ID] --auto_key=[Device Key]
Required portal settings during installation.
Please make note of the following settings while going through the CLI installation prompts.
| Setting | Value |
|---|---|
| Device ID | Retrieved from the device settings page |
| Policy (Block List) | Retrieved from the device settings page |
| Policy (Allow List) | Retrieved from the device settings page |
Compatibility
We have tested compatibility with the following:
| Operating system | Version | Supported |
|---|---|---|
| Ubuntu | 18.04 | Yes |
| Ubuntu | 16.04 | Yes |
| Ubuntu | 14.04 | Yes |
| Debian | Stretch 9 | Yes |
| Debian | Jessie 8 | Yes |
| Raspbian | Raspbian 8 | Yes |
Install Methods
On Device Install via Web Automation
Installing On-Device with Web Automation, which this document covers, allows you to easily configure settings on our Portal web interface. After configuring the settings on our portal, you will run a command on the device to pull down the configuration. From that point forward your device will sync it’s configuration updates made on the portal. This document will cover each setting in more detail below.
On Device CLI Install

Installing On-Device via CLI, which this document does not cover, will have you run through a series of prompts asking for setting particular to your install. Please see our iptables (On Device CLI) guide for more details.
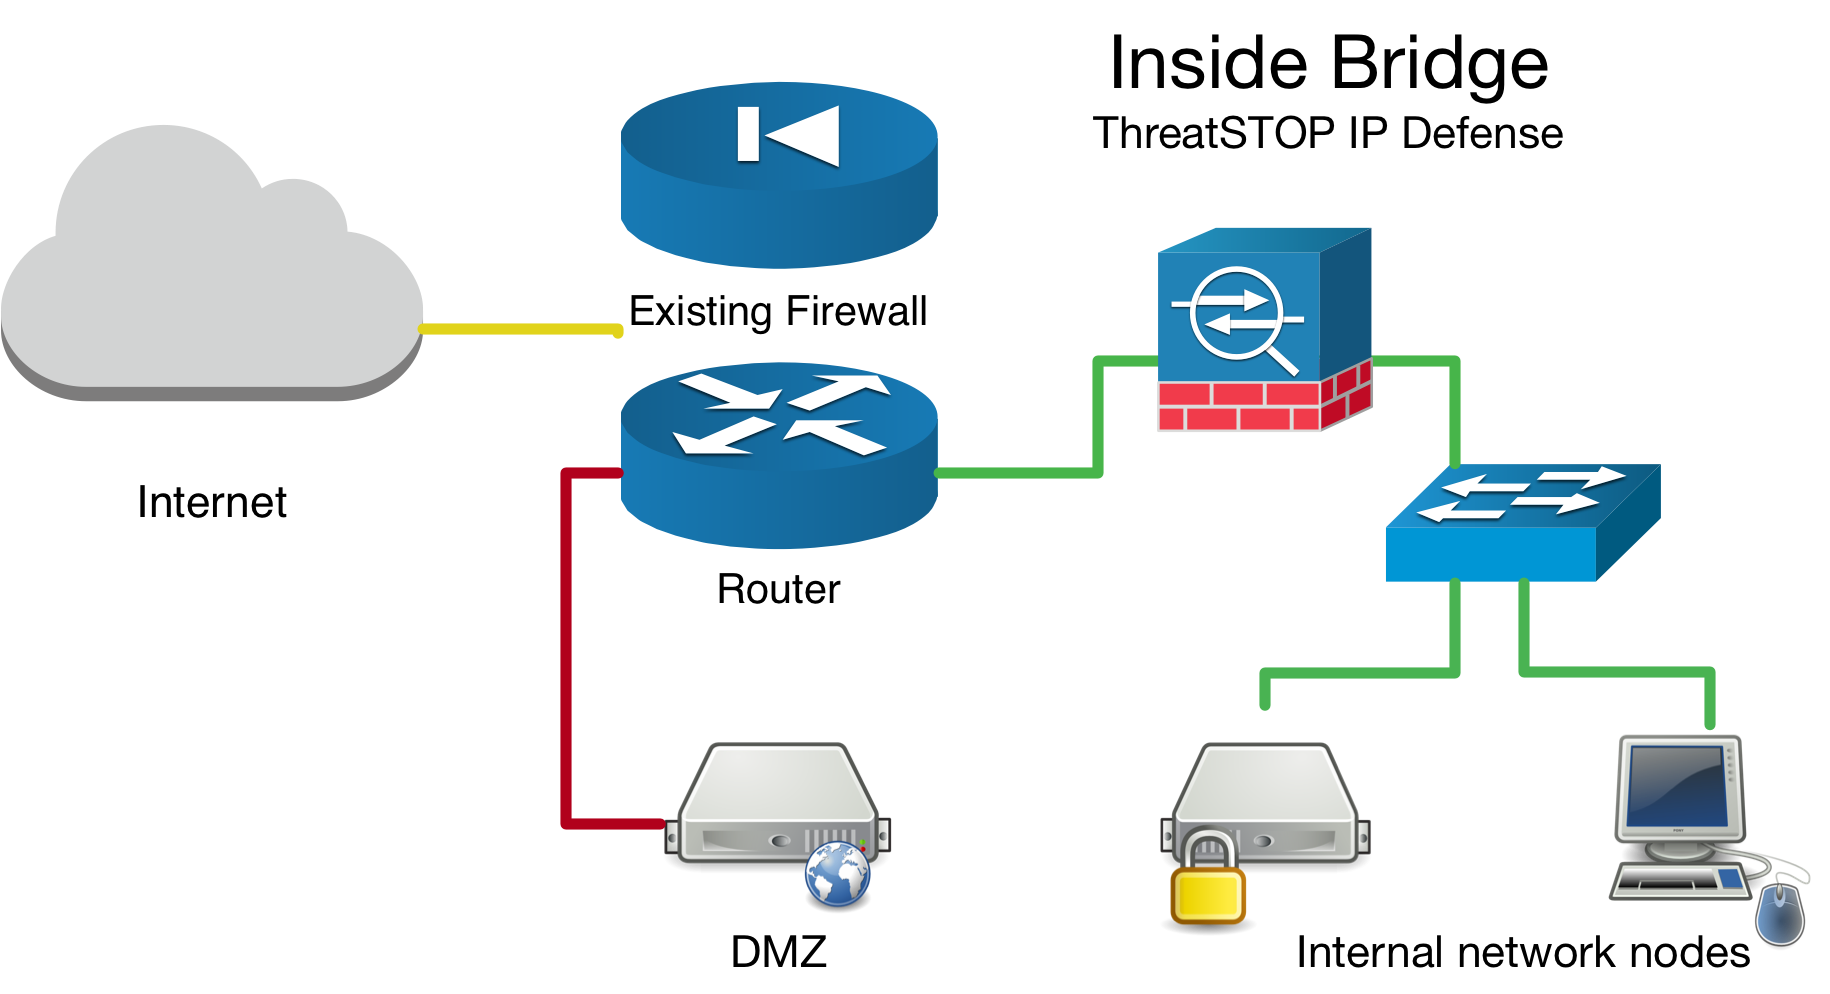
Network Bridge Considerations
If you have setup your device as a network bridge it is important to make sure you load the br_netfilter module. You can temporarly load the kernel module on-demand by running sudo modprobe br_netfilter. However, we have included an advanced menu item to permanently add it to a modules startup config file. Make sure you answer ‘Y’ - yes to the advanced prompt, or add --load_br_netfilter to the tsadmin add command while installing.

More information about netfilter kernel module available here.
Inside Bridge Example
Outside Bridge Example

Placement of device in network topology
If you are installing this device in an environment that already has a firewall/router it is preferable to install the ThreatSTOP device “inside” the firewall/router if it is doing NAT to track down infected machines on your network. Otherwise the logs will only see the single IP from the next hop instead of the true source node’s IP.
To ensure your bridge device only needs inbound & local firewall rule sets, test traffic to a known test address in both directions. The following logging demonstrates traffic being dropped by the firewall rule-set in both directions by the TS-inbound firewall rule set.
Positioning firewall rules
We automatically place our ruleset above all others so we block unwanted traffic as early as possible.
High Availability / HA / Cluster installs
We recommend you setup each device as a separate device in the portal and go through the on device configuration just as a normal single device. This way they get unique TDID’s and we can later identify which device reported the indicator of compromise hit.
Installation Overview
This document will go over installation and integration of ThreatSTOP directly in Linux via Netfilter’s iptables & ipset. The basic steps are as follows:
- Add & Configure device in Admin Portal
- Add our public software repository & key to your device using native Linux management commands
- Install ThreatSTOP software via apt-get
- Configure ThreatSTOP service on device
- Test configuration / logging.
Prerequisites
- Device added & configured via the admin portal.
- SSH access with su privileges to the Linux host.
- Current active ThreatSTOP account.
Minimum hardware requirements
| Type | Min. Amount |
|---|---|
| Memory | 1GB |
| Hard Drive | 4GB |
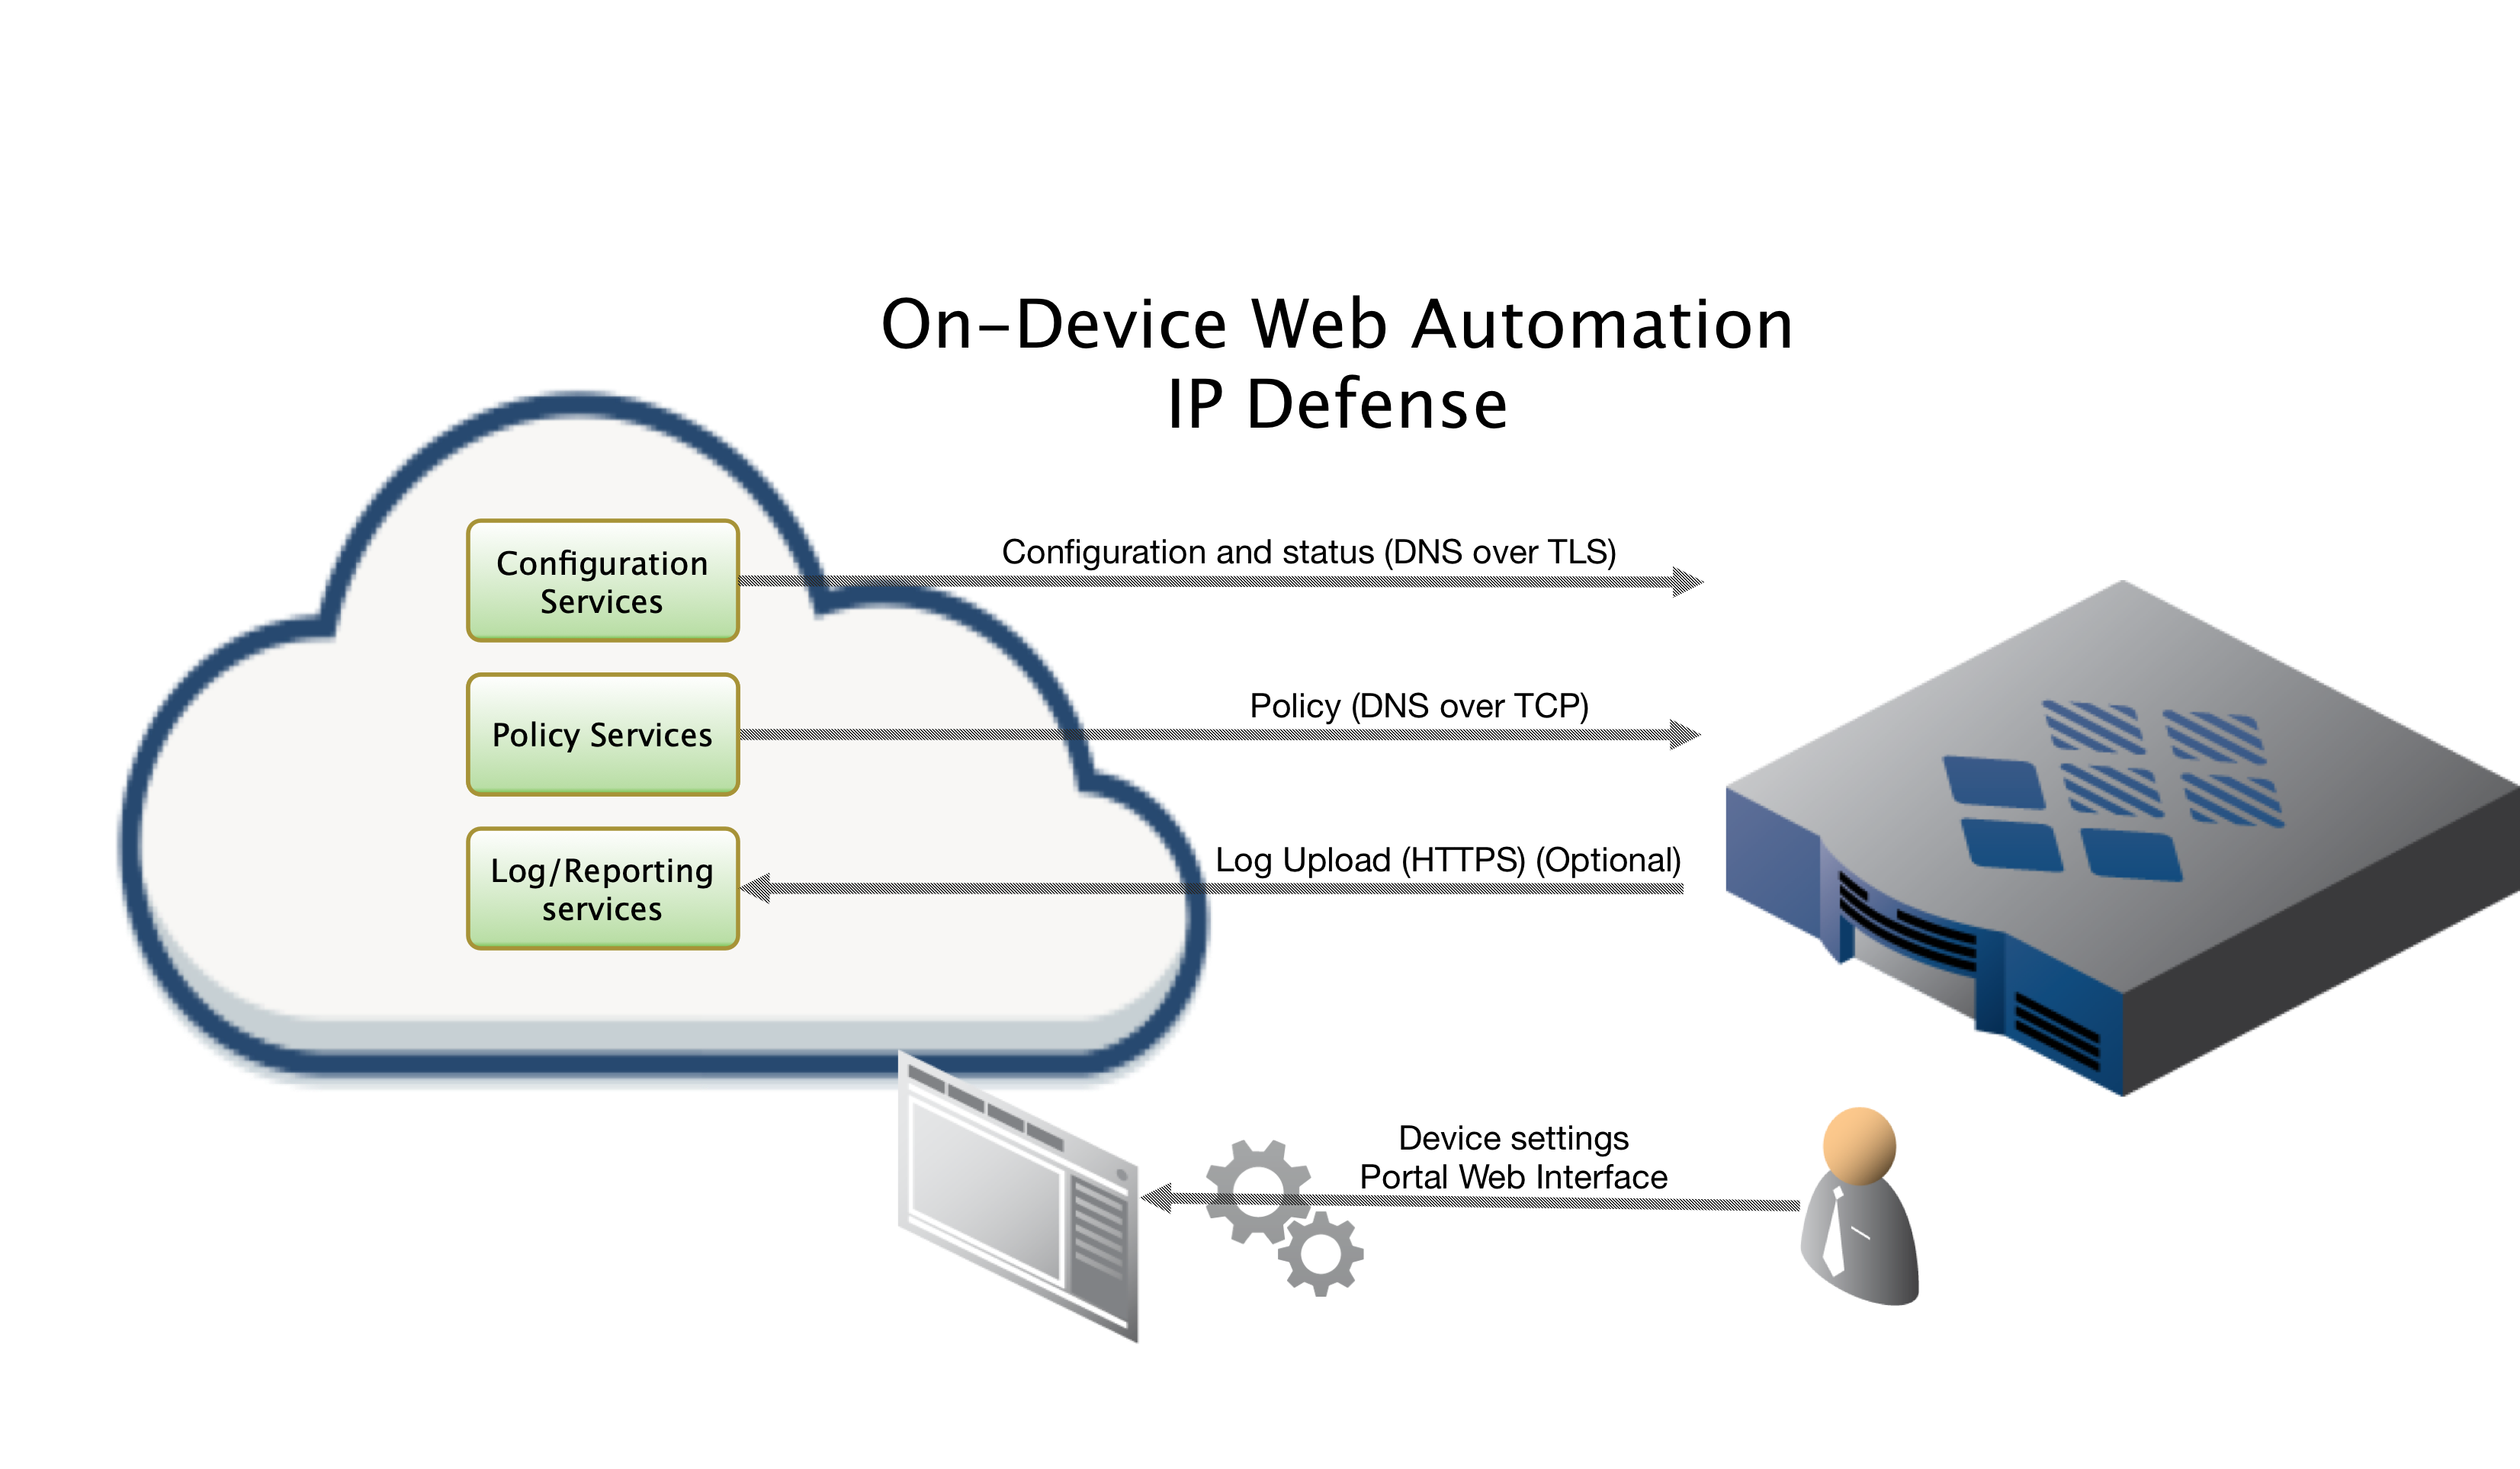
ThreatSTOP Communication Overview
Connectivity
To retrieve its configuration and policy, and to upload log data, the device needs the following connectivity:
- DNS over TCP - Policy service
- Hostname: ts-dns.threatstop.com
- IP Range: 192.124.129.0/24
- Outbound TCP port 53 or 5353
- DNS over TLS - Configuration service
- Hostname: ts-ctp.threatstop.com
- IP Range: 204.68.97.208/28
- Outbound TCP port 5353
- HTTPS - Log service
- Hostname: logs.threatstop.com
- IP range: 204.68.99.208/28
- Outbound TCP port 443
- Direct Connection or via Proxy
- NTP
- Hostname: time.nist.gov
- Outbound UDP port 123
Setup
Step 1: Portal device configuration
During this step, you will create a device entry on the Admin Portal. You will select a device type and enter the configuration settings. A minimum configuration only requires a handful of settings but optional, advanced settings are also available.
To create a device entry:
- Log into the Admin Portal with your ThreatSTOP account
- Browse to the Device page and click Add Device
- Select the model:
- Type: IP Defense
- Manufacturer: Linux
- Model: iptables (Ubuntu)
- Integration Type: On device with Web Automation
The Admin Portal will display a form to enter the device settings described below.
-
Nickname: this is a mnemonic name used to identify the device. It can be set to any string (A-Z, 0-9, - and _). If you create multiple device entries, each entry must have a unique nickname. The Nickname will be used to identify the device on the device and in the Reporting user interface.
-
Policy: select a pre-defined policy or a customized policy. It must be an IP Defense Policy.
-
IP Type: Access to the ThreatSTOP services is controlled in part using an ACL allowing the device IP to connect. If your device has a static public IP address (the most common case), select static. If your device has a dynamic public IP address, the ThreatSTOP services can lookup the IP address using a DNS fully-qualified name (FQDN).
-
Public IP address: In static mode, this is the public IP address of the device. It is possible to configure multiple device entries with the same public IP address.
-
Note: An optional field to store a note of your choice about the device - location, identifiers, model…
-
Allow Action: Specifies iptables rule action to be performed on matches from allow list.
-
TSPrefix: This is a prefix we prepend to allow / block ipset groups. We recommend keeping this extremely short (no more than 29 characters).
-
Maximum Policy Size: Option limit on the number of entries in the policy. If the policy becomes larger than this setting, the device will truncate it down to the Maximum Policy Size.
Advanced Settings
-
DNS Port: The device uses TCP Port 53 (outbound connections) to retrieve policy data. If this port is blocked or filtered (for example, networks using a DNS Application Layer Gateway), use this setting to switch to TCP Port 5353.
-
Load br_netfilter: This (yes/no) prompt will allow tell the installation to create a permanent configuration file to load
br_netfilterso that bridged traffic get’s processed via the systems iptables rulesets. -
Logopts: This field is used to set additional iptables logging rules see iptables logging options for more details.
-
Logopts Direction: This sets what direction (inbound, outbound, or both) we will setup the iptables “logopts” logging options.
Step 2. Setup software package repository
Adding the repository key
You’ll need to add the repository key as we sign the debian packages for safety and security.
| Download URL | SHA 256 |
|---|---|
| https://debian.threatstop.com/GPG-KEY.asc | dd25d4c954f695806b02c2d2f876f9c2679c18ecc5a91cb08982712a4a9ba5b6 |
# download the threatstop public repo key
wget https://debian.threatstop.com/GPG-KEY.asc
# compare the hash
shasum -a 256 GPG-KEY.asc
# add verified key to aptitude
sudo apt-key add GPG-KEY.asc
Adding the repository
Log into your device via SSH and start a configuration session by typing configure.
Type or copy & paste the following commands to add the ThreatSTOP software repository.
echo "deb https://debian.threatstop.com/ThreatSTOP/ xenial main # xenial #" | sudo tee /etc/apt/sources.list.d/threatstop.list
sudo apt-get update
Step 3. Install ThreatSTOP software via package manager
The ThreatSTOP on device software will download via aptitude package manager. Depending on the OS release you may have other dependancies as well. We try to host all required dependancies such as dnsutils. However, if you are unable to install our service due to this, please contact support.
After setting up the repo, install by running:
sudo apt-get update
sudo apt-get install ts-iptables
After installation you will be able to configure the device via the tsadmin add command.
Step 4. Configure ThreatSTOP service on device
This document covers Web Automation installation where you configure the settings on the admin portal and then link up the device using the tsadmin add --type auto command.
Configure
-
SSH into the Linux device.
-
To begin configuring the device, run the following command:
$ tsadmin add --type=auto --device_id=[Device ID] --auto_key=[Device Key]Note: During this step, the tsadmin will attempt build a secure channel to pull down all settings to configure itself. -
Finally, the setup will attempt to update / download policy. note It may take up to 1 hour for the policy to generate if you just created a custom policy in the portal. If this step fails, it will retry again in a few hours.
Proceed to Step 5. Testing your configuration.
Step 5. Test configuration / logging
To test your integration to ensure proper functionality we will attempt to ping a known test address added to most of our IP Defense policies (bad.threatstop.com / 64.87.3.133).
Although there may be some slight differences on depending on your particular operating system, you should generally see traffic being properly filtered as shown below.
# to get a list of configured bad hosts `sudo ipset -L TSblockaddr`
# Below we search for our sample "bad" indicator of compromise 64.87.3.133
admin@linux_server:~$ sudo ipset -L|grep 64.87.3.133
64.87.3.133
# Next we will ping the IP to ensure we are generating log entries
PING 64.87.3.133 (64.87.3.133) 56(84) bytes of data.
^C
--- 64.87.3.133 ping statistics ---
3 packets transmitted, 0 received, 100% packet loss, time 2006ms
# check logs to confirm physical interface direction and that the ThreatSTOP rule matches in both directions
cat /var/log/threatstop/threatstop.log
# from localhost block
May 30 15:38:53 linux_server kernel: [51423.183451] ThreatSTOP-TSblock IN= OUT=br0 SRC=10.0.2.15 DST=64.87.3.133 LEN=84 TOS=0x00 PREC=0x00 TTL=64 ID=11294 DF PROTO=ICMP TYPE=8 CODE=0 ID=31025 SEQ=1
# bridge traffic block
May 30 15:50:53 linux_server kernel: [52142.887934] ThreatSTOP-TSblock IN=br0 OUT=br0 PHYSIN=enp0s8 PHYSOUT=enp0s3 MAC=52:54:00:12:35:02:08:00:27:a3:c1:cd:08:00 SRC=10.0.2.16 DST=64.87.3.133 LEN=84 TOS=0x00 PREC=0x00 TTL=64 ID=29096 DF PROTO=ICMP TYPE=8 CODE=0 ID=2068 SEQ=1
If you see the logging lines and blocked traffic, Congratulations, you’ve successfully installed IP Defense! Your first logs should be visible on the portal in 15min to 2 hours depending on the cycle.
You can manually send logs by doing the following. Depending on your installed OS the output of the commands below may differ, but this should still serve as a general guide.
admin@linux_server:~$ tsadmin logs
tsadmin manual
The tsadmin command is the central executable for managing the threatstop integration. It has several sub commands to perform various functions outlined below. Sub commands are interpreted differently by the tsadmin & do not contain a preceeding --.
- add The add command installs & configures the ThreatSTOP service on the device.
- remove This command removes the ThreatSTOP integration from the device.
- update This command forces the device to update its policy as well as check for new settings if web automation installation is used.
- show This command shows the configured settings.
- version This command shows the current version of package.
- logs This command forces log rotation & sends logs as well as restarting logging facilities so it knows to write to a new file handle.
tsadmin add sub parameters
The following tsadmin add sub parameters can be added inline to seed the installation. If you are installing via web automation you will only be using auto_key and device_id.
- advanced Run advanced prompts. i.e.
--advanced - allow_list ThreatSTOP Allow list. i.e.
--allow_list=[allow list] - auto_key Web Automation configuration key i.e.
--auto_key=xxxxxxxxxxxx - block_list ThreatSTOP Block list i.e.
--block_list=[block list] - device_id ThreatSTOP device ID (TDID). i.e.
--device_id=[Device ID] - dns_server DNS server
- load_br_netfilter Load Linux kernel bridge netfilter module and add to startup. Valid choices: (y, n). i.e.
--load_br_netfilter=y - logopts Extra iptables log options (i.e. –log-uid, –log-level 6, etc…) i.e.
--logopts="--log-uid" - logopts_direction Traffic direction for extra iptables log options. Valid choices: (in, out, both). i.e.
--logopts_direction=out - maxpolicysize Maximum size of block list items (%20 for allow list).
- port DNS port for upstream queries
- allow_action: Specifies iptables rule action to be performed on matches from allow list.
--allow_action=ACCEPT - silent Suppress output & auto accept all prompts. Useful when automating cli installs. i.e.
--silent - skip_checkpolicy Skip validating your ThreatSTOP policy exists and reachable. Useful in offsite installations.
- skip_checkvalidip Skip validating your public IP is registered with ThreatSTOP. Useful in offsite installations.
- take_defaults Auto accept all prompts with confirmation countdown. Useful when automating cli installs. i.e.
--take_defaults - tsprefix Prefix for iptables / IPset rules (1-29 chars) i.e.
--tsprefix="ThreatSTOP" - type Installation type (auto - web automation, manual - via the CLI prompts). Defaults to manual
Troubleshooting
To get a list of configured settings run:
tsadmin show
To get a full list of available command line parameters on the command line type:
tsadmin --help
If you are not able to download the policy, run the following:
admin@linux_server# wget -qO - http://logs.threatstop.com/cgi-bin/validip.pl
Your IP address: 1.2.3.4
Address is in the list of authorized hosts
This will tell you if your public IP has been allowed to access the policy. If you are unable to get a response it means you need to update the public IP on the devices section of the admin portal.
Version Changelog
ts-iptables (5.00-01) trusty; urgency=low
 * GS-2013 : Major Refactor with SDC
           : Added web automation
           : Added enhanced validation and CLI interface
           : Added CentOS / RHEL support
           : Added Debian / Raspbian support
           : Added Support for syslog-ng
           : Added enhanced log options for iptables
           : Added bridge support (br_netfilter)
 -- ThreatSTOP Support <support@threatstop.com>  Thu, 16 May 2019 10:20:00 -0700
ts-iptables (4.15-02) trusty; urgency=low

  * GS-1100 : support new and old style Net::DNS
  * GS-1198 : move log file to threatstop-controlled directory

 -- ThreatSTOP Support <support@threatstop.com>  Fri, 4 Nov 2016 18:35:34 -0700
ts-iptables (4.14-00) trusty; urgency=low

  * AZ-84   : provide a script that allow for changing of the block and allow policies
  * GS-623  : don't skip future log file name changes, just because the config is already there
  * GS-1068 : do not allow installation directory to be configurable
              (debian packaging controls this location now)
iptables logging options
The following options are typically available on iptables 1.4+ Ref. Please refer to your specific iptables manual for exact details. The following is here as a general reference:
--log-tcp-sequenceLog TCP sequence numbers. This is a security risk if the log is readable by users.--log-tcp-optionsLog options from the TCP packet header.--log-level 4This is the standard syslog levels. 4 is warning. You can use number from the range 0 through 7. 0 is emergency and 7 is debug.--log-ip-optionsLog options from the IP packet header.--log-uidLog the userid of the process which generated the packet.
Uninstalling ThreatSTOP
Remove ThreatSTOP service integration from device
To uninstall the service you can run:
$ tsadmin remove
    ThreatSTOP ts-iptables remove starting @ Wed May 29 22:40:20 2019

Are you sure you want to uninstall ThreatSTOP? (y/n) y
The same script get triggered when removing the software via aptitude by running sudo apt-get remove ts-iptables. In both cases your config file will be left behind in /opt/threatstop/threatstop.conf incase you wish to re-install.
Restore previous configuration
We create a backup of the configuration prior to installing our service located at /opt/threatstop/pre-threatstop_ipset & /opt/threatstop/pre-threatstop_iptables.
You should be able remove all threatstop related rules / configuration with tsadmin remove. However in the event something goes wrong you can take the following steps to manually remove the rules.
The most common installation of iptables & ipset loads the rules into a kernel extension. For this reason we can’t just delete the rules without unloading them from the Linux kernel first. The general method of removing rules is as follows:
- flush ipset hashsets
- remove rules using those hashsets from iptables
- destroy the hashsets
manually removing threatstop rules
- Uninstall ts-iptables package. This ensures the
threatstop_iptables_save&threatstop_iptables_restorescripts don’t save/load previous rulesets on startup. - Reboot (which will not load old rules), or if rebooting is not possible.
- Gather a list of ipset hashset names to remove by running
sudo ipset -L -name. ThreatSTOP’s naming convention ends with (allowaddr, allownet, blockaddr, blocknet). We also create temporary rulesets ending in (allowaddrnew, allownetnew, blockaddrnew, blocknetnew) prior to swapping new rules in place. - For each rule name run
sudo ipset flush <rulename> - For each rule name identify and remove iptables rules using that rule.
sudo iptables -L ThreatSTOP --line-numbers. You can simply runsudo iptables -D <chain name> <rule number>. - For each rule name run
sudo ipset destroy <rulename>
This should complete the uninstallation of threatstop rules.