Overview
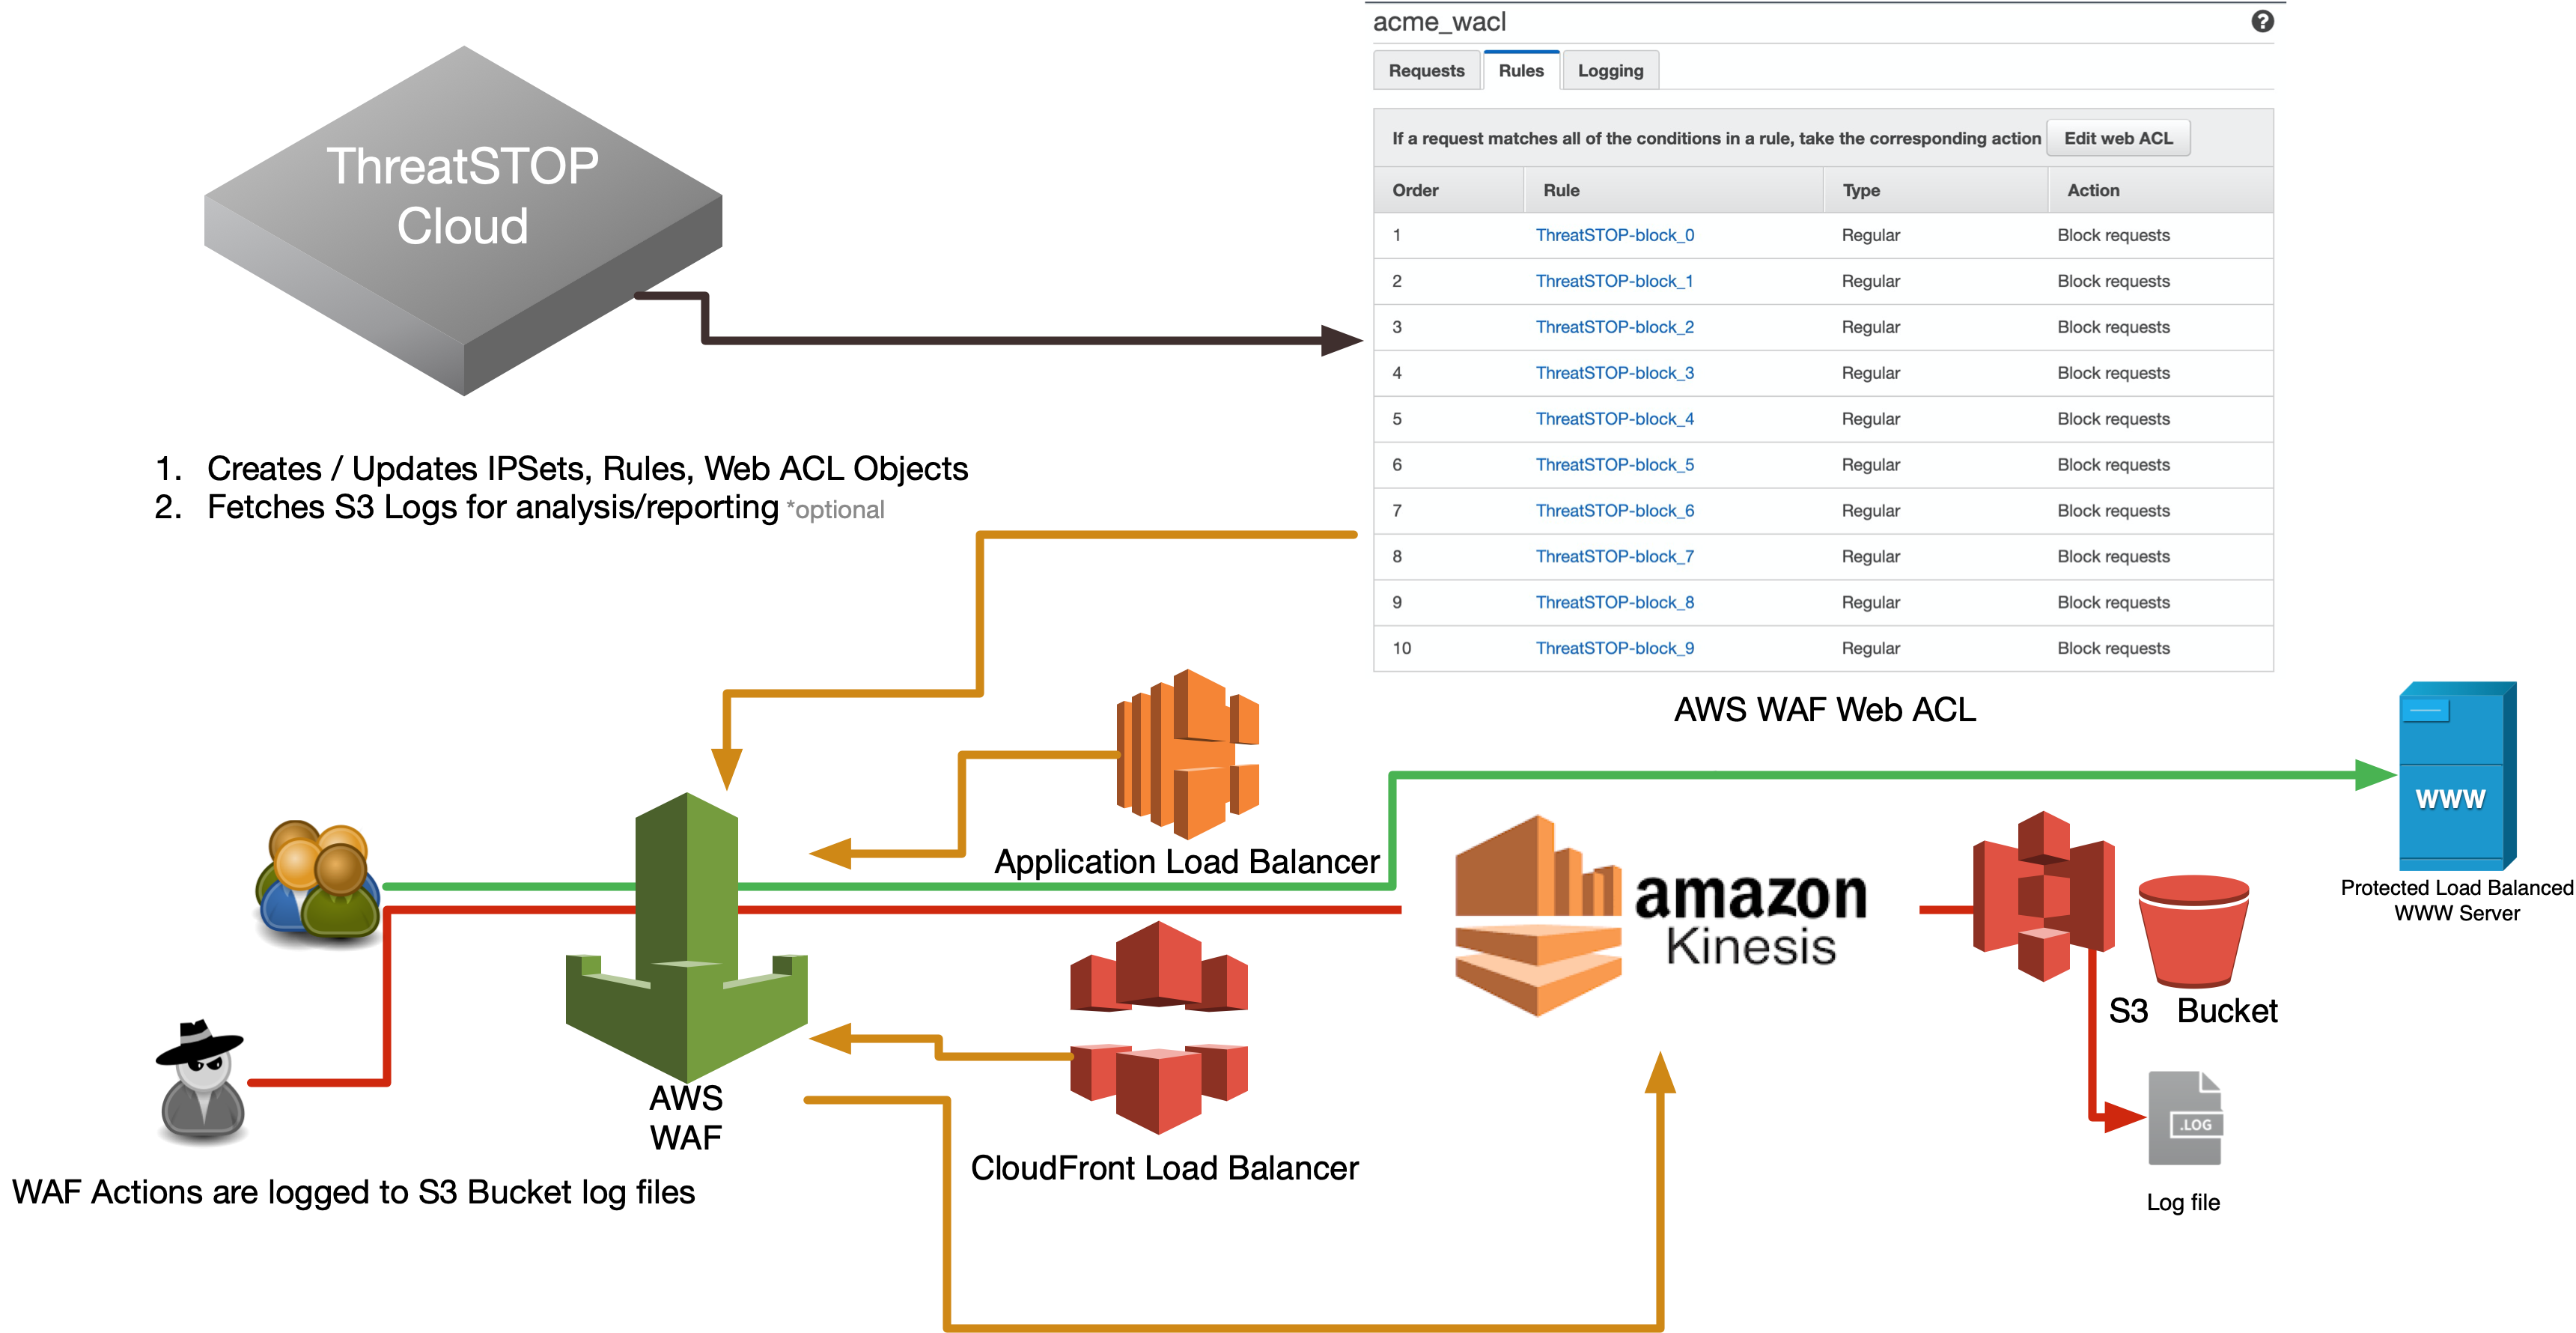
This document describes how to integrate ThreatSTOP’s IP Defense service on an AWS Web Application Firewall (WAFv2). This integration runs in ThreatSTOP’s cloud and updates your AWS Web Application Firewall (WAF) via the AWS API. Once setup, we will keep the WAF IPSets updated based on the policy you select. The integration can optionally collect logs for reporting purposes. The WAFv2 may be applied to either a CloudFront or a Regional Load Balancer.
Compatibility
| Manufacturer | Version | Supported |
|---|---|---|
| AWS | WAF-Classic | No |
| AWS | WAFv2 | Yes |
AWS Costs
The AWS costs associated with the integration are tied to the account containg the WAF and S3 buckets. They include:
- the costs of the WAF rules (WAF WebACL subscription, IPSet rules, number of web requests processed by the Web ACL).
- S3 costs to store logs and retrieve logs if logging is enabled.
Current Version
| Current Version | Released |
|---|---|
| 1.00 | April 2022 |
WAFv2 Integration types
| Integration Type | Documentation | Requires Virtual Machine | Notes |
|---|---|---|---|
| TSCM (CLI) | WAFv2 | Yes | Configuration done through ThreatSTOP Centralized Manager (TSCM) VM Command line interface (CLI), AWS Identity Access ID & Secret stored on VM only |
| TSCM with web automation | WAFv2 | Yes | Configuration done through ThreatSTOP Admin portal, AWS Identity Access ID & Secret stored on VM only |
| Cloud | WAFv2 | No | Configuration done through ThreatSTOP Admin portal, Supports both Identity and Role based access stored in Admin portal |
ThreatSTOP Data Flow Diagram
Installation considerations
- Amazon limits Web ACLs (v2) to 100 rules per region. Each rule can have multiple predicates (IPSet Match Groups) using the ‘OR’ operator. Each IPSet is capable of supporting 10,000 IP Addresses/CIDRs.
- Any managed rule(s) for things like SQL Injection Protection, or other custom rules will not be touched so long as they are named differently than the ThreatSTOP rule naming convention (e.g. tdid_12345678_block_IPSet_0).
- The integration supports a monitoring mode by changing the block action to ‘COUNT’. The default ‘BLOCK’ of course blocks the request, while ‘COUNT’ allows the request but logs the event. This is useful for validating a policy without enforcing filtering.
- The Web Application Firewalls (WAF) only protect endpoints for HTTP/HTTPs traffic. If you need protection for other endpoint types, please contact ThreatSTOP Support for assitance selecting the right product for your specific environment.
- The maximum size of the ThreatSTOP policy that can be loaded on the AWS WAF is correlated to the # of block/allow IPSets configured in the integration. For instance if you take the defaults and assign 30 block IPSets and 1 allow, the resulting policy can contain up to 300k block rules (subnets) and 10k allow rules.
- The ThreatSTOP cloud performs policy updates through the AWS API. Access keys can be associated with an access policy that restricts access based on the source IP. If you do so, please allow these two subnets: 204.68.99.208/28 and 192.124.129.0/24.
Prerequisites
- Current active ThreatSTOP account
- AWS WAFv2 Web ACL (WAF Classic not supported)
- AWS IAM Access ID & Access Secret OR IAM Role ARN & External ID setup with access to WAFv2 objects, and read-only access to your S3 Log Bucket (see permissions below).
- AWS Web ACL created. This ACL does not have to be assigned, but must exist prior to setup. The name should be alphanumeric only without spaces or special characters aside from (‘-‘, ‘_’, ‘.’).
- S3 Access (Step 2 guides you to creating a bucket for WAF logging)
Connectivity
To update policy and retrieve log data, the AWS key needs to allow the following subnets:
- 204.68.99.208/28
- 192.124.129.0/24
Setup
Step 1 - Create AWS WAF Web ACL
You may skip this step if you have already created an AWS Web ACL, otherwise direct your browser to https://console.aws.amazon.com/wafv2/home#/webacls.
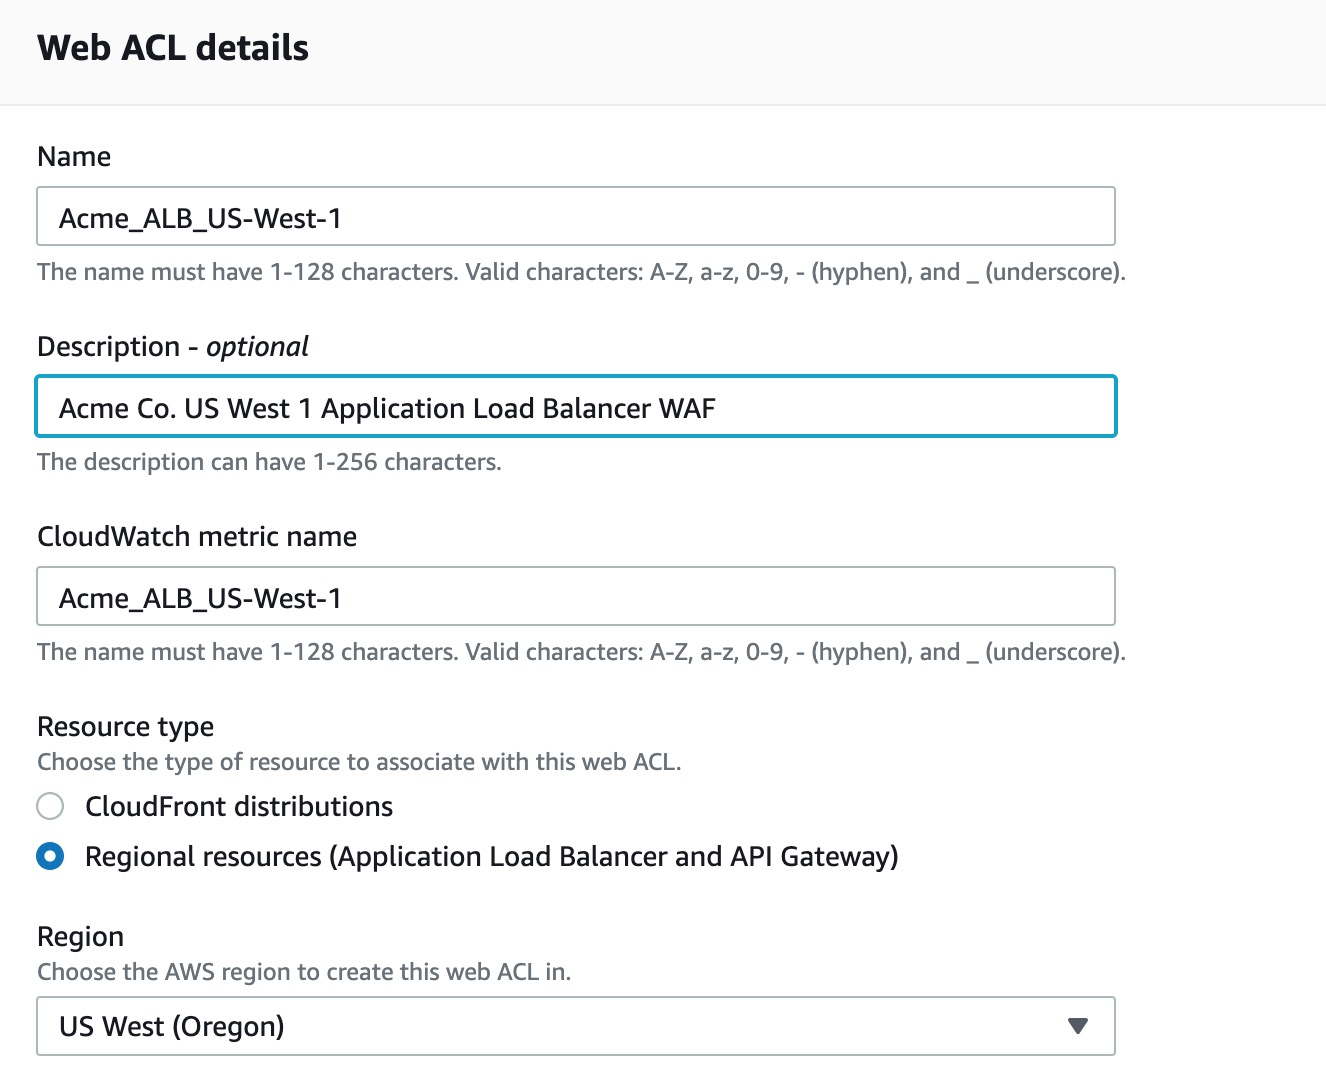
- Click ‘Create Web ACL’ and choose a friendly name containing only A-Z, a-z, 0-9, _, - characters.
- Region should be set to whatever region your Application Load Balancer, API Gateway or CloudFront is on.

You do not have to choose to add any rules in this phase, we just need the ACL to exist prior to adding and configuring the WAF device on the ThreatSTOP Admin Portal.
Step 2 - Setup S3 Logging
Enabling logging and log upload is recommended and enable ThreatSTOP’s reporting functionality. You can skip this step if you are not planning on using the reporting features. The data retention policy can be configured according to your needs; we recommend at least 2 days. Logs are typically retrieves every 15 minutes.
You will be presented with
- Open up a web browser to AWS WAF > Web ACL
- Select your region from the pull down menu, then click on your WAF. (You will see AWS WAF > Web ACLs > WAF_NAME at the top)
- Select the Logging and metrics pane and hit Edit.
You can use either S3 Bucket (easiest) or Kinesis Data Firehose stream.
S3 Bucket (recommended)
- Select the [Create new] button to start the s3 bucket creation wizard.
- Enter in a bucket name beginning with aws-waf-logs-.
- Ensure the region matches the WAFs region.
-
You can take all other defaults and hit Create bucket.
- ThreatSTOP’s log processing pipeline requires S3 event notifications to trigger log downloads.
- To set up the notifications, navigate to the “Properties” tab of the newly created bucket and go to the “Event notifications” section.
- Select the checkbox for “All object create events”.
- In the “Destination” section, enter the SQS queue ARN (you can find this value on the Devices page in the ThreatSTOP admin portal).
- Click [Save changes] to complete the setup.
- Return to the WAF > Logging and Metrics pane and select the newly created S3 bucket.
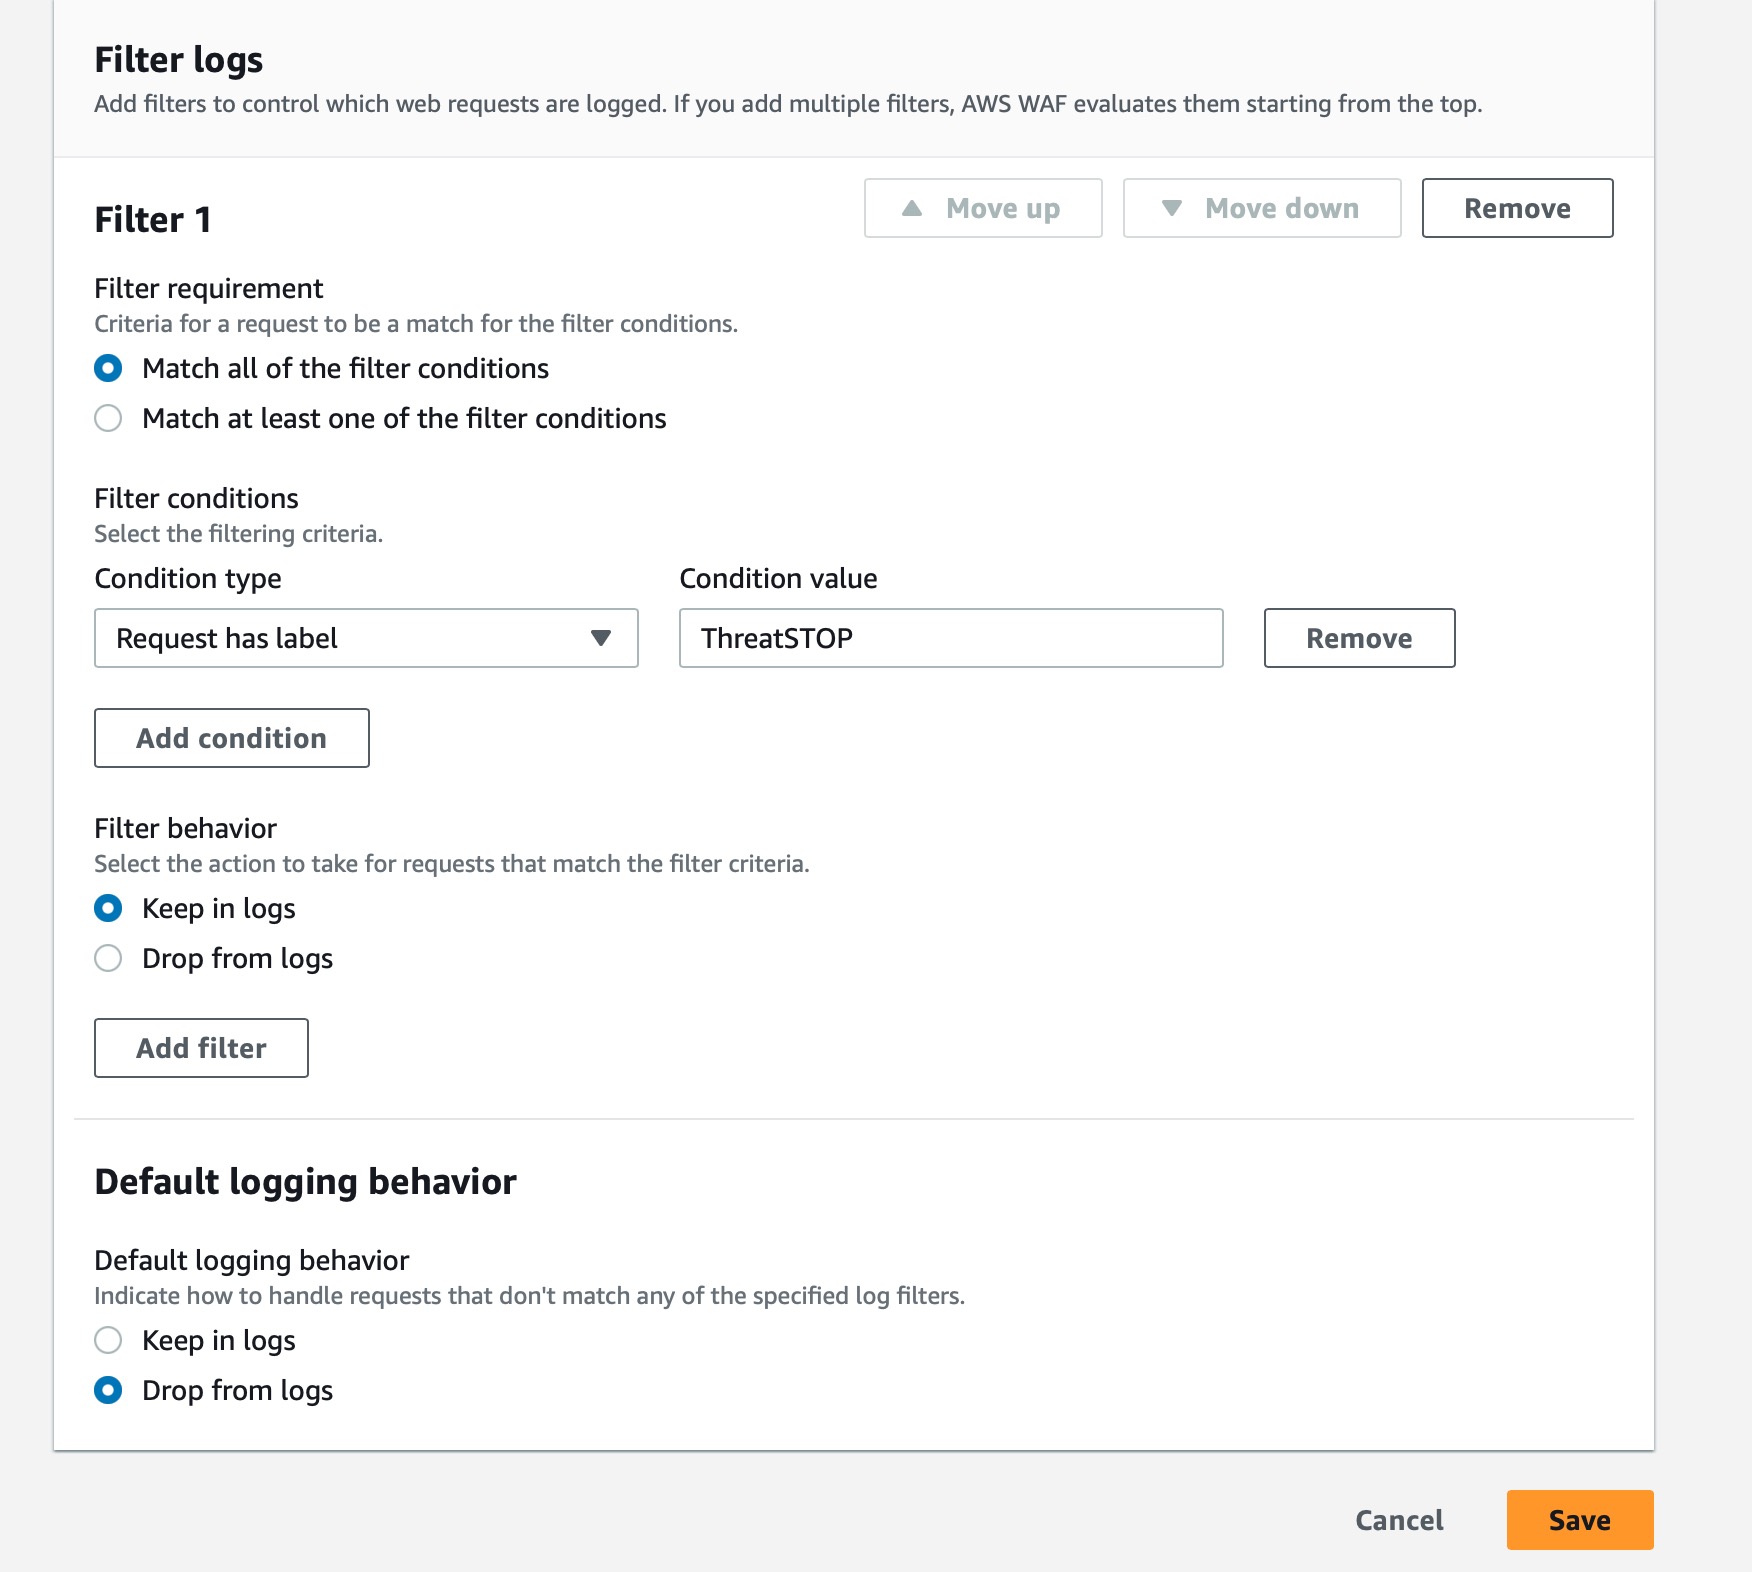
Log Filtering
By default, AWS WAFv2 logs all traffic when logging is setup. During intial WAF setup it may be desirable to see both allows & blocks to ensure proper functioning. However, once you go into production, you may want to remove allows from the logging which is possible by setting up WAF log filtering. This has the benefit of not only keeping storage costs down, but also data transfer costs.
The specific settings should be customized to meet your individual needs. Below we’ll run through a general excersize on how to setup log filtering to keep only block logs.
- Log into AWS Console > go to WAF & Shield > Web ACLs > Select the region your Web ACL is in > Logging and Metrics > On the logging section hit Edit
- In the Filter Logs section for our example we’ll set it to “Match all of the filter conditions”
- Set the condition type to rule action on request
- Set the condition value to block
- Filter behavior should be set to keep in logs
- Futher you may opt to have a default of Drop from logs if you only care about block logs.
- Hit [save] to complete.
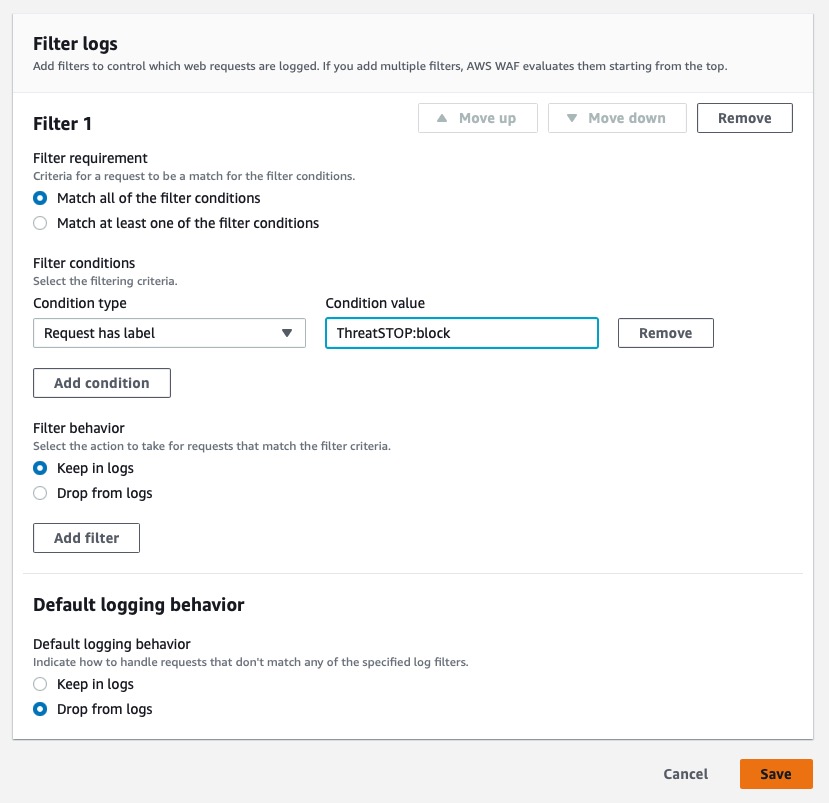
Advanced Filtering
If you have multiple blocking policies and are trying to isolate the ThreatSTOP filtering further. First, ensure your WAFv2 rules have labels setup so you can filter based on those labels. Use request has label for condition type and the label ThreatSTOP fig 1. for the condition value. If you want to restrict just block logs from ThreatSTOP labels see fig 2..
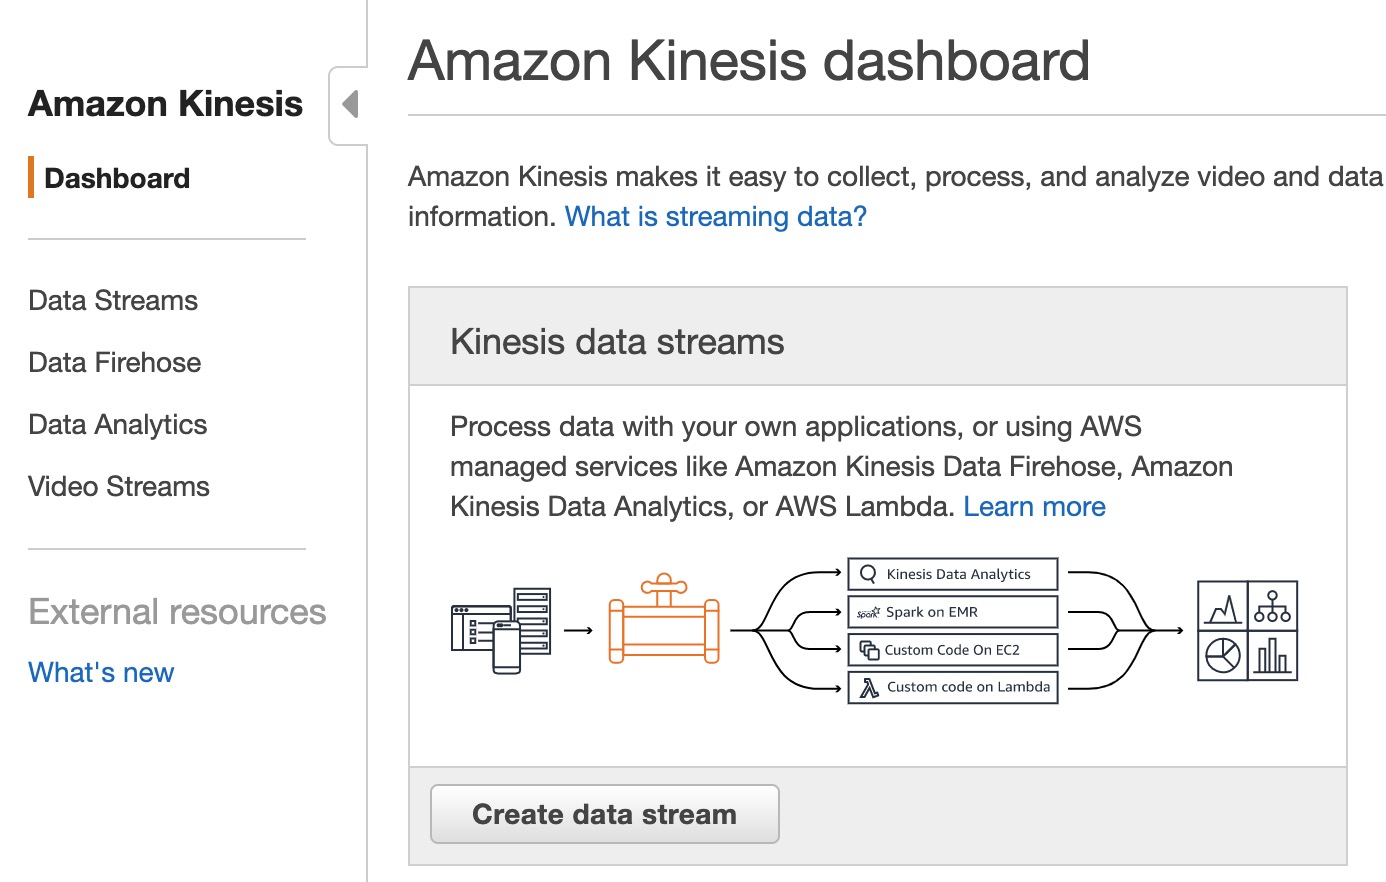
Kinesis Data Firehose
- Log into AWS Console and go to setup Kinesis Data Firehose section.
- If you are setting up a CloudFront WAF, you must setup the firehose delivery in the ‘us-east-1’ region.
- Delivery stream name Per AWS, this must begin with ‘aws-waf-logs-‘ in order to be able to choose for as a WAF data stream.
- Source should be set to “Direct PUT or other sources”
- Data transformation is not necessary and should be Disabled
- Convert record format is not necessary and should be Disabled
- Destination should be set to ‘Amazon S3’
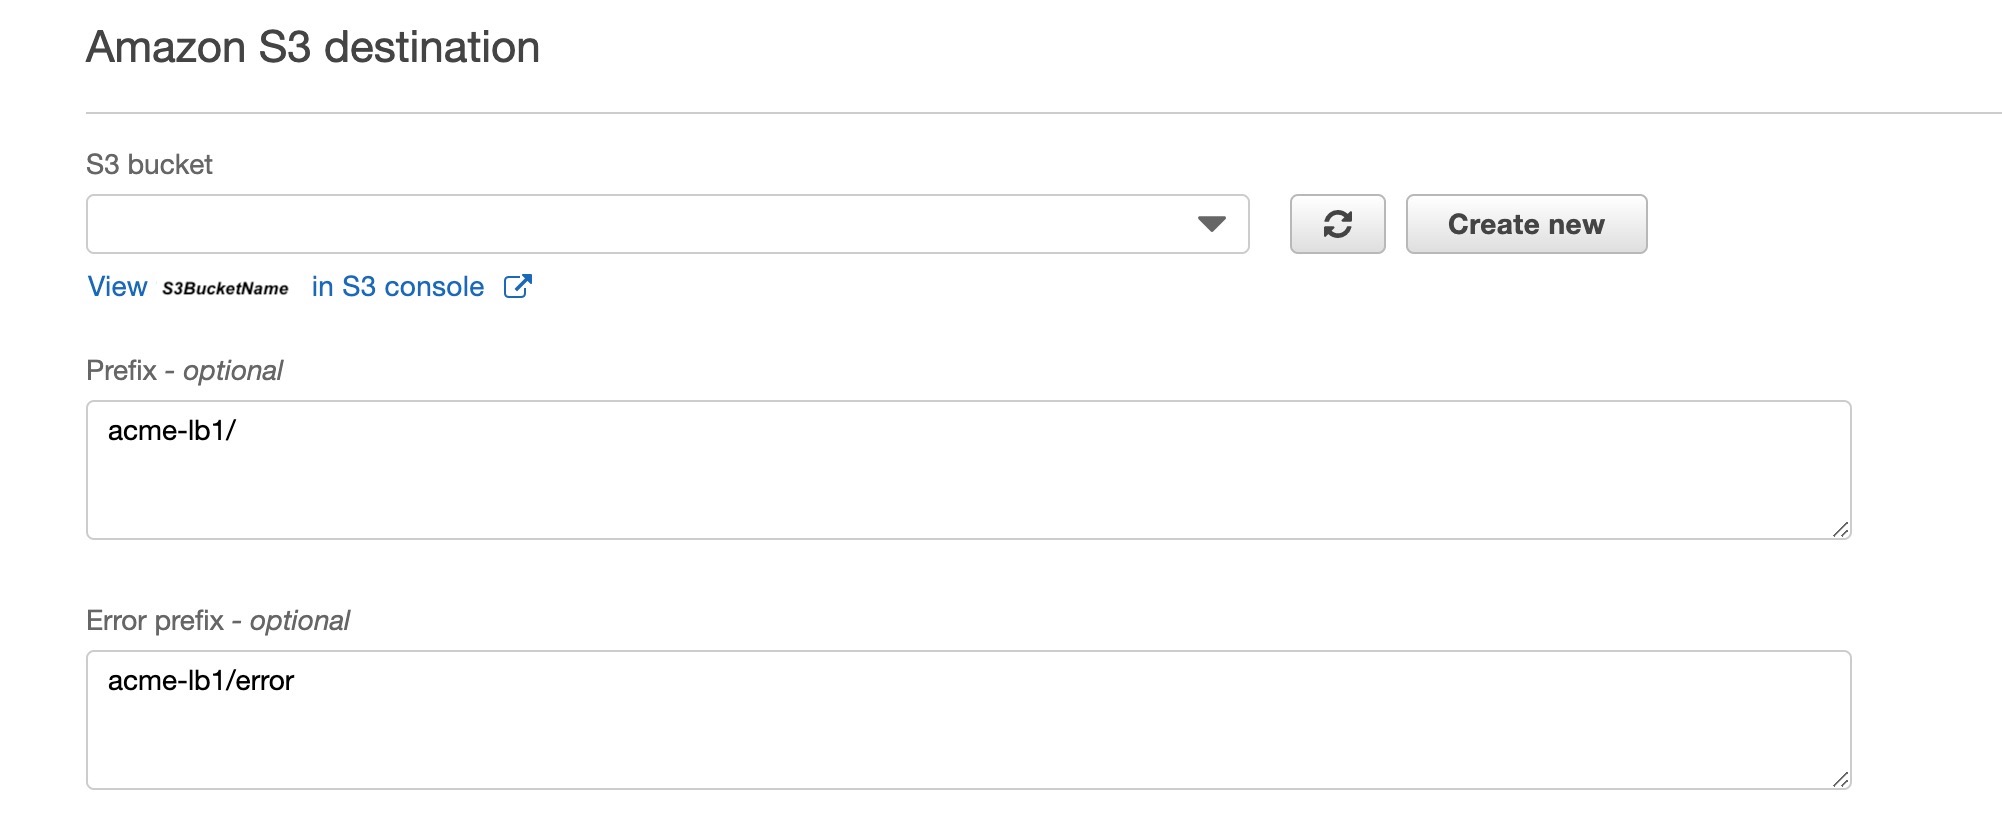
- S3 Destination should be set to the S3 Bucket you intend to store the logs in. If you intend to log multiple WAFs to the same Bucket, it is best to create a subdirectory via the “View
in S3 Console" link.
aws-waf-logs-AcmeWafLogs/acme-lb1/2019/12/25/13/aws-waf-logs....- Prefix This optional setting directs the data stream how to name the logs. If you created a subdirectory in the step prior, you add that in as a prefix. This is demonstrated in the screenshot above. Note: Remember to add the trailing slash
- Buffer size This can be kept at 5MB.
- Buffer interval This can be set to every 60 seconds.
-
S3 compression This should be Enabled (GZIP only)
- When selecting an IAM Role for the firehose setup, you will need to either choose a pre-existing role that has sufficient privileges to write the logs to the selected S3 bucket, or create a new role via the menu.
Step 3 - Setup IAM Access
Permission Policy
If you’re new to AWS or are not comfortable with creating permissions, there are two predefined policies that grant ThreatSTOP all required access (AWSWAFConsoleFullAccess & AmazonS3ReadOnlyAccess).
However, security best practices call for allowing only the minimal access required to perform the necessary operations in your AWS environment. We’ve included required specific permissions below.
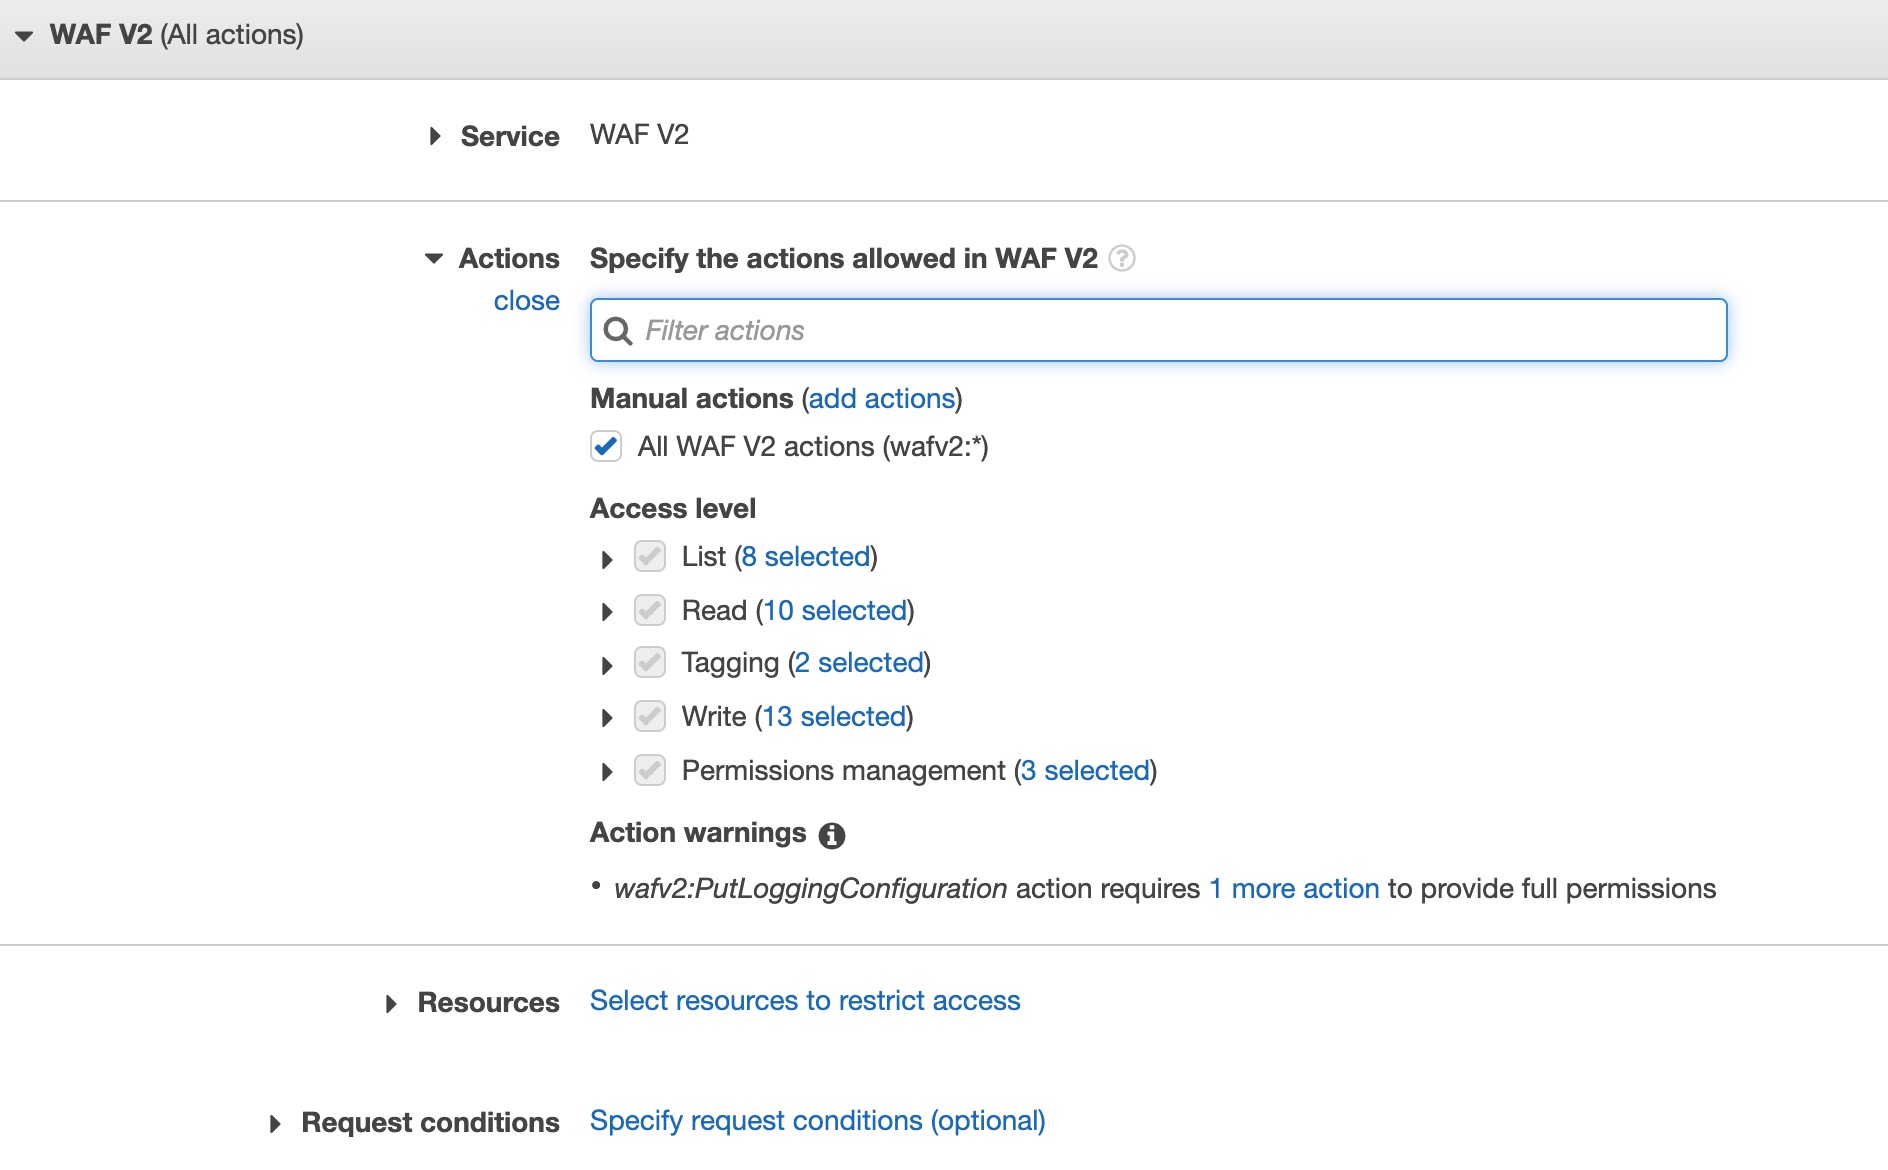
Basic WAFv2 IAM Permission Policy
- Navigate to AWS IAM Policies and hit [Create Policy]
- You can use the Visual editor, or simply open up the JSON tab and replace the contents with the sample below.
- Select [Next] and add Tags if necessary.
- Select [Next] to give your permission policy a name. We recommend
ThreatSTOP-WAFv2-S3-Permissions
{
    "Version": "2012-10-17",
    "Statement": [
        {
            "Sid": "VisualEditor0",
            "Effect": "Allow",
            "Action": [
                "wafv2:ListWebACLs",
                "wafv2:ListResourcesForWebACL",
                "wafv2:ListRuleGroups",
                "wafv2:ListIPSets",
                "wafv2:GetWebACL",
                "wafv2:GetRuleGroup",
                "wafv2:GetIPSet",
                "wafv2:CheckCapacity",
                "wafv2:UntagResource",
                "wafv2:TagResource",
                "wafv2:UpdateWebACL",
                "wafv2:DeleteIPSet",
                "wafv2:UpdateIPSet",
                "wafv2:CreateIPSet",
                "wafv2:UpdateRuleGroup",
                "wafv2:GetLoggingConfiguration",
                "wafv2:PutLoggingConfiguration",
                "s3:ListBucket",
                "s3:GetObject",
                "s3:ListAllMyBuckets"
            ],
            "Resource": "*"
        }
    ]
}
For advanced AWS users, you may want to further restrict these permissions to only the Web ACL or S3 buckets being used. The example below demonstrates how this can be done. Replacing all the tags, for example <AWS REGION> with your particular region (e.g. us-west-1).
Restricting resource access to Web ACL & S3 bucket
{
    "Version": "2012-10-17",
    "Statement": [
        {
            "Sid": "VisualEditor0",
            "Effect": "Allow",
            "Action": [
                "wafv2:TagResource",
                "wafv2:ListResourcesForWebACL",
                "wafv2:PutLoggingConfiguration",
                "wafv2:UpdateWebACL",
                "wafv2:GetLoggingConfiguration",
                "wafv2:GetIPSet",
                "wafv2:UpdateRuleGroup",
                "wafv2:GetWebACL",
                "s3:ListBucket",
                "wafv2:CreateIPSet",
                "wafv2:DeleteIPSet",
                "wafv2:UntagResource",
                "wafv2:UpdateIPSet"
            ],
            "Resource": [
                "arn:aws:wafv2:<AWS REGION>:<AWS ACCOUNT ID>:<regional | cloudfront>/ipset/tdid_*/*",
                "arn:aws:wafv2:*:<AWS ACCOUNT ID>:*/rulegroup/*/*",
                "arn:aws:wafv2:<AWS REGION>:<AWS ACCOUNT ID>:<regional | cloudfront>/webacl/*/*",
                "arn:aws:s3:::aws-waf-logs-<S3 BUCKET NAME>"
            ]
        },
        {
            "Sid": "VisualEditor1",
            "Effect": "Allow",
            "Action": [
                "wafv2:CheckCapacity",
                "wafv2:ListRuleGroups",
                "s3:GetObject",
                "wafv2:ListWebACLs",
                "s3:ListAllMyBuckets",
                "wafv2:ListIPSets"
            ],
            "Resource": "*"
        }
    ]
}
Below you’ll have two choices to setup access by either creating a User Identity or Role Based Access.
- User Identity creates a user account specifically for ThreatSTOP in your AWS account. You’ll then provide AWS Access Key ID & AWS Access Secret to ThreatSTOP during initial configuration of the WAF device.
- Alternatively, you can setup Role based access for ThreatSTOP. This is the recommended method which adds a few extra layers of security but is a little more complex to setup. If you choose Role based access you’ll provide ThreatSTOP with a Role ARN & External ID instead of Access Key ID & Secret.
Identity Based Access
- To create user access credentials we’ll to be used by ThreatSTOP to update your Web ACL and fetch logs from S3, direct your browser to AWS Identity and Access Management console.
- Select Users on the left and click [Add User].
- If prompted for a choice between Programmatic access or AWS Management Console access, choose Programmatic access.
- Hit [Next] to select the
ThreatSTOP-WAFv2-S3-Permissionspolicy we created in the previous step. - Finally hit [Create user] to finish creating the user identity.

Role Based Access Control
Alternatively to supplying ThreatSTOP a set of credentials, AWS offers IAM Roles to facilitate delegating access to ThreatSTOP via short lived session tokens. This allows ThreatSTOP to manage your WAF & download WAF logs without needing static user identity credentials.
The setup for this method is a little more advanced but ultimately the most secure access method offered.
- You’ll start out by creating a role in AWS IAM.
- For Trust entity type choose [AWS account], then choose Another AWS account and set our AWS Account ID:
845034975027 - Next, select the Require external ID checkbox and create a unique identifier (at least 12 characters long). **Note this external ID as we’ll need it during the portal setup.
- Do not select the Require MFA checkbox.
- Select [Next] to select the permission policy for this Role. Select the permission policy created in the prior step ThreatSTOP-WAFv2-S3-Permissions, or see the permission notes above to create a new permission policy if you haven’t already done so.
- Do not set permissions boundary
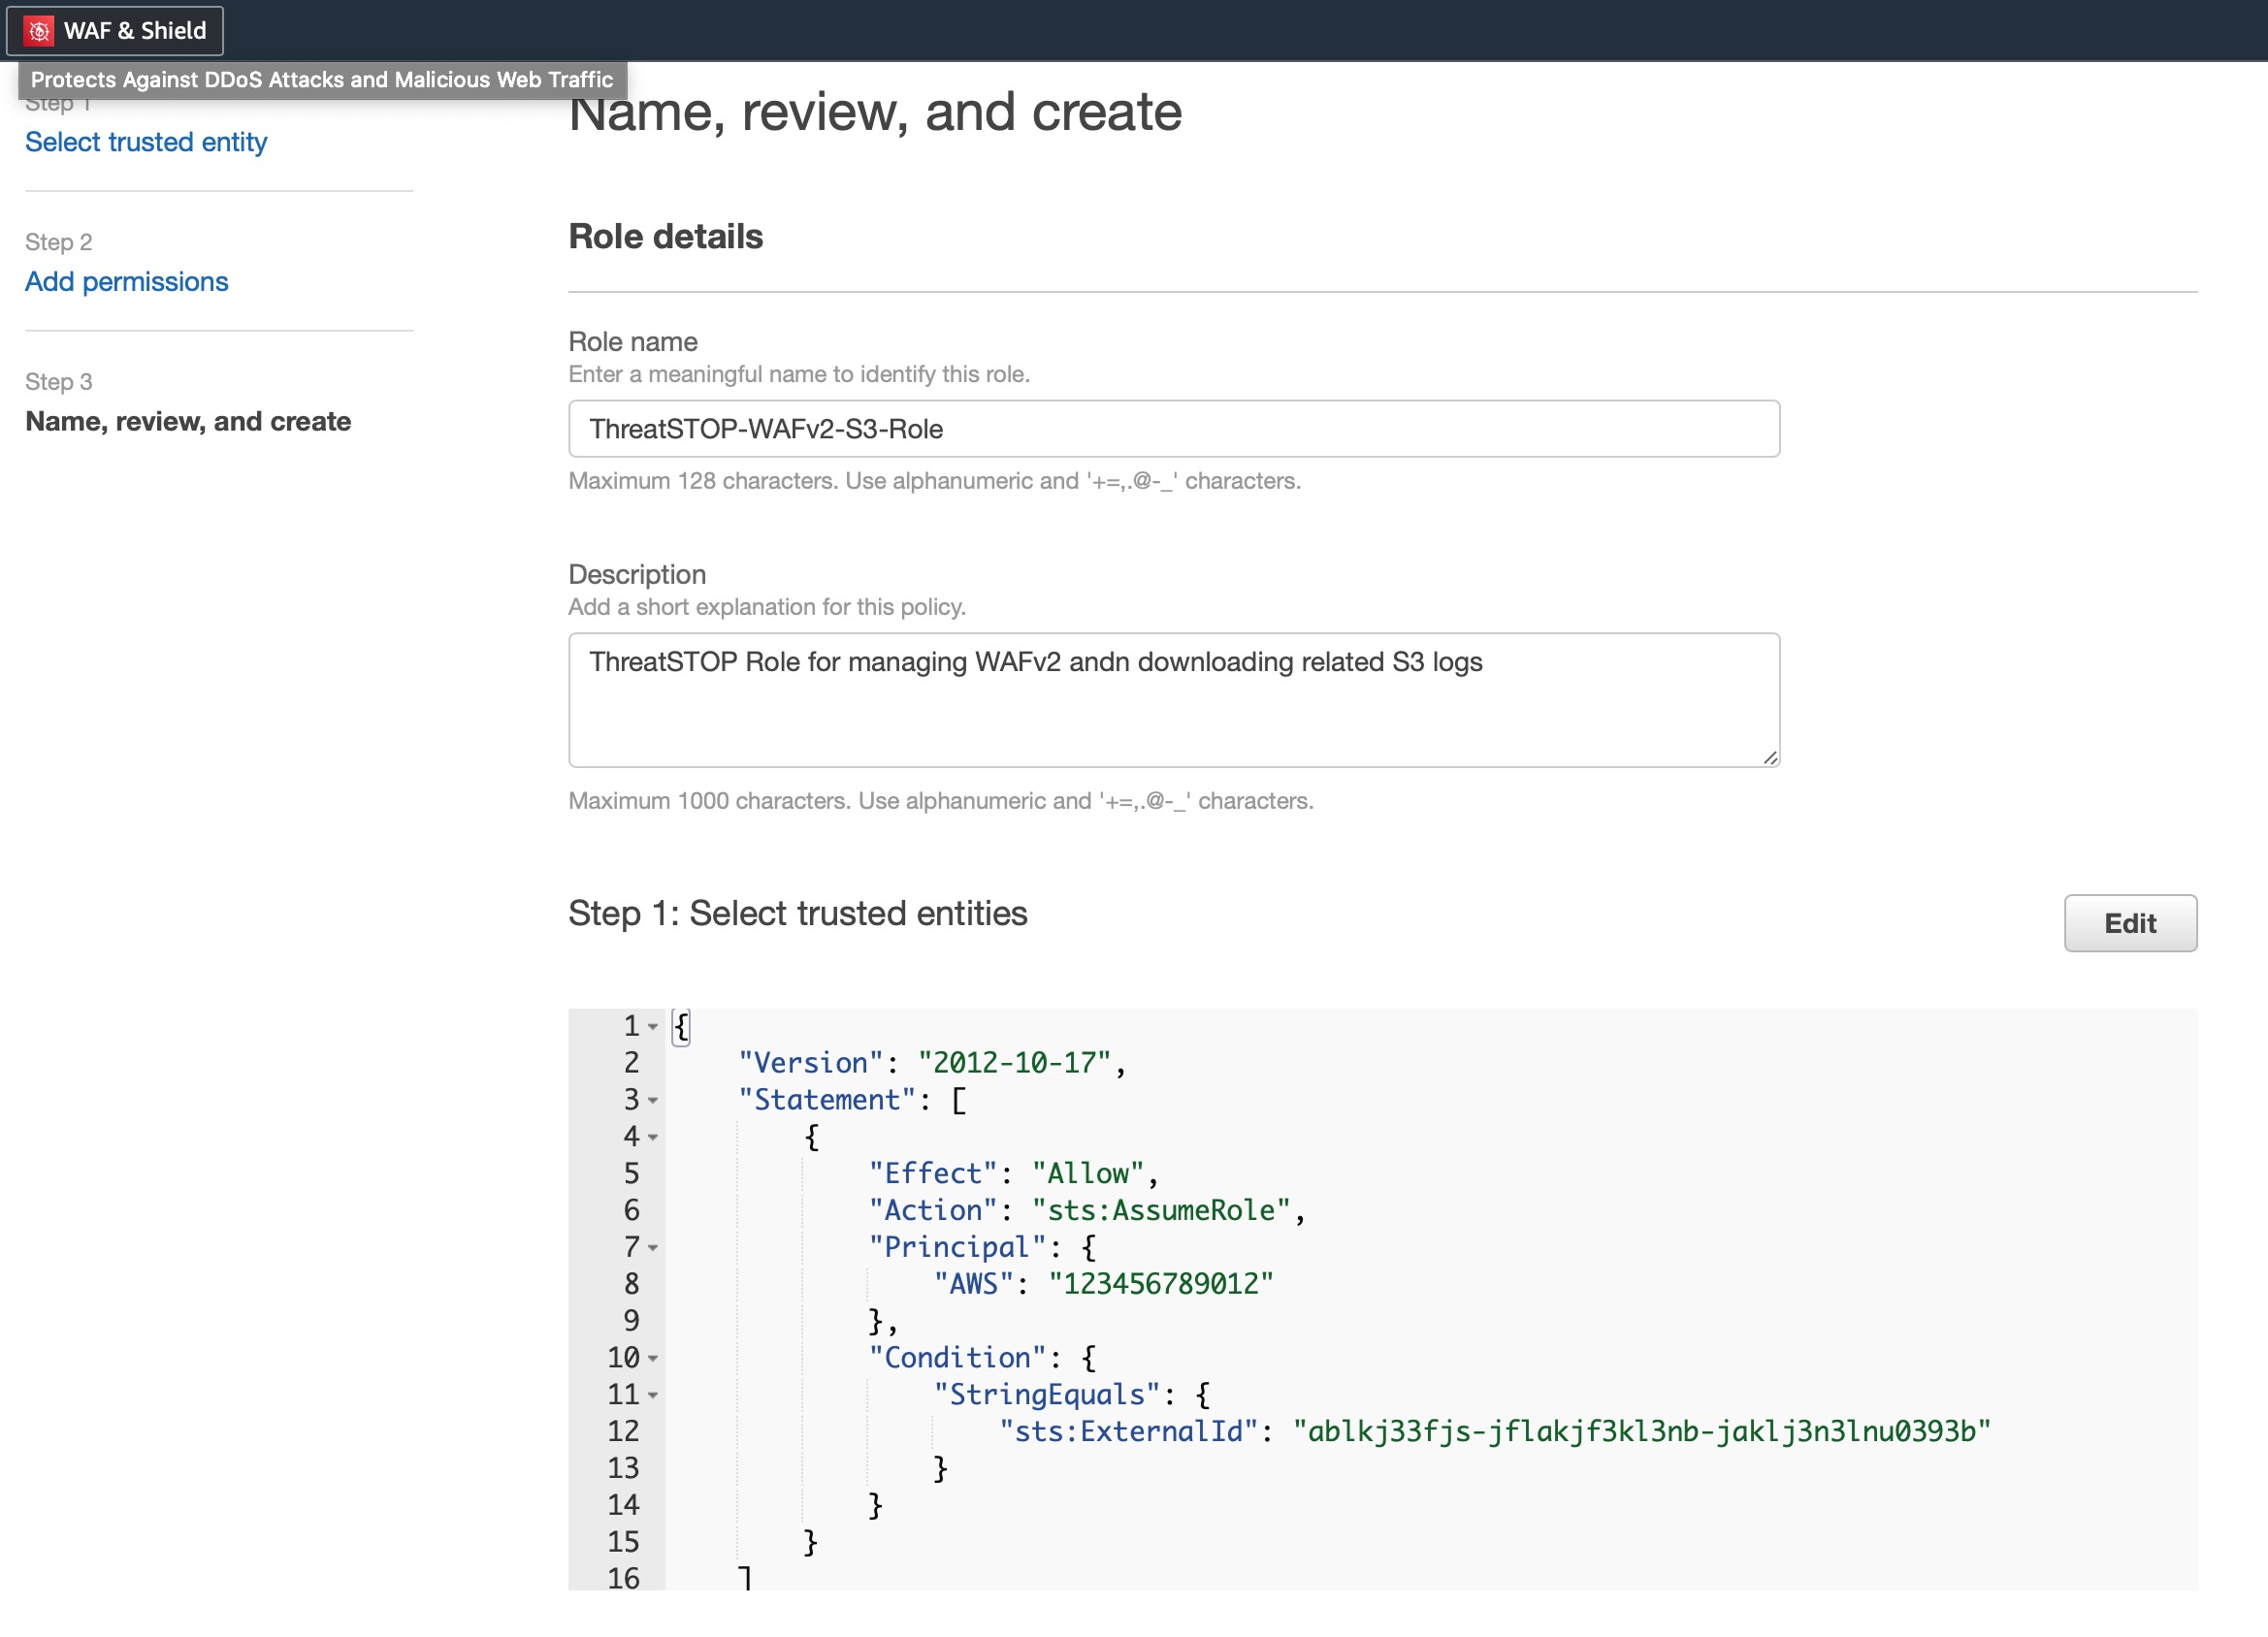
- Select [Next] to give your Role a name. We recommend something short and descriptive like
ThreatSTOP-WAFv2-S3-Role. Note this role name as we’ll need it to form the Role ARN in a later step. - Finally a description, review Trust & Permission policies and finally hit [Creat role] to finish.
arn:aws:iam::<AWS ACCOUNT ID>:role/ThreatSTOP-WAFv2-S3 where <AWS Account ID> is your accounts 12-digit AWS Account ID & ThreatSTOP-WAFv2-S3 is the Role name. Step 4 - Portal device configuration
During this step, you will create a device entry on the Admin Portal.
To create a WAF device entry:
- Log into the Admin Portal with your ThreatSTOP account
- Browse to the Device page and click Add Device
- Select the device manufacturer and model:
- Type: IP Defense
- Manufacturer: AWS
- Model: WAFv2
- Integration type: Cloud
-
Nickname: this is a mnemonic name used to identify the device. It can be set to any string (A-Z, 0-9, - and _). If you create multiple device entries, each entry must have a unique nickname. The Nickname will be used to identify the firewall and in the Reporting user interface.
-
Policy: select a pre-defined policy or a customized policy. It must be an IP Defense Policy.
-
Note: An optional field to store a note of your choice about the device - location, identifiers, model…
Device Specific Settings
-
AWS Access Type: AWS Access type (identity or role based)
-
AWS Access ID: AWS Access ID for accessing the API (required for identity access)
-
AWS Access Secret: AWS Access Secret for accessing the API (required for identity access)
-
AWS Role Access ARN: AWS Role access ARN (required for role based access)
-
AWS External ID: AWS Role External ID (required for role based access)
-
AWS Region: AWS Region your WAF is in i.e. us-west-2. If you are using a CloudFront WAF this setting must be set to us-east-1 per Amazon’s requirements.
-
AWS Scope: AWS Scope should be set to REGIONAL unless you are installing a CloudFront WAF.
-
Allow IPSet limit: AWS WAF # of allow IPSets to create. Each IPSet has a 10,000 IP addresses/CIDR capactiy. (Max. 100 rules between block & allow).
-
Block IPSet limit: AWS WAF # of block IPSets to create. Each IPSet has a 10,000 IP addresses/CIDR capactiy. (Max. 100 rules between block & allow).
-
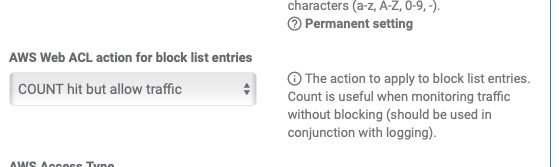
AWS Web ACL action for block list entries: Action to be performed for the block policy. BLOCK is the default action, and as the name implies will block traffic. COUNT will allow traffic but log it. This mode is useful when analyzing the impact of a policy.
-
Web ACL Name: AWS WAF Web ACL name
-
Add Labels: Enabled by default, this feature adds AWS Rule labels for enhanced reporting & so that you can drive custom behavior such as custom responses. Note that this label will still be in the ThreatSTOP namespace (e.g. MyLabel would produce
ThreatSTOP:MyLabel:blockfor a block rule). -
Custom Label: AWS custom rule label to supersede the stock labels we insert for policy & ThreatSTOP Device ID (TDID).
-
S3 Bucket Name + Prefix: S3 Bucket prefix used for storing firewall logs E.g. “aws-waf-logs-acme-west-1/AWSLogs/12345678910/WAFLogs/us-west-1/wafname”. If setup for to Kinesis, you may not have the AWSLogs/12345678910/WAFLogs/us-west-1/wafname directory structure. In either case the path should lead to the root of the dated directories e.g. 2022/12/31/etc…
Upon saving the form, a device entry will be created in ThreatSTOP’s cloud. Shortly after the policy is ready it will be updated in the AWS WAF.
Step 4 - Testing Configuration
There are several ways of testing the WAF is properly blocking and logging web traffic. A few are listed below as examples.
Option A - Check IPSet policy for policy CIDRs
- Open up a web browser to AWS WAF > Web ACL
- Select your region from the pull down menu, then click on your WAF. (You will see AWS WAF > Web ACLs > WAF_NAME at the top)
- Select the rules section at the top of that pane. You should see one or two policies there for Allow & Block (as configured)
- You can inspect the IPSets assigned to those rules to ensure the policy has been updated
Option B - Test applying the policy
- Create an EC2 instance with an Elastic Public IP. Add the Public IP address to your policy, or directly to one of the IPSet groups and attempt to GET the webpage. The attempt should be logged via to the S3 Bucket configured.
- Add the Public IP address of your network to an ALLOW IPSet and setup the a rule to apply it. This should log the ALLOW to the same S3 log bucket.
Checking device status
To check the health of your device you can navigate to the ThreatSTOP Admin Portal and review the status indicators in the Status, Policy update & Log update columns.

In the screenshot above you will see when the last policy update happened (2 minutes ago). The status column will show ‘N/A’ until the device successfully updates at which point it will change to ‘Operational’, indicating we’ve been successfully able to update the policy data in AWS. You’ll also see when the last log was uploaded if you’ve enabled logging.
Notifications
- If we encounter issues performing any creation or routine update operations that may impact your protection our backend will email you (admin account).
The email will have a subject WAFv2 Cloud Integration with ThreatSTOP requires your attention and will contain some detail on what the issue was with your specific device.
| Error ID | Error Message | Information |
|---|---|---|
| 65 | “Please make sure your AWS ID & Secret are correct and they have the correct permissions.” | Your AWS credentials have become invalid. Check for account expiration. If credentials were changed please update the device settings in the admin portal. |
| 66 | “We failed to retrieve the default action from AWS.” | There was an error retrieving WebACL metadata from the AWS API. If the device is new please double-check AWS IAM Permission Policy, otherwise if problem persists please open a support ticket with ThreatSTOP. |
| 67 | “We tried and failed to fetch rules. This could mean protection is not working. Please retry updating device again as soon as possible.” | There was a failure updating the Web ACL. We will try again soon, if you get another message in the next hour the issue has not been resolved. Depending on when this error occurs it could mean your WAF is not being protected by the ThreatSTOP policy. You can validate the Web ACL rules & IPsets to see what is currently being enforced. |
| 70 | “Error encountered while updating the IPsets on your device. We will attempt to re-try the update.” | There was some unforseen error communicating with the AWS API while attempting to update an IPSet object. We will typically try again shortly. This is likely an API outage/temporary issue. If this problem persists (you’ll get another email in the next hour) open a ticket with ThreatSTOP support. |
| 71 | “Failed updating the configuration of your WAF device. Please retry updating device again as soon as possible.” | There was a failure updating the Web ACL. We will try again soon, if you get another message in the next hour the issue is not resolved. Depending on when this error occurs it could mean your WAF is not being protected by the ThreatSTOP policy. You can validate the Web ACL rules & IPsets to see what is currently being enforced. |
| 72 | “Failed deleting your ThreatSTOP policy from your WAF device. You may need to manually delete these objects in AWS.” | There was an error removing one or more objects from AWS. If you have removed permissions prior to deleting the device from the Admin portal, you will need to manually remove the ThreatSTOP IPSets & Web ACL rules. |
| 73 | “Failed deleting allow IPSets. You may need to manually delete these objects in AWS.” | There was an error removing one or more objects from AWS. If you have removed permissions prior to deleting the device from the Admin portal, you will need to manually remove the ThreatSTOP IPSets & Web ACL rules. |
| 74 | “Failed deleting block IPSets. You may need to manually delete these objects in AWS.” | There was an error removing one or more objects from AWS. If you have removed permissions prior to deleting the device from the Admin portal, you will need to manually remove the ThreatSTOP IPSets & Web ACL rules. |
| 88 | “Your policy includes more allow CIDRs than is supported by the number of allow IPSets configured.” | The policy you have assigned has more IP Addresses (CIDRs) than the IPSets total capacity. This means some IP Addresses (CIDRs) may not have been added. Please review your policy or adjust your WAF device in the ThreatSTOP Admin portal to increase capacity. |
| 89 | “Your policy includes more block CIDRs than is supported by the number of block IPSets configured.” | The policy you have assigned has more IP Addresses (CIDRs) than the IPSets total capacity. This means some IP Addresses (CIDRs) may not have been added. Please review your policy or adjust your WAF device in the ThreatSTOP Admin portal to increase capacity. |
| 90 | “Your policy includes more block and allow CIDRs than is supported by the number of block and allow IPSets configured. “ | The policy you have assigned has more IP Addresses (CIDRs) than the IPSets total capacity. This means some IP Addresses (CIDRs) may not have been added. Please review your policy or adjust your WAF device in the ThreatSTOP Admin portal to increase capacity. |
| 91 | “Issues were encounterd while installing the allow policy to your WAF. We are re-trying the installation, but your protection might be stale until that time.” | There were issues installing the policy or creating required AWS objects. Please double-check the IAM permissions & credentials. |
| 92 | “Issues were encounterd while installing the block policy to your WAF. We are re-trying the installation, but your protection might be stale until that time.” | There were issues installing the policy or creating required AWS objects. Please double-check the IAM permissions & credentials. |
| 93 | “Issues were encounterd while installing the allow and block policy to your WAF. We are re-trying the installation, but your protection might be stale until that time.” | There were issues installing the policy or creating required AWS objects. Please double-check the IAM permissions & credentials. |
If you have additional questions/concerns contact ThreatSTOP Support for more information.
Logging and Reporting
If log upload is enabled, the ThreatSTOP Cloud will retrieve logs every 15 minutes, as long as there were WAF Actions performed by the policy since the last upload. The logs can be analyzed in the IP Defense Reports 15 minutes after they’ve been uploaded.
AWS Labels and Custom Responses
In this section we’ll talk about how you can use the new rule labels feature introduced May ‘23, to drive custom behavior such as custom responses.
- Log into the admin portal and edit your WAFv2 cloud device.
- If you want to block a request but respond with custom text, JSON, or HTML response, you’ll have to first switch the block action in the WAFv2 setup to
Count hit but allow traffic. This will temporarily allow traffic while we finish setting up the complimentary label match rule to block the traffic so you may want to schedule this change according to your organizational needs.
- Save the settings to your WAFv2 cloud device and wait for them to propogate to AWS. You’ll know this has happened when you see the labels added in the WebACL Rule setup.
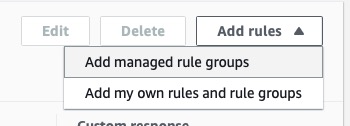
- Next in AWS, click on your WebACL > Rules > Add rules > Add my own rules and rule groups. This will kick off the rule builder wizard.
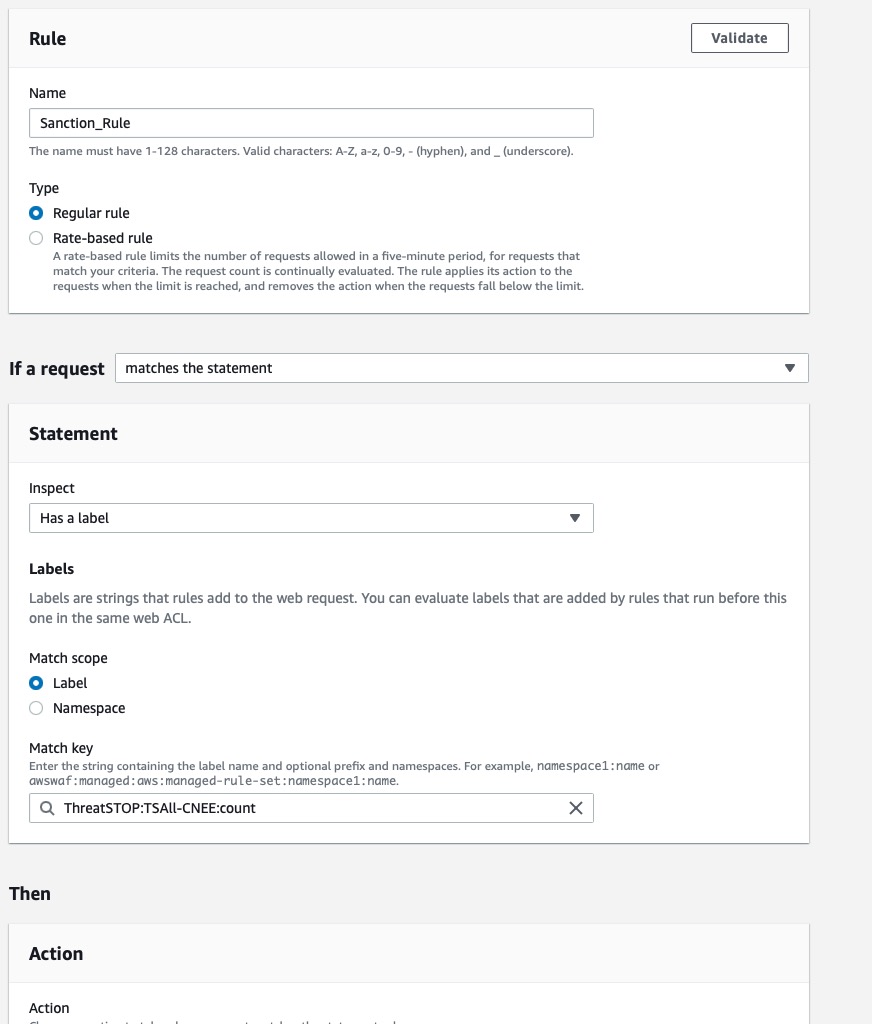
- Give your rule a name, type: regular rule, if a request matches the statement, inspect has a label, Match Scope set to Label and choose the label that makes the most sense to you. We add more than one label to give you additional flexibility in determining which one is right for you.
- For the purpose of this example we’ll set it to ThreatSTOP:count.
- For section labeled Then, we’ll setup the action to be taken.
- Action: Block (you can set this to whatever you need)
- Custom Response: Toggle setting to reveal additional settings
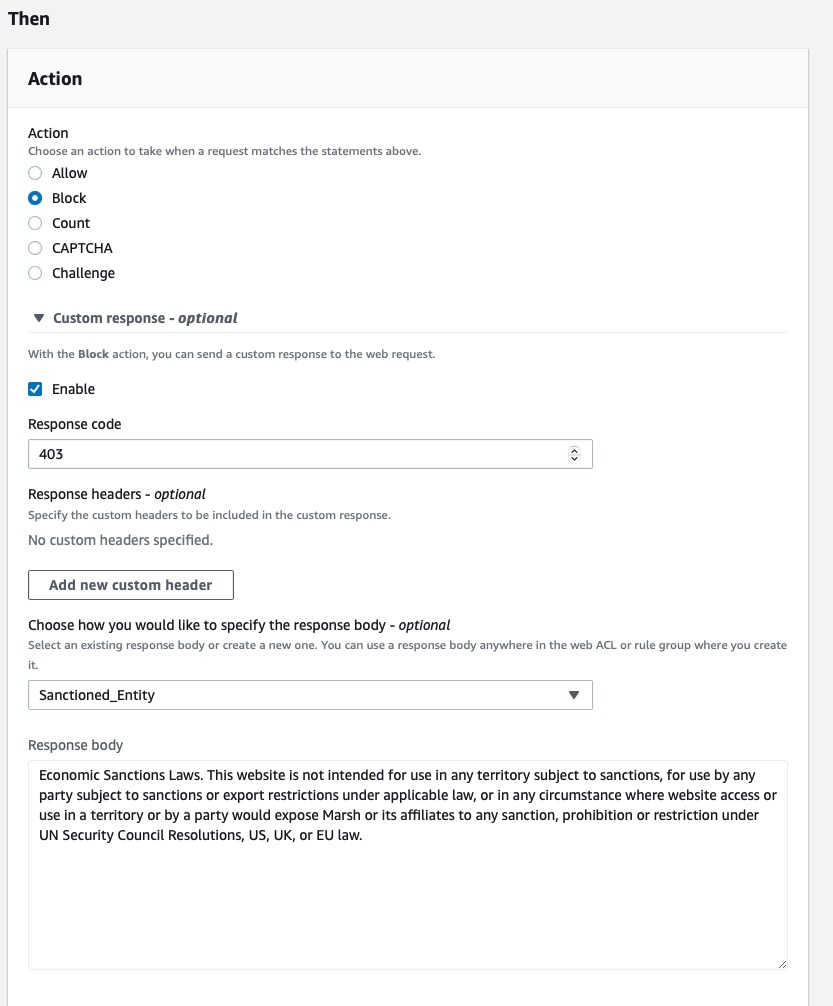
- Enable: check
- Response code: 403 (this is a general forbidden HTTP code, please use what you wish)
- Choose how you would like to specify the response body: click the dropdown and select “Create a custom response body”
- Give your custom response a name e.g. “Sanctioned_Entity”
- Content-Type: Plain text (again, choose whatever makes sense for your organization)
- Response Body: Enter in the verbiage, JSON or HTML snippet you wish to display just before being given the block HTTP/403 response.
- Hit [Save]
- Hit [Add rule] to save the form and finish the rule setup.
Configuration changes
To change the configuration (number of IPSets, policy), simply modify settings in the ThreatSTOP Device admin portal and the integration will propagate the changes to the WAF object. If you are modifying the number if (allow/block) IPSets assigned to a device, we will first remove all IPSets and re-install the new set. This process typically only takes a few seconds, however during that time the policy will not be protecting so you’ll want to schedule that accordingly.
Changing the policy
- Update the policy assigned to the device in the Admin Portal
- Wait up to 15 minutes (depending on the policy it is typically ready and installed within a minute) for the changes to propagate to ThreatSTOP’s policy service.
CIDR deduplication and merging
- It is important to note that we do CIDR deduplication & CIDR merging in order to maximize IPSet capacity.
- Recently AWS removed the ability to create empty IPSets, so you may note IPSet(s) with a single IP Address (64.87.3.133/32 for block IPSet or 192.124.129.42/32 for allow) in them. This is normal and the only address you will find duplicated. This acts as a reservation for the IPSet for future use.
View the networks contains in the current policy
- Login into WAF Web ACL console
- Set the Filter to the AWS region your WAF resides in.
- Select the Web ACL name, go to the ‘Rules’ tab, and select a rule to see its members.
Additional information
- A good overview of how Elastic Load Balancers work.
Version Changelog
| Version | Release Date | Notes |
|---|---|---|
| 1.00 | 2022-04-06 | Initial WAFv2 Cloud support |
Uninstalling ThreatSTOP
To uninstall the ThreatSTOP integration simply log into ThreatSTOPs device admin portal and click Delete. Deleting the device entry will remove the managed objects from the WAF and stop log retrieval.
If you enabled log processing:
- Sign in to AWS console
- Navigate to the “Properties” tab of your S3 bucket and go to the “Event notifications” section.
- Delete the “All object create events” event.
- This will ensure no more logs are downloaded by ThreatSTOP for processing.