Introduction
A10 Networks’ Threat Intelligence solution powered by ThreatSTOP is an end-to-end security solution for detection, blocking, and reporting of inbound and outbound security threats. This solution provides the ability to proactively block known threats based on malicious indicator threat feeds downloaded regularly to the appliance. The A10 device imports the threat feeds as a class list (TPS) or BW List (ADC) to block malicious IPs and protect the network.
This installation guide will cover how to integrate ThreatSTOP and A10’s Threat Protection Service (TPS) and Application Delivery Controller (ADC), running A10’s Advanced Core Operating System (ACOS).
DDOS Targets
Requirements and Compatibility
ACOS Releases
- For Thunder TPS: ACOS 3.1.2 or higher
- For Thunder ADC: ACOS 4.1.0 or higher
Supported A10 Hardware Models
- Thunder TPS: Thunder 840, 1040, 3030S, 4435, 5433, 6435, 6635, 14045
- Thunder ADC: Thunder 840, 930, 940, 1030S, 1040, 3030S, 3040, 3230, 3430, 4430, 4440, 5330, 5430-11, 5440, 5630, 5840, 6430, 6440, 6630, 7440(-11)
Maximum policy size
The maximum size of the policy that can be loaded depends on the A10 device.
- Thunder TPS
| Model Number | Total Maximum Policy Size | Maximum IP entries in a Class-List | Maximum Class-List counts |
|---|---|---|---|
| Thunder 5434 Thunder 6435 Thunder 6635 Thunder 14040 |
96 million | 16 million | 8 |
| Thunder 4435 | 48 million | 16 million | 8 |
| Thunder 3030S | 24 million | 8 million | 8 |
| Thunder 1040 Bypass | 8 million | 2 million | 8 |
| Thunder 1040 Thunder 840 |
2 million | 2 million | 8 |
- Thunder ADC (Size of BW-List)
| Model Number | Total Maximum Policy Size |
|---|---|
| All | 8 million |
ThreatSTOP Reporting
- ThreatSTOP reporting features are available for ADC only. They do not include DDOS events.
It is also possible to integrate ThreatSTOP with most SIEM solutions.
ThreatSTOP Threat Intelligence Proxy (TIP) virtual machine
The TIP is available as a virtual machine image for the following Operating Systems:
| Distribution | Version | Notes |
|---|---|---|
| Red Hat Enterprise Linux (RHEL) | 7.9 | Red Hat 7 support ends as of June 2024 |
| Red Hat Enterprise Linux (RHEL) | 9.3 | RHEL 9 requires ESXI 6.7U2 or later |
| Ubuntu Linux | 16.04-20.04 | Deprecated, should use Ubuntu 24.04 |
| Ubuntu Linux | 24.04 |
Hardware Requirements
| Resource | Setting |
|---|---|
| CPU | 2+ |
| RAM | 12GB |
| Drive space | 20GB |
These requirements are implemented by the TIP OVA file.
- The current version of the TIP is 1.51-04. You can retrieve the version of your TIP by running the following command on the virtual machine:
$ tsadmin version 1.51-04 - The current version of the A10 module is 3.17-03.
# Ubuntu
$ dpkg -l | grep ts-a10
# RHEL
$ rpm -qa | grep tscm-a10
Pre-requisites
To perform the installation, you will need the following:
- a supported A10 device
- a ThreatSTOP account
- administrator access on your A10 device
- the ThreatSTOP TSCM image for your preferred Operating System:
- a hypervisor such as VMWare ESXi or Microsoft Hyper-V
Network connectivity
To retrieve its configuration and policy, and to upload log data, the machine needs the following connectivity:
- DNS over TCP - Policy service
- IP Range: 192.124.129.0/24
- Outbound TCP port 53 or 5353
- HTTPs - Configuration service
- Hostname: logs.threatstop.com
- IP range: 204.68.99.208/28
- Outbound TCP port 443
- NTP
- Ubuntu images
- ntp.ubuntu.com
- Red Hat images
- 0.centos.pool.ntp.org
- 1.centos.pool.ntp.org
- 2.centos.pool.ntp.org
- 3.centos.pool.ntp.org
- Outbound UDP port 123
- Ubuntu images
The A10 device must be able to reach the TIP on the following ports:
- SSH(SCP) TCP port 22
- Syslog UDP port 514
System overview
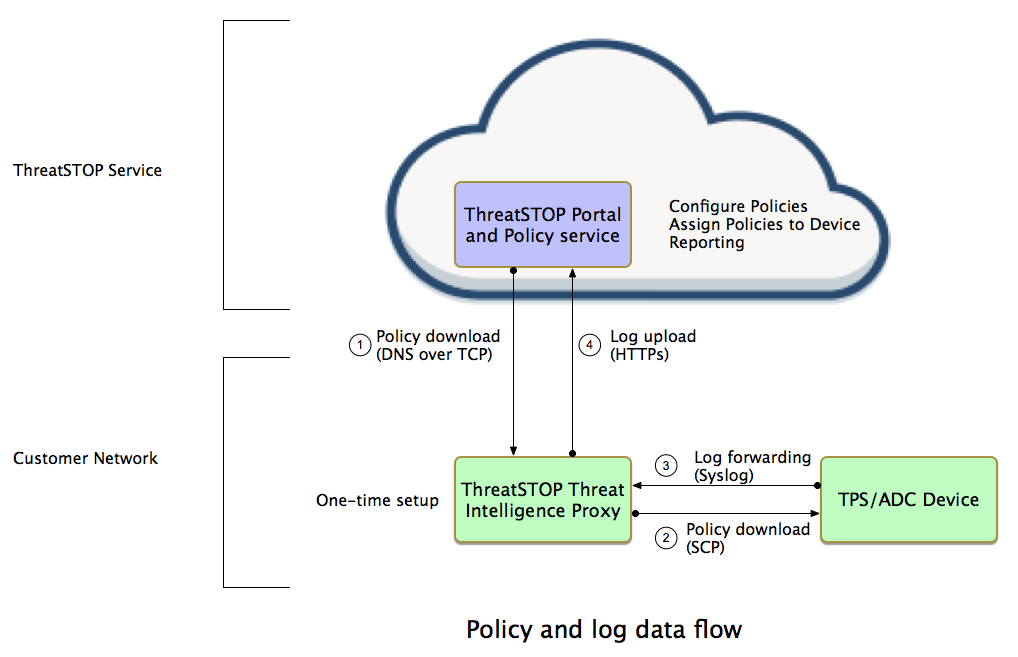
The Threat Intelligence Proxy is a Linux machine appropriated for policy enforcement in the A10/ThreatSTOP environment. ThreatSTOP provides pre-installed virtual machines in Open Virtualization Archive (OVA) format.
The Threat Intelligence Proxy proxy downloads policies from the ThreatSTOP cloud to distribute to the A10 device(s) in the network. The policies that are downloaded are configured in the ThreatSTOP portal to block malicious traffic.
The configured policies are made available as ACOS class lists, which the A10 devices can then retrieve (via sftp) from the Threat Intelligence Proxy and use to update their active security policies. Additionally, logs of blocked connections can be forwarded from the A10 device to the Threat Intelligence Proxy via syslog and then uploaded to ThreatSTOP’s cloud to provide detailed reports.
The Threat Intelligence Proxy refreshes the class lists every 2 hours.
Configuration overview
Policies and targets
ThreatSTOP policies are assembled with targets, that is policy building blocks that group malicious IP addresses and domains related to types of threats. ThreatSTOP policies for A10 include two types of targets:
-
standard targets, which are configured on the ThreatSTOP Portal Standard targets can be selected to define a custom policy using the policy editor on the Portal. Additionally, a set of predefined policies is available. These predefined policies are described below. Custom policies allow you to select specific targets and exclude others, as well as adding your own set of IP addresses.
-
DDoS targets, which are configured on the ThreatSTOP TIP. The current list is available here.
It is possible to use either types of targets (standard or DDoS) for each A10 device, or to use both of them in the same class lists.
Device Settings
You will need the following settings to complete the installation.
| Setting | Value |
|---|---|
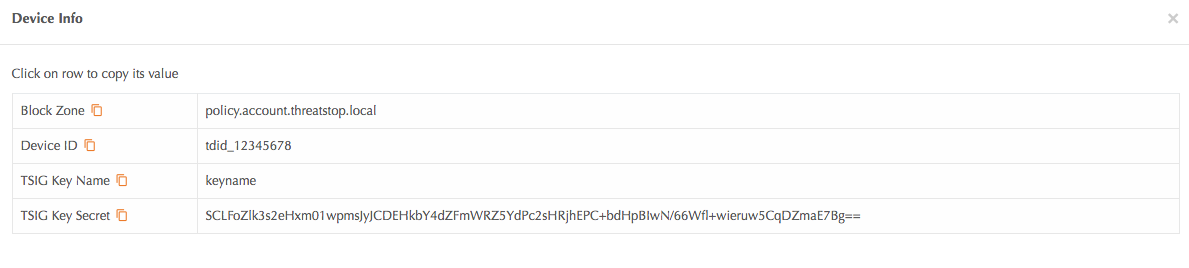
| Device ID | Retrieved from device settings page on the ThreatSTOP Portal |
| Policy Zone Name | Retrieved from device settings page on the ThreatSTOP Portal |
| Policy TSIG Key Name | Retrieved from device settings page on the ThreatSTOP Portal |
| Policy TSIG Key Secret | Retrieved from device settings page on the ThreatSTOP Portal |
To retrieve them from the Portal:
- Login and click the link to the device tab to reveal the list of devices
- Click on the Device Info icons for the device you want to configure

Installation steps
Integrating ThreatSTOP with your A10 device requires 3 steps:
- Creating a device entry on the ThreatSTOP portal
- Installing the Threat Intelligence Proxy (TIP) on your network
- Configure the A10 device to retrieve block lists and send logs for reporting
ThreatSTOP Portal
- Login to the ThreatSTOP portal and add your device.
- Click on the Devices menu and select + Add Device. The Device selection form will be displayed.
- Select the manufacturer and model:
- Device Type: IP Defense
- Manufacturer: A10
- Model: Thunder ADC or Thunder TPS
- Next, select TSCM as the integration type. The Device settings form will be displayed.
The device settings are:
-
Nickname: this is a mnemonic name used to identify the device. It can be set to any string (A-Z, 0-9, - and _). If you create multiple device entries, each entry must have a unique nickname. The Nickname will be used to identify the device on the TIP and in the Reporting user interface.
-
Policy: select a pre-defined policy or a customized policy. It must be an IP Defense Policy.
-
IP Type: Access to the ThreatSTOP services is controlled in part using an ACL allowing the device IP to connect. If your device has a static public IP address (the most common case), select static. If your device has a dynamic public IP address, the ThreatSTOP services can lookup the IP address using a DNS fully-qualified name (FQDN).
-
Public IP address: In static mode, this is the public IP address of the device. It is possible to configure multiple device entries with the same public IP address.
-
Domain name: In Dynamic mode, this is a DNS FQDN which must be kept up-to-date as an A record pointing to the device’s dynamic IP.
TIP virtual machine
- Download the OVA image for your preferred Operating System:
- The Download section of the Device page provides links and SHA256 checksums for each version

- Deploy the OVA to your Hypervisor software
- After the virtual machine has booted, connect to it with an ssh client.
- IP Address: the TIP will display its IP address on its console after booting (press enter to display the login prompt)
- Username: threatstop
- Default password: threatstop
- Start the TIP configuration process by running the following command. You can select a device name of your choice. If configuring multiple devices, each device entry must have a different name.
$ tsadmin add --type a10 <device name>
The TIP configuration command will prompt you for the following configuration settings:
- Device management IP address: This is the internal IP address of the A10 device.
- Device Identifier: This is the ID of the device entry in the Portal and must be correct for log upload to function.
- IP protection zone: This is the name of the Policy Zone attached to the device. If set, it must match the name of the policy configured in the portal. If this field is left empty (‘none’), the class lists will include the DDoS targets only, and won’t include the policy configured on the portal.
- DDOS targets: The comma-separated list of DDoS targets should be included in the class lists files. The list of available DDoS Targets can be viewed here. For example: ntp,resolvers,drones. This requires a A10/DDOS subscription.
- Policy TSIG Key name: used for access control and service authentication (A10/DDOS subscription only)
- Policy TSIG Key secret: used for access control and service authentication (A10/DDOS subscription only)
- For TPS devices
- Maximum file size for class lists: The maximum number of entries in a class list file for your device. Please refer to the Maximum Policy Size table above.
- Maximum file count for class lists: The maximum number of class list files to generate. Typically 4 files. Changing this setting will require altering the class list configuration on the A10 device.
- For ADC devices
- Maximum file size for class lists: The maximum number of entries in a BW file for your device. Please refer to the Maximum Policy Size table above.
- Maximum file count for class lists: ADC devices support a single BW file. Always use 1.
- SFTP password: set a password for the A10 device to access class lists on the TIP using sftp. The username is set to the device id, allowing multiple A10 devices to retrieve different class lists.
- Send logs to ThreatSTOP: If set to ‘yes’, logs will be uploaded to the ThreatSTOP cloud for enrichment and reporting. Setting this to ‘no’ will disable log upload.
Advanced settings
The TIP configuration supports the following advanced settings, for uncommon network configurations. To enable these settings, run the tsadmin command with –advanced.
$ tsadmin add --type a10 <device name> --advanced
- DNS Port: the ThreatSTOP policy service is available on TCP port 53 and 5353 (DNS Protocol). Using port 53 is recommended unless your network configuration blocks or alters outbound DNS requests on this port.
- Syslog IP address: the internal IP address of the A10 device. It must be the IP of the interface which will send log data via syslog - typically, the IP address of the A10 device’s management port.
- Log rotation size: the TIP will upload logs received from the A10 device every 15 minutes or when the log files reaches this size, whichever comes first. A lower setting will trigger log upload more frequently on a system receiving a high volume of log events.
- Enable syslog forward: The TIP will forward the logs it received to the configured IP address. This allows sending logs to both the ThreatSTOP cloud and another internal syslog server, typically for loading data in a SIEM.
-
Enable policy updates: If set to ‘no’, the TIP will stop updating the class files. This should remain set to ‘yes’ unless you wish to disable updates temporarily.
- You can review the list of devices configured
$ tsadmin list # Lists all devices $ tsadmin show <device name> # Display the settings of the selected device - Once configured, you can trigger the initial policy download with the following command. The device will also updates the class lists automatically every hour, at the top of the hour. Note that using a policy that includes all DDoS targets will require 10 to 15 minutes to update the update process.
$ tsadmin update <device name> - After the update completes, the class lists files will be available via sftp. Each update will replace the files atomically. You can check that the files are available in /usr/share/a10/<device name>.
TIP Configuration changes
You can revisit the configuration of any device entry of the TIP; for example to update the IP address, the policy name or the list of DDoS targets to include. Run the following commands to reset any value:
$ tsadmin list # retrieve device name if needed
$ tsadmin configure <device name>
Thunder TPS configuration (Command line)
With the Threat Intelligence Proxy (TIP) setup in the previous section, we can move onto to setting up the A10 device to retrieve the class lists and provide logs to the TIP. This is performed with the A10 device’s Command Line Interface.
Importing the Class Lists
Each class list will be imported via sftp using an automated, recurring import. The period option will import the updated list into the device and is defined in seconds. The recommended value is 86400 seconds (once a day), although faster updates are possible for the high end A10 devices.
Replace the sftp settings (IP address, username and password) with the values used during setup.
- user: this is always the ThreatSTOP device ID. It can also be retrieved with the ‘tsadmin list’ command.
- address: the IP address of the TIP
- password: as entered during the TIP device configuration
For example:
[INFO ] :     address : 192.168.3.1
[INFO ] :        path : /
[INFO ] :        user : tdid_e16144c5
- Login into the A10 device’s command line using an SSH client and enter the following commands:
import-periodic class-list threatstop0 use-mgmt-port sftp://<user>:<password>@<ip address>/block-000-nsp.txt period 86400
import-periodic class-list threatstop1 use-mgmt-port sftp://<user>:<password>@<ip address>/block-001-nsp.txt period 86400
import-periodic class-list threatstop2 use-mgmt-port sftp://<user>:<password>@<ip address>/block-002-nsp.txt period 86400
import-periodic class-list threatstop3 use-mgmt-port sftp://<user>:<password>@<ip address>/block-003-nsp.txt period 86400
- Use the CLI command show class-list to confirm that the class-lists are properly downloaded.
#show class-list
Name                     Type                     IP       Subnet   DNS      String   Location
threatstop0              [ipv4]                   751848   0        0        0        file
threatstop1              [ipv4]                   248152   0        0        0        file
threatstop2              []                       0        0        0        0        file
threatstop3              []                       0        0        0        0        file
Total: 4.
Building the policy
Next, create a source based policy:
ddos src-based-policy block
  policy-class-list threatstop0
  policy-class-list threatstop1
  policy-class-list threatstop2
  policy-class-list threatstop3
!
Binding the policy
Finally, bind the policy to the DDoS protected object (e.g. DDoS dst zone)
ddos dst zone threatstop
  ~cut~
  port <port> <protocol>
    ~cut~
    src-based-policy block
      policy-class-list threatstop0
        deny
      policy-class-list threatstop1
        deny
      policy-class-list threatstop2
        deny
      policy-class-list threatstop3
        deny
Setup log export via syslog
logging host <TIP IP address> use-mgmt-port port 514
Thunder TPS configuration (Web GUI)
Importing the Class List from the TIP
- Navigate to TPS > Templates > General > Class List and click Import
Building the policy
- Navigate to TPS > Templates > General > Source Based Policy, and click Create
Binding the policy on the DDOS Zone
- Navigate to TPS > Protected Objects > Zones, then click Create.
- Enter the Zone name and IP address accordingly.
- Move to the Service Port tab and apply policies with actions (e.g. Deny) under the service port (e.g. Port 80 HTTP)
Thunder ADC Configuration (CLI)
The basic configuration steps for Thunder ADC are same as TPS described above. However, Thunder ADC uses a BW-List instead of Class-List to import the bock IP list.
Import the IP list as BW-List
- Login into the A10 device’s command line using an SSH client and enter the following commands:
import-periodic bw-list threatstop0 use-mgmt-port sftp://<user>:<password>@<ip address>/block-000-nsp.txt period 86400
Build a template
- Enter the following commands to build a template
slb template policy bl1
bw-list name threatstop0
bw-list id 0 reset logging
Bind with Virtual Service (VIP)
- Finally, bind the policy to the virtual service (VIP):
slb virtual-server vs1 <Virtual IP>
port 80 tcp
  service-group sg1
  template policy bl1
Thunder ADC Configuration (Web GUI)
The basic configuration steps for Thunder ADC are same as TPS described above. However, Thunder ADC uses a BW-List instead of Class-List to import the bock IP list.
Import the IP list as BW-List
- Navigate to ADC > BW-Lists and click Create.
Build a template
- Navigate to ADC > BW-Lists and click Create.
Bind with Virtual Service (VIP)
- Navigate to ADC > Virtual Services and select the policy on the Template Policy column
Support for multiple devices
Setting up multiple devices is done by repeated the setup steps.
- You can reuse an existing policy or define a new one in the ThreatSTOP Portal
- Create a new device entry in the ThreatSTOP Portal
- Follow the TIP Device configuration steps
- Configure the additional A10 devices to retrieve and apply the class lists files
Policy updates for each devices are processed serially.
Other operations
Current configuration
To view the current settings on the TSCM, run
$ tsadmin show <device name>
Configuration changes
- After the initial configuration is completed, settings can be changes by running **tsadmin configure
**.
Software updates
To update the TIP and retrieve new versions of the ThreatSTOP software, login as threatstop and run the following command:
# Ubuntu
$ sudo apt-get update && sudo apt-get -y dist-upgrade
# Red Hat RHEL
$ sudo yum update
Uninstallation procedure
Thunder TPS
-
Please make sure to unbind the class lists from the src-based-policy configuration before removing the class lists.
-
To remove the ThreatSTOP class lists from the Thunder TPS device, issue the following commands on the A10 device
no import-periodic class-list threatstop0
no class-list threatstop0
no import-periodic class-list threatstop1
no class-list threatstop1
no import-periodic class-list threatstop2
no class-list threatstop2
no import-periodic class-list threatstop3
no class-list threatstop3
Thunder ADC
-
Please make sure to unbind the BW-List from the Virtual Server/VIP configuration before removing the lists
-
To remove the ThreatSTOP class lists from the Thunder ADC device, issue the following commands on the A10 device
no import-periodic bw-list threatstop0
delete bw-list threatstop0
TIP Configuration
From this point on, the A10 device will not be updated but the TIP will continue to download the policy data.
- On the TIP, remove the device entry:
$ tsadmin remove <device name> - Finally, delete the device entry on the Portal. Note that report data associated with the device will become inaccessible.
Troubleshooting
If the tsadmin commands returns one of the following error messages:
- Unable to retrieve policy
- Unable to retrieve DDOS target
validate the following:
- NTP status (timedatectl status)
- Connectivity to the DNS service listed above
If 15 minutes have elapsed since the device was created and the tsadmin command continues to fail, please contact ThreatSTOP support.
Additional Information
DDoS Targets and predefined policies
The list of available DDoS targets and predefined policies is available here.
OS upgrade process
If you would like to upgrade your TSCM instance to a newer OS (e.g. from RHEL 7 to RHEL 9), please follow these steps:
- update your current TSCM to use the current TSCM Core packages by running yum update
- run tsadmin backup
- create a new TSCM using the RHEL9 image
- copy the backup file to the new TSCM
- on the new TSCM, run tsadmin restore
Please refer to the backup/restore documentation.
Version History
| TSCM | A10 module | Changelog |
|---|---|---|
| 1.51 | 3.17 | Added support for Ubuntu 24.04 |
| 1.50 | 3.16 | Added support for RHEL 9.3 |
| 1.48 | 3.15 | Images built with Ubuntu 20.04 and RHEL 7.9 |
| 1.40 | 3.12 | Improve installation prompts without DDOS support enabled |
| 1.37 | 3.11 | Added network configuration feature and additional details during policy download |
| 1.35 | 3.10 | Added Web automation features |
| 1.27 | 3.00 | Added TSCM integration. Added ability to provide different policies to multiple devices |