Overview
This document describes the integration process for NIOS DNS Firewall with ThreatSTOP’s Response Policy Zones. After integration you will be able to choose policy targets on our admin portal, and optionally review hits to the policy if logging is enabled to ThreatSTOP’s upstream analysis servers.
- Step 1 - ThreatSTOP Portal Setup
- Step 2 - TSCM Logger Setup †
- Step 3 - NIOS Logger Setup †
- Step 4 - NIOS Response Policy Zone Setup
- Step 5 - Testing Integration
† These steps are only required if you intend to use ThreatSTOP’s reporting & analysis utilities.
Compatibility
Supported Systems
| Operating System | Product Line / Version |
|---|---|
| Infoblox | NIOS 7.x |
Prerequisites
- Current active ThreatSTOP account
- Admin access on NIOS Device
Connectivity
To retrieve its configuration and policy, and to upload log data, the machine needs the following connectivity:
- DNS over TCP / UDP
- IP Range: 192.124.129.0/24
- Outbound TCP port 53 or 5353
- HTTPS
- Hostname: logs.threatstop.com
- IP range: 204.68.99.208/28
- Outbound TCP port 443
Step 1 - ThreatSTOP Portal Setup
- Log into your ThreatSTOP account or register for one.
- If you want to use a custom DNS Firewall policy, please read DNS Firewall Policies

- Create a new Device Entry: Click on Devices and then on Add Device.
- The Manufacturer is: Infoblox
- The Model is: NIOS
- Select the DNS Firewall policy - either a pre-defined policy or a custom policy
The Admin Portal will display a form to enter the device settings described below and the links to retrieve the TSCM image.
-
Nickname: This is a mnemonic name used to identify the device. It can be set to any string (A-Z, 0-9, - and _). If you create multiple device entries, each entry must have a unique nickname. The Nickname will be used to identify the device on the TSCM and in the Reporting user interface.
-
Policy: Select a pre-defined policy or a customized policy. It must be an DNS Policy.
-
IP Type: Access to the ThreatSTOP services is controlled in part using an ACL allowing the device IP to connect. If your device has a static public IP address (the most common case), select static. If your device has a dynamic public IP address, the ThreatSTOP services can lookup the IP address using a DNS fully-qualified name (FQDN).
-
Public IP address: In static mode, this is the public IP address of the TSCM. It is possible to configure multiple device entries with the same public IP address.
-
Note: An optional field to store a note of your choice about the device - location, identifiers, model…
Device Settings
You will need the following settings to complete the installation. You can retrieve the RPZ Zone name, Policy TSIG Key name, Policy TSIG Key secret and Device ID via the settings of the device in the Admin Portal.
| Setting | Value |
|---|---|
| Device ID | Retrieved from device settings |
| DNS Server IP Address | Zone masters retrieved from device settings |
| RPZ Zone Name | Retrieved from device settings |
| Policy TSIG Key Name | Retrieved from device settings |
| Policy TSIG Key Secret | Retrieved from device settings |
Step 2 - TSCM Logger Setup
If you’ve chosen to send logs, this will collect and transmit logs to our secure servers for upstream analysis and reporting. On this step we’ll be installing a generic network logger on the TSCM for receiving NIOS logging.
- Login to your TSCM device.
- At the command prompt enter the following command
tsadmin add --type logger <device name> --advanced:
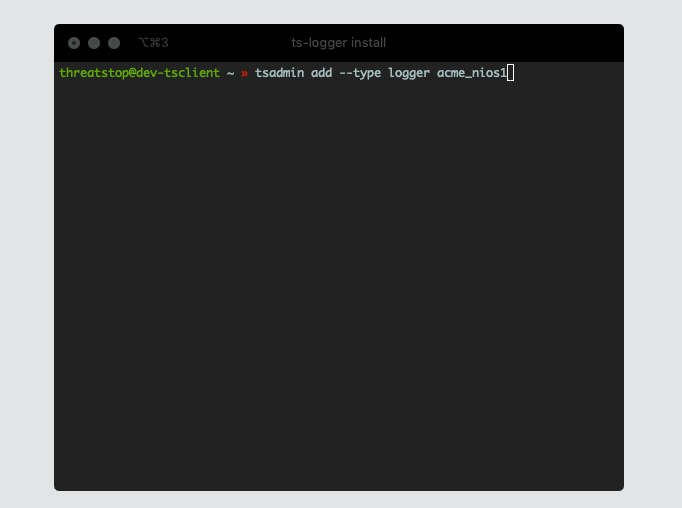
 # <device name> should be replaced with a friendly nickname like the one used in the portal
 # If you have more than one NIOS devices make sure to include the --advanced flag to give you some additional options
threatstop@TSCM_VM$ tsadmin add --type logger acme_nios1 --advanced
[INFO ] : Validating access with DNS server
[INFO ] : checking https://logs.threatstop.com:443/validip.pl
Configuring ThreatSTOP Log Relay Device device.
Enter the device ID (tdid):  tdid_abcd1234
Device management IP address : 10.0.0.1

Logging/reporting configuration
Send logs to ThreatSTOP? (y or n) [default y]

Advanced settings
Please enter all additional syslog source IP(s). Use none for none. Separate
    multiple entries with a space : [default none] 10.0.0.2 10.0.0.3
Log rotate size : (in Kb, minimum 50) [default 100]
Enable syslog forward? (y or n) [default n]
Log upload proxy ( e.g. 'http://proxydomain.com:3128', 'none' for none)?
    [default none]
Successfully added acme_nios1
This will add a NIOS compatible logging device, and prompt for the following settings:
Standard Settings
- Device ID: This is the device id or TDID given in the quick settings section or referenced in the portal.
- Device Management IP address This is the IP Address of the NIOS device as observed by the TSCM. Please note if logs will be coming from more than one NIOS device you must include all other IP addresses in “additional syslog source” prompt.
- Send logs to ThreatSTOP to enable sending logs to ThreatSTOP select ‘y’.
Advanced Settings
You will only see prompts for the following settings when the --advanced flag is used during the tsadmin add operation.
- Additional syslog IP addresses This setting is used to add additional IP addresses the logger should be listening to for logs.
- Log Rotation Enter the Log rotation size, in Kb to enable rotation. Most users keep this set this to around 100 Kb.
- Enable syslog forward This setting can be used to direct traffic being received by the TSCM outbound to another logging server.
- Log upload proxy This can be used if you would like the TSCM to use a specific proxy. This setting is optional.
- This will complete your setup and begin sending your logs to ThreatSTOP.
If for any reason you need to reconfigure the NIOS logging device enter this command, and you will be able to update the device settings:
tsadmin configure <device name>
Once this step is completed you will have a network syslog instance on the TSCM waiting for traffic from the IP Addresses you specified.
Step 3 - NIOS Logger Setup
Next we configure your NIOS device to report RPZ events to the network logger we just setup on the TSCM.
- Enabling Logging for RPZ
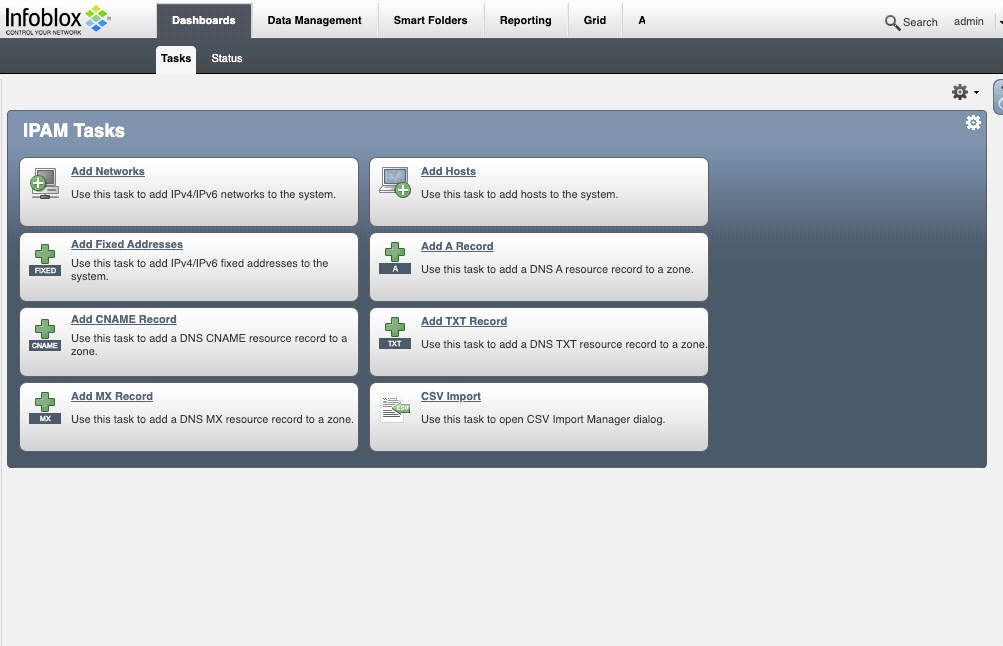
** Assuming you have setup the DNS service and are using RPZ domains, you need to verify that the RPZ events are being captured as logged events. Navigate to Data Management –> DNS –> Members -> Grid DNS Properties –> Edit. Once the Grid DNS Properties window is open, select the Logging tab.
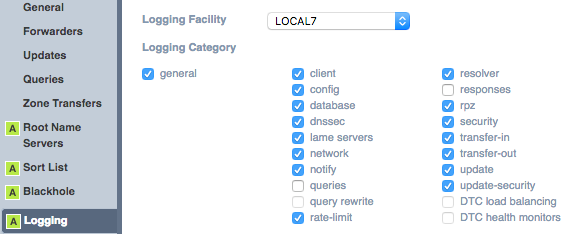
- Change the Logging Facility to LOCAL7 unless another facility is required for logging.
- Select the categories desired, but at a minimum, ensure that rpz and security checkboxes are selected.
- Click the Save & Close button when finished to apply the changes. A restart of the DNS service will probably be required.
- Add an External Syslog server
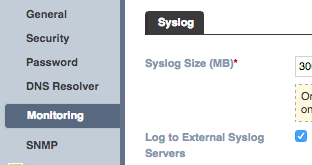
- Open the Grid Properties, Select Grid –> Grid Manager –> Members –> Grid Properties –> Edit. Once the Grid Properties Editor window is open select the Monitoring tab.
- Select the Log to External Syslog Servers checkbox if not already selected.
- Click on the Add Server icon at the top right of the External Syslog Servers table. This will display a form to the a syslog server.
- Complete the Add External Syslog Server form
- Add the IP Address of the syslog server
- Change the Transport to your preferred method.
- Select the Interface that NIOS server will us to send syslog packets.
- Change the Node ID to Host Name.
- Change Logging Category to Send selected categories and select DNS RPZ and DNS Security categories only.
- Click the Add button to insert the new syslog server into the table.
- Click the Save & Close button to complete the setup of the external syslog server. A service restart may be required.

Step 4 - NIOS Response Policy Zone Setup

- Navigate to Data Management –> DNS –> Response Policy Zones
- Click on the Add icon at the top right of the table. This will open a wizard dialog to add the RPZ feed.
- Select the Add Response Policy Zone Feed option and click Next button
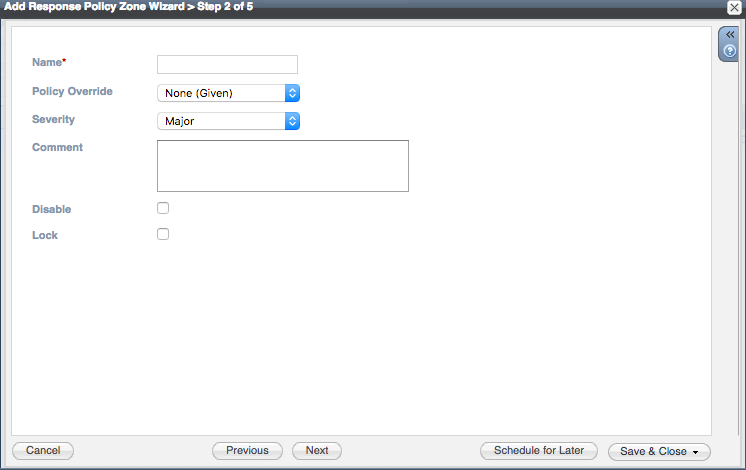
- Enter in the name of the RPZ zone and click Next button.
Zone name: [retrieve from the device settings on the portal]
- Add the Grid Secondary name server
- Select the down arrow next to the Add icon button and select Grid Secondary.
- Click on the Select button below Add Grid Secondary then click Add button.


- Add the External Primary name server
- Name: should match the RPZ feed
- Setup TSIG by selecting Use TSIG checkbox. Retrieve the key name and secrete from your device settings on the ThreatSTOP Portal. Select hmac-md5 for the algorithm.
TSIG Key name: [retrieve from the device settings on the portal]
TSIG Key secret: [retrieve from the device settings on the portal]
External Primary Name Server name: ts-rpz.threatstop.com
External Primary Name Server IPv4 address: [Zone masters retrieved from device settings]
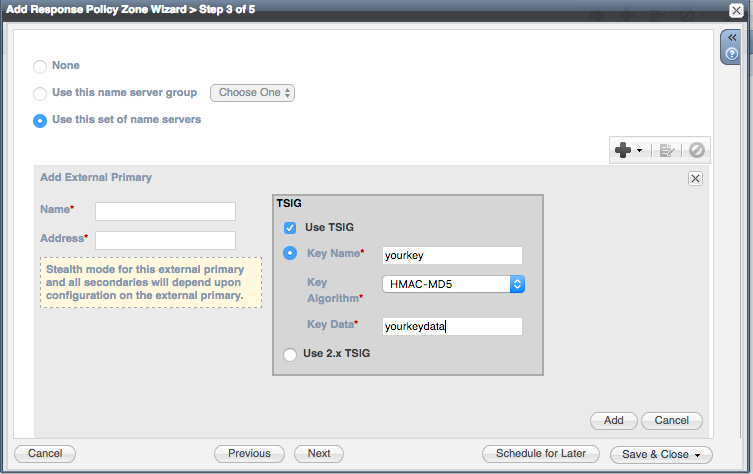
- Click Add button to insert external DNS server into table.
- Click Next button to go to next wizard screen.
- Click Next button without making any changes to Extensible Attributes.
- Click Next button to accept Schedule Change - Now option.
- Click Save & Close button to submit changes.
Step 5 - Testing Integration
After device setup has been completed, a test will need to be run to verify the firewall is behaving as intended. To perform this test:
- Open a console on the TSCM and enter “tail -f /var/log/threatstop/devices/<device name>/syslog”
- From a device behind the firewall that is not the TSCM, attempt to connect to bad.threatstop.com with a web browser.
- If the connection is blocked, you will see a connection blocked error message in the web browser, and the log being tailed will update.
- If the connection is not blocked you will see the ThreatSTOP logo appear, and the configuration settings will need to be double checked.
- If the command runs successfully update the device’s configuration as detailed in TSCM Configuration to begin sending logs back to ThreatSTOP for enhanced security.
| RPZ Actions | Description |
|---|---|
| PASSTHRU | Allow the request regardless of other rules that apply to the same FQDN; will cause the query to be logged in the RPZ log. |
| DROP | Don’t reply to the query. If this the only DNS server used by the client, this will result in a DNS lookup failure. If not, the client will try its other DNS servers. |
| NODATA | Return empty response. This won’t trigger a DNS error but the lookup will fail. |
| CNAME | (NIOS exclusive) Respond with the specified resource record; typically used for a walled garden. |
| NXDOMAIN | Return NXDOMAIN (Domain doesn’t exist), causing a DNS lookup failure. |
You can test the RPZ policy is working correctly by verifying a known blocked address like bad.threatstop.com returns NXDOMAIN or one of the actions detailed above. Below is an example of running with the DNS Utility dig.
dig @[NIOS DNS Server IP or Hostname] bad.threatstop.com
;; ->>HEADER<<- opcode: QUERY, status: NXDOMAIN, id: 5611
;; flags: qr rd ra; QUERY: 1, ANSWER: 0, AUTHORITY: 0, ADDITIONAL: 2
Below is an example using nslookup, found natively on Windows machines.
C:\Users> nslookup bad.threatstop.com [NIOS DNS Server IP or Hostname]
Server:     [NIOS DNS Server Hostname]
Address:    [NIOS DNS Server IP]#53

** server can't find bad.threatstop.com: NXDOMAIN
Looking up a non-restricted website like google.com should return its current IP. You can repeat this on any client using this device as a DNS server.
- Check that a log entry was added to
/var/log/threatstop/devices/[device name]/syslog - You can test connectivity to ThreatSTOP by running:
$ curl https://logs.threatstop.com/cgi-bin/validip.pl
Your IP address: <ip address>
Address is in the list of authorized hosts
If you are not receiving logging on the TSCM from the NIOS device, you can run the following command:
tcpdump port 514 -v
Then simultaneously on another machine attempt to generate blocked traffic like in the examples above. If you do not see any traffic hitting the dump it’s likely that the logging on the NIOS needs to be adjusted.