Overview
ThreatSTOP DNS Defense Cloud is a Protective DNS service hosted by ThreatSTOP. The service delivers the flexibility and security of ThreatSTOP’s DNS Defense by simply forwarding DNS queries to ThreatSTOP’s cloud-based DNS servers.
ThreatSTOP DNS Defense Cloud servers implement security policies that prevent the resolution of DNS names or DNS resource records (e.g. IP addresses) used by malicious actors and cyberthreats to direct traffic to their systems or exfiltrate data, thus preventing devices in your network from communicating with these malicious systems.
Features
If you are new to ThreatSTOP, you can read an overview of our platform here.
DNS Defense Cloud offers the same features as ThreatSTOP’s on-premise DNS Firewall:
- Filtering of DNS requests based on your custom policy.
- Policies can include all ThreatSTOP targets (lists of malicious domains and IP addresses) and customizable lists of domains and IP addresses.
- Filtering triggers: filtering by domain, IP address in responses and name servers.
- Filtering actions: block, redirect, drop and whitelist.
- Logging and reporting of policy hits
Deploying DNS Defense Cloud doesn’t require installing an agent or a DNS server.
Requirements
There are three requirements to use DNS Defense Cloud:
- Control over the IP address of the DNS servers used in your networks.
- DNS Queries must originate from a static list of IP v4 networks.
- Ability to send DNS queries to the ThreatSTOP service IP addresses (e.g. no blocking of DNS traffic)
Query Logging
Query logging of DNS Defense Cloud traffic is an optional feature which can be enabled or disabled in the service configuration. It allows our systems to dynamically analyze your traffic for potential malicious threats, enabling real-time protection against cyber attacks. This data also powers our machine learning models, allowing us to not only stay ahead of emerging threats but also continuously improve our ability to identify and mitigate risks. By opting in to DNS query logging, you also enable ThreatSTOP to provide faster and more effective assistance in the event of a security incident.
Additionally, opting in allows you to take full advantage of our machine learning-enhanced threat hunting services, where our experts can proactively detect and investigate suspicious activities within your network using the data logged from DNS queries.
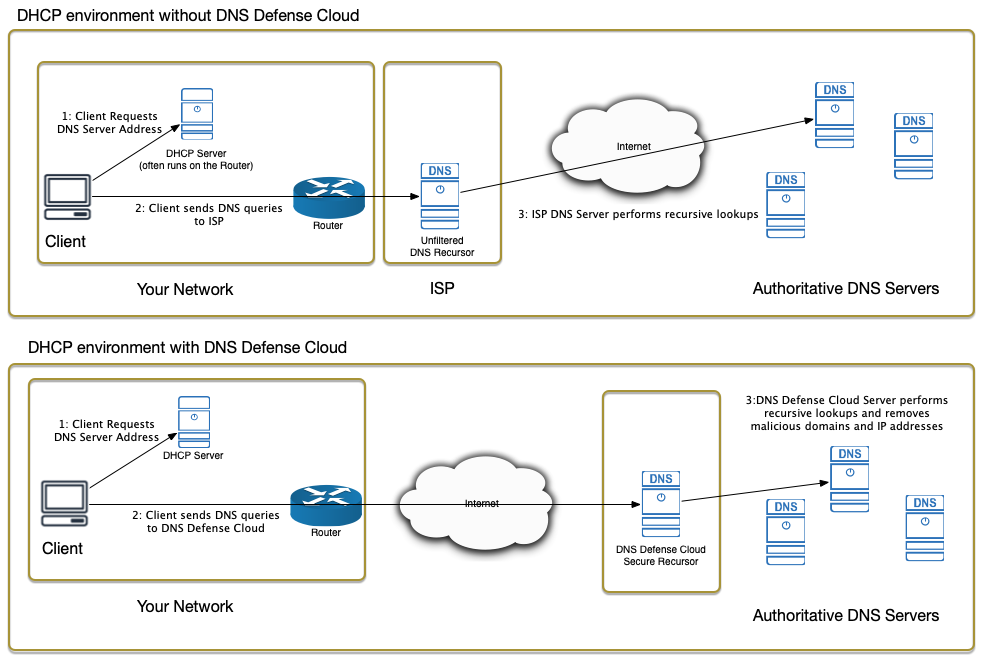
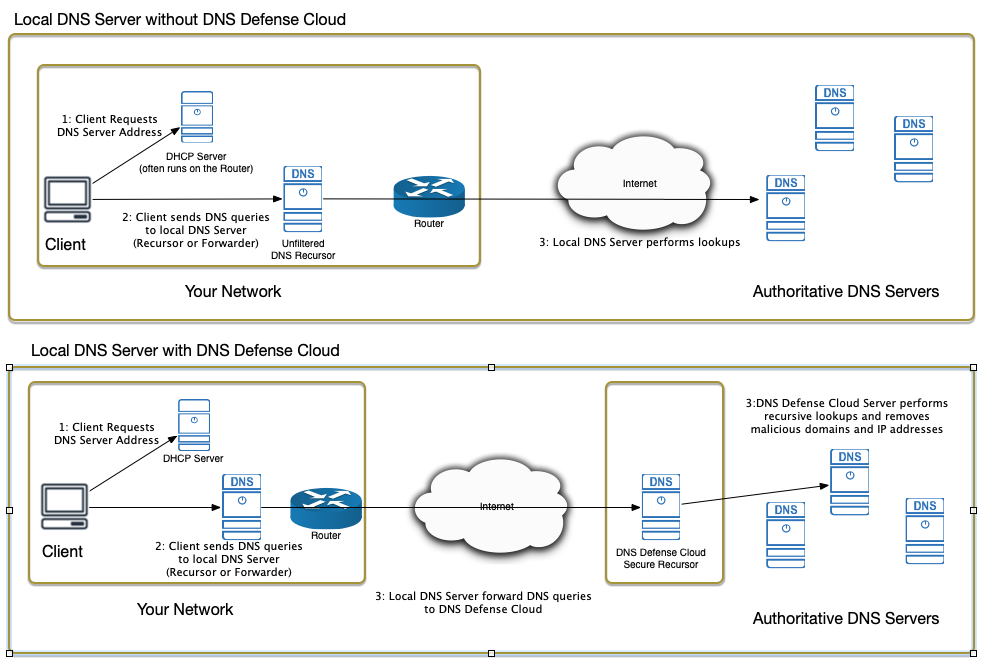
Typical network diagram
Common network environments will:
- either use a third-party DNS server (e.g. provided by the ISP or Google’s public servers), often configured by DHCP or Active Directory.
- or manage their own DNS server, typically running on Unix or Windows Server.
Typically, enabling DNS Defense Cloud requires a simple network configuration change. The following diagrams give an overview of how DNS works before and after setting up DNS Defense Cloud.
Networks without a local DNS server
Networks with a local DNS server
Configuration
Using DNS Defense Cloud takes two easy steps:
- provide the public IP address(es) that will send DNS queries in the ThreatSTOP Portal
- for environments without a DNS server, change the IP address of the resolver used by endpoints, typically by changing the DHCP configuration
- for environments with a DNS server, configure the DNS server to forwards queries to the ThreatSTOP DNS servers.
Service Configuration
To setup your DNS Defense Cloud service:
- Create a ThreatSTOP account and login to the Admin Portal.
- In the Admin Portal home page, enter the subnet(s) that will send DNS queries. For testing, you can use the public IP address (IP v4) of your laptop. You can find this IP address here.

- Click on Continue
- The Portal will display your two DNS Defense Cloud service IP addresses.
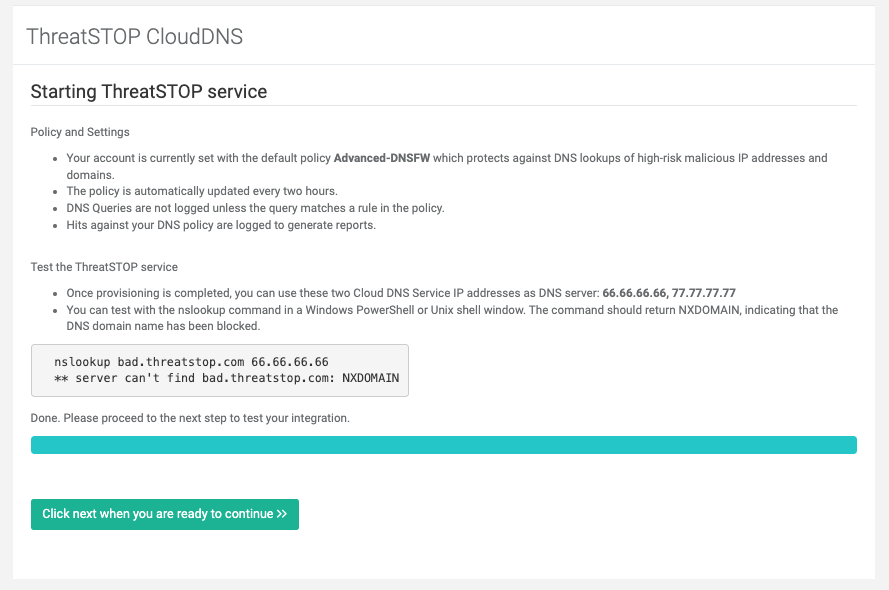
- Perform a test DNS lookup: open a shell (Unix) or Powershell windows (Windows) and use nslookup with one of the two service IP addresses:
$ nslookup bad.threatstop.com SERVICE_IP
Server:		SERVICE_IP
Address:	SERVICE_IP#53

** server can't find bad.threatstop.com: NXDOMAIN
- If the server returns NXDOMAIN, you have successfully completed the setup.
- If the command times out, check that the IP address you entered in the configuration is correct.
-
If the command returns an IP address, check that you are using SERVICE_IP as the DNS server.
- The DNS Defense Cloud servers are ready to receive your DNS queries. Click Continue to take the next steps: use your laptop for testing, or configure your network to send DNS queries to DNS Defense Cloud. You can also build your own policy or review the reports as DNS Defense Cloud starts reporting blocked queries.
Changing your DNS Configuration
After the is service configured, you can change your DNS server. To test with a small number of devices, you can change their DNS server directly, as long as the DNS requests come from an IP address listed in the device settings. Alternatively, you can change the DNS configuration for your entire network.
If you need assistance configuring your environment to enable DNS Defense Cloud, you can contact our support team.
Testing on a desktop computer
You can test the service on your deskop computer by simply changing its DNS server setting.
- Windows 10:
- Open the Control Panel and click on View network status and tasks under Network and Internet.
- Under Active Networks, click on your current connection
- Click on Properties
- Select Internet Protocol Version 4 (TCP/IPv4) and click on Properties
- Select Use the following DNS servers and enter both DNS Cloud Defense Service IP addresses as Preferred and Alternate.
- Close the windows to apply the configuration changes.
- MacOS:
- Go to System Preferences > Network, click on your current connection (typically Wi-Fi or Ethernet)
- Click Advanced and select the DNS tab
- Click the + icon to replace the DNS server(s) with the ThreatSTOP DNS service IP addresses.
- Linux:
- On recent versions of Linux running systemd-resolver, edit /etc/systemd/resolved.conf and set the DNS variable to both ThreatSTOP DNS Service IP addresses separated by a space and restart the resolver (systemctl restart systemd-resolved). Note that this change is not permanent. To make the change permanent, edit the settings of the network interface, typically in /etc/systemd/network/.
- On older version of Linux, /etc/resolv.conf, comment out the existing name server address and add the ThreatSTOP DNS service IP addresses.
- Revert the change to go back to your existing DNS server configuration.
Production setup
Production: Configuring an existing DNS server
If you manage your own DNS server, you will need to change its configuration to forward to the ThreatSTOP DNS service IP addresses. If the DNS server is already configured to use an upstream forwarder, you can simple change the forwarder IP address. If the DNS server is configured as a recursor, you will need to change its mode to forwarder.
If your DNS server is also an authoritative server for your own DNS domain(s), you will need to configure the server to remain authoritative for these zones and only forward queries for external domains.
Examples for common DNS servers are available below:
Production: Without an existing DNS server
If you are not running your own DNS service, you can still enable DNS Defense Cloud as long as you can change the IP address of the DNS service used in your network. Typically, this is done by changing the IP address of the DNS server provided by the DHCP service.
Examples for common DNS servers are available:
Settings
DNS Defense Cloud has two configuration settings:
-
The list of networks that are allowed to access the DNS service configured in your account. You can configure networks with a netmask up to 24 bits as well as configure multiple subnets, in case your DNS server has multiple external IP addresses or you are forwarding DNS queries from multiple sites.
-
The policy, which can be a pre-defined policy managed by ThreatSTOP’s security team or your own customized policy. Learn how to create your own policies here.
Settings can be changed on the Device Settings page in the Admin Portal
Reporting
Client IP in reports
DNS queries that match filtering rules are logged and made available through the reporting features of the Admin Portal. By default, reports will identify the client IP as the machine sending the DNS request, e.g. your forwarding DNS server or your public IP address.
If your DNS server supports ECS (EDNS Client Subnet, a DNS option), you can enable it to identify the client IP address. This is supported by several DNS servers, including:
Reporting features are described here. Unless ECS is enabled in your environment, the client IP address shown in reports will be either the public IP address of the endpoint, or the public IP address of the DNS server making DNS requests on behalf of the endpoints when running a DNS server.