Prologue
The Vyatta OS has been rebranded over the years as it was re-acquired by various manufacturers. Throughout this document we will refer to it as Vyatta, but all decendent operating systems we support (Ubiquiti EdgeMAX / EdgeRouter running EdgeOS, Vyos) can be used interchangeably. For more information see Vyatta Wikipedia History
Current Version
| Current Version | Released |
|---|---|
| 3.07-01 | Jan 22nd, 2026 |
Quick settings
curl -fsSL http://debian.threatstop.com/GPG-KEY.asc | sudo apt-key add -
echo "deb http://debian.threatstop.com/ThreatSTOP/ squeeze main # squeeze #" > /tmp/threatstop.list
sudo cp /tmp/threatstop.list /etc/apt/sources.list.d/
sudo apt-get update
sudo apt-get install stunnel
sudo apt-get install ts-vyatta
$ tsadmin add --type auto --device_id=[Device ID] --auto_key=[Device Key] **WARNING - THIS IS NOT A VALID COMPLETE COMMAND**
Compatibility
We have tested compatibility with the following:
| Manufacturer | Version | Supported |
|---|---|---|
| Brocade | vRouter 5400 series | Yes |
| Brocade | vRouter 5600 series | No |
How to check your version
With installs greater than v3.00 you can use native package manager commands to find installed version.
vyatta@brocade:~$ tsadmin version
3.07-01
If your installation is below v3.00 you will see a No such file or directory response.
Installation definitions
Modes of operation
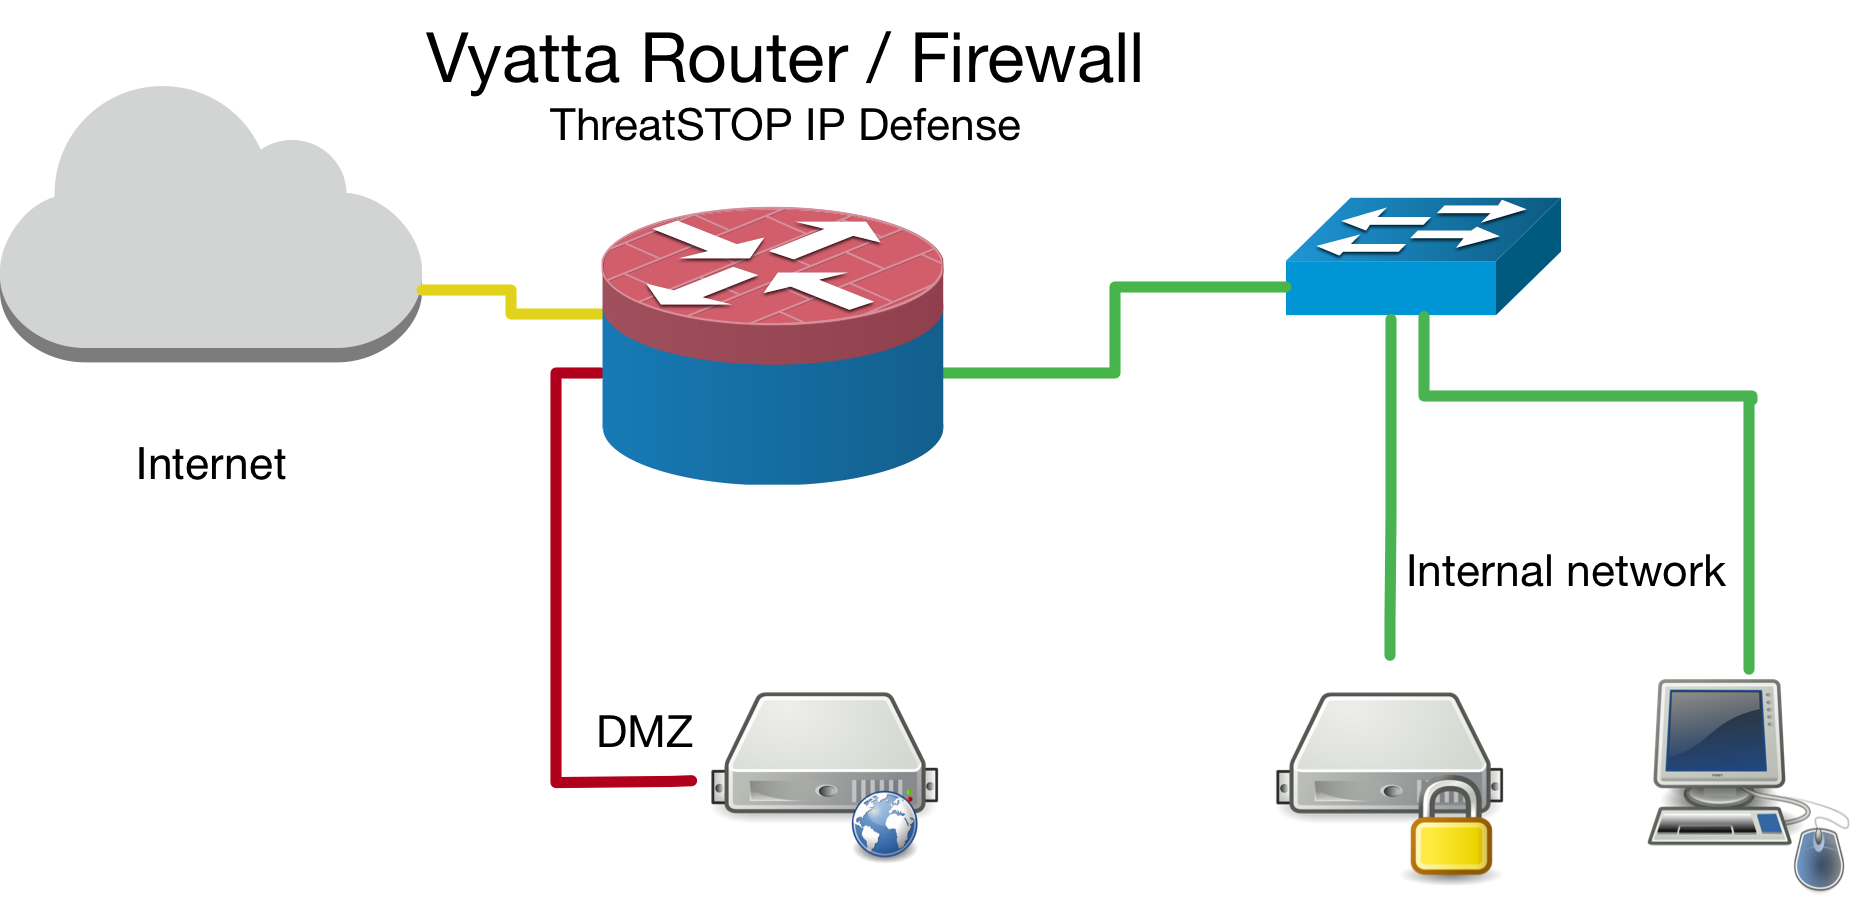
We currently install rule sets based on the current device configuration. We break them down to two major methods, bridge & router.
Placement of device in network topology
- In bridge mode, we only create inbound & local firewall rule sets as traffic always travels in to the virtual
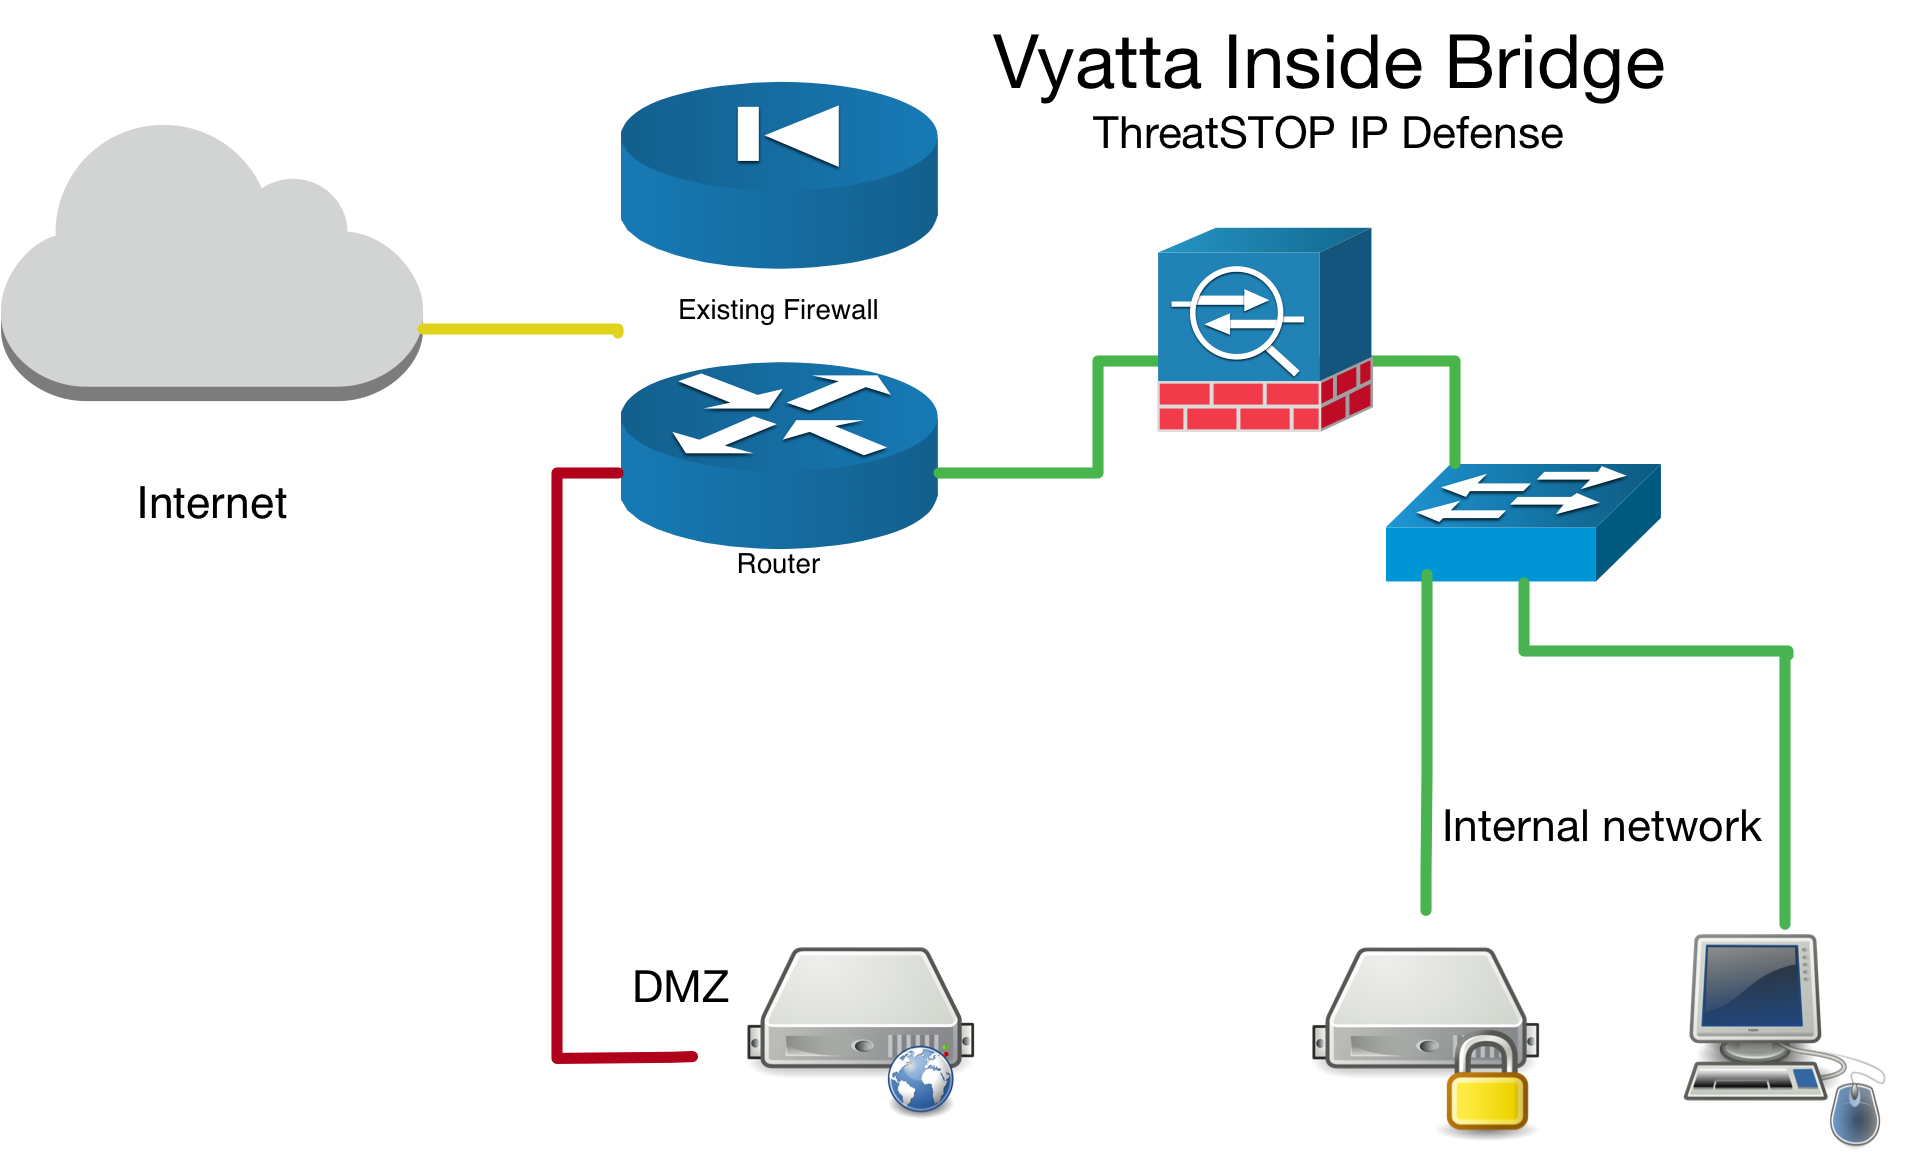
brXinterface. You can apply the firewall rule set outbound as well, but our testing shows this is unnecessary as the inbound rule will drop the traffic on the edge (more efficient). Please refer to your devices manual for proper firewall configuration as versions may have slightly different implementations of these rules. - It is preferable to install the ThreatSTOP device “inside” the firewall/router (see Vyatta Inside Bridge diagram below) if it is doing NAT to track down infected machines on your network. Otherwise the Vyatta will only see the single IP from the next hop instead of the true source node’s IP.
Router mode
If you have setup your device as a router, we will ask for an interface and corresponding interface-type. In router mode this means of the external / edge interface (it is more efficient to drop traffic on the outset).
Aggregate / Bonding / Etherchannel
If your configuration has multiple external interfaces you should still choose “router” as the mode of operation. Additionally, you may have to apply the firewall rule set manually to those additional interfaces after completing a successful installation. You can see the firewall setup commands by running show configuration commands |grep interfaces | grep firewall. Most customers with multiple external interfaces run bonding / aggregated interfaces, in which case the interfaces are collapsed under a single virtual interface e.g. bondX (x can be 0-23) and interface-type bonding. Please refer to your devices manual for proper configuration as different operating systems / versions may have slightly different implementations of aggregate interfaces.
PPPOE
Please refer to your devices official documentation to ensure PPPOE is supported before attempting to use this feature. If your device supports PPPOE you will need to specify the PPPOE instance / unit number at time of install. For web automation this means expanding the advanced settings section and typing in your PPPOE instance / unit number (0 in most cases unless you have several configurations setup).
To identify your PPPOE instance number check for in either show interfaces pppoe or show configuration commands. You will be looking for pppoe 0 which tells you your instance / unit # is ‘0’.
sample output of show configuration commands, here we also see the instance / unit number is ‘0’.
set interface ethernet eth0 description "DSL Modem"
set interface ethernet eth0 duplex auto
set interface ethernet eth0 smp_affinity auto
set interface ethernet eth0 speed auto
set interface ethernet eth0 pppoe 0 default-route auto
set interface ethernet eth0 pppoe 0 mtu 1492
set interface ethernet eth0 pppoe 0 name-server auto
set interface ethernet eth0 pppoe 0 user-id <PPPoE Username>
set interface ethernet eth0 pppoe 0 password <PPPoE Password>
Bridge mode
If you have setup your device as a network bridge. We will ask for an interface and corresponding interface-type. In bridge mode this means of the virtual bridge interface brX (X can be 0-999). To see what your system has configured run show interfaces.
Inside Bridge Example
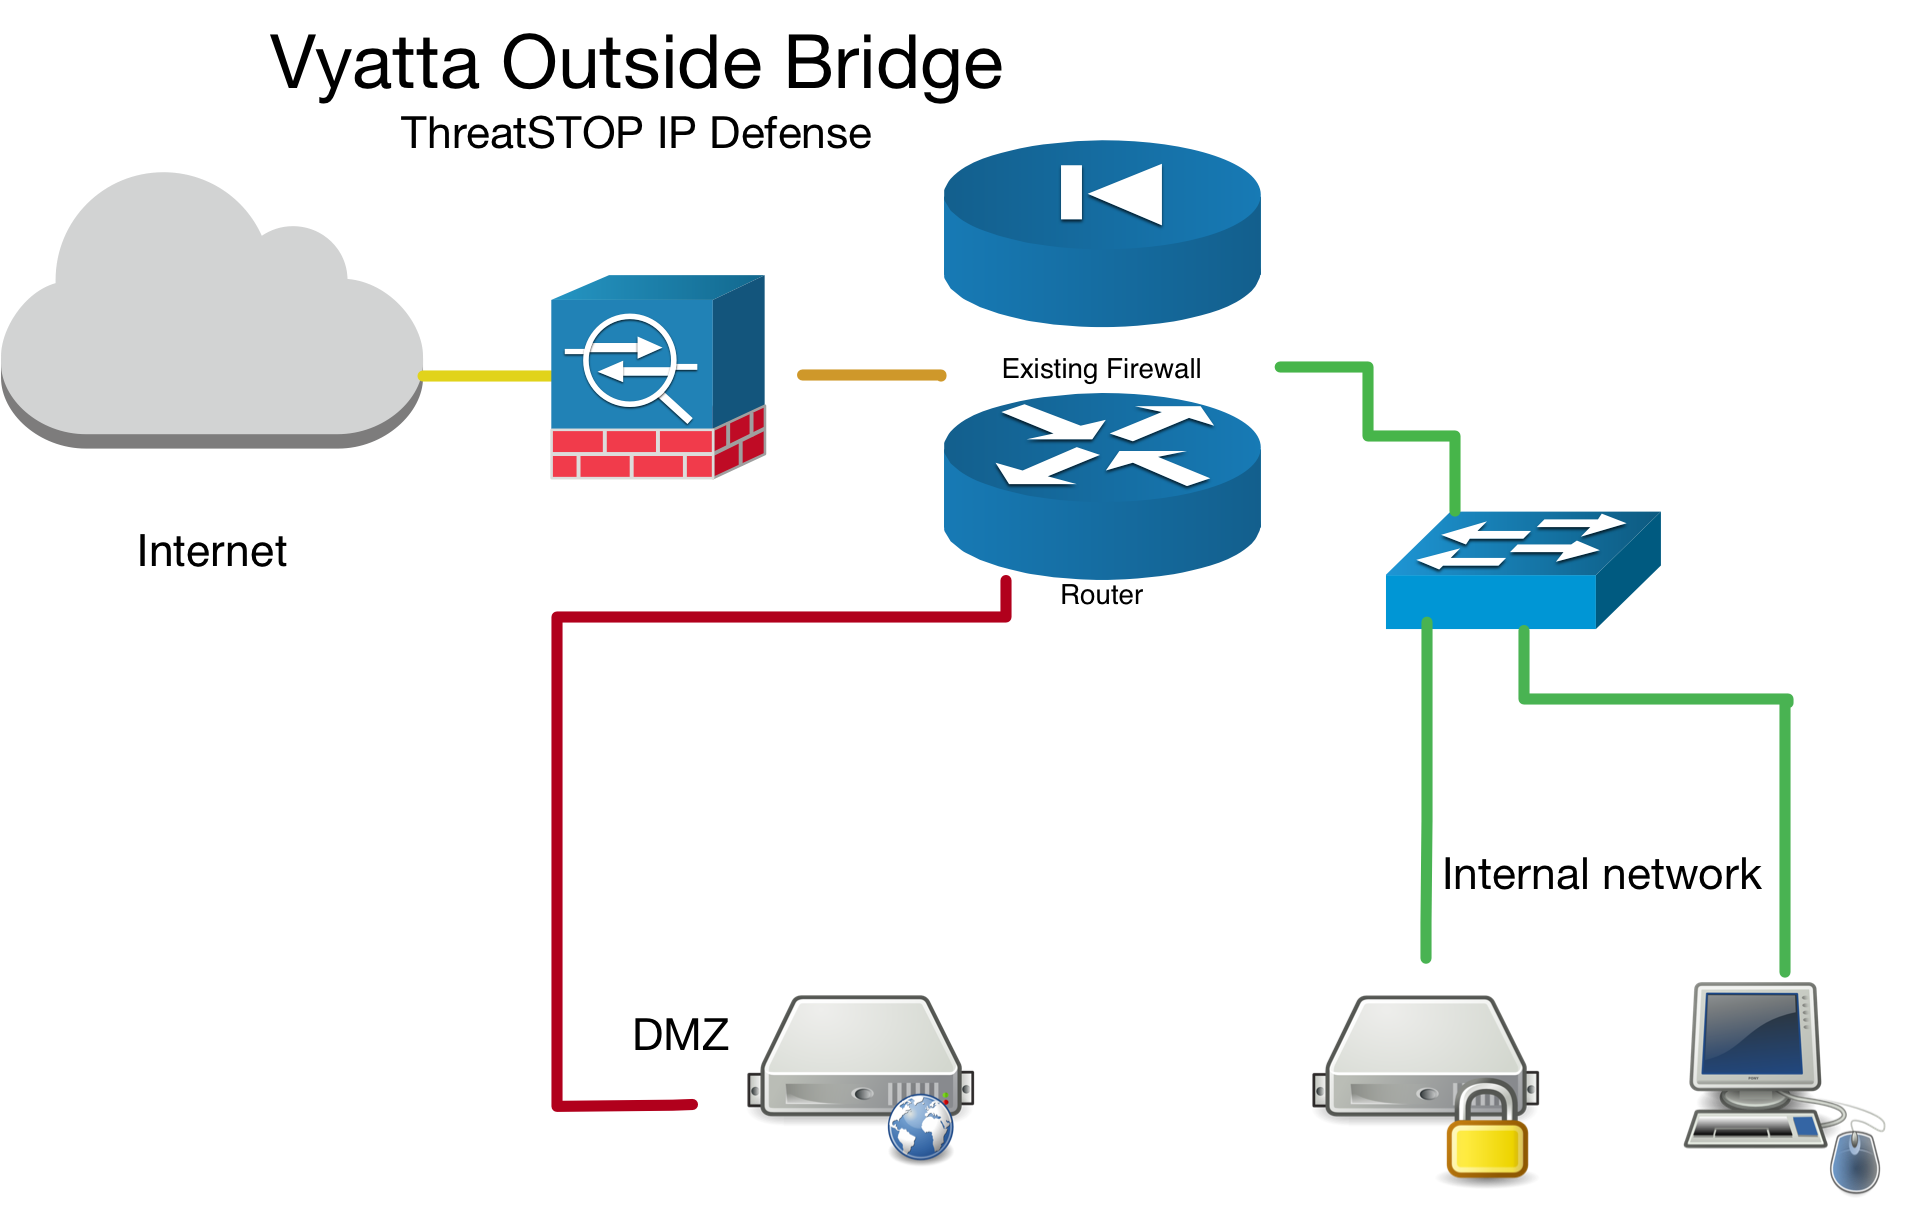
Outside Bridge Example
To ensure your bridge device only needs inbound & local firewall rule sets, test traffic to a known test address in both directions. The following logging demonstrates traffic being dropped by the firewall rule-set in both directions by the TS-inbound firewall rule set.
# to get a list of configured bad hosts
vyatta@brocade:~$ sudo ipset -L|tail
31.31.23.168
31.31.168.232
# check logs to confirm physical interface direction and that the ThreatSTOP rule matches in both directions
Jan 18 18:26:24 brocade kernel: [78090.058913] [TS-inbound-17-D] IN=br0 OUT=br0 PHYSIN=eth2 PHYSOUT=eth1 MAC=00:0c:29:80:75:5d:00:0c:29:bd:1c:96:08:00 SRC=10.0.13.232 DST=31.31.23.168 LEN=60 TOS=0x00 PREC=0x00 TTL=64 ID=9945 DF PROTO=TCP SPT=53329 DPT=80 WINDOW=29200 RES=0x00 SYN URGP=0
Jan 18 18:26:25 brocade kernel: [78090.753437] [TS-inbound-15-D] IN=br0 OUT=br0 PHYSIN=eth1 PHYSOUT=eth2 MAC=00:0c:29:bd:1c:96:f0:1c:2d:65:bf:cd:08:00 SRC=10.0.70.82 DST=31.31.168.232 LEN=60 TOS=0x00 PREC=0x00 TTL=63 ID=54502 DF PROTO=TCP SPT=55964 DPT=22 WINDOW=29200 RES=0x00 SYN URGP=0
Positioning firewall rules
There a many factors when it comes to positioning firewall rules in a rule set. While you are able to place our ThreatSTOP rules anywhere from 1-9997 we recommend you put them near the top to drop unwanted traffic at the edge of your network to not tie up additional resources. Our default of 10 has a few pre-allocated spots in case you need whitelist network groups or bypass our filter.
Multi-Device setup
When installing the ThreatSTOP service on multiple devices you will have to run through creation in the portal and on device setup on each device separately.
High Availability / HA / Cluster installs
Some Vyatta based devices do support various HA protocols such as VRRP, or Clustering. We recommend you setup each device as a separate device in the portal and go through the on device configuration just as a normal single device. This way they get unique TDID’s and we can later identify which device reported the IOC hit.
Installation Overview
This document will go over installation and integration of ThreatSTOP via web automation directly on to your Vyatta device. The basic steps are as follows:
- Add & Configure device in Admin Portal
- Add our public software repository & key to your device using native Vyatta management commands
- Install ThreatSTOP software via apt-get
- Configure ThreatSTOP service on device
- Test configuration / logging.
Prerequisites
- Device added & configured via the admin portal.
- Vyatta based device setup as either a router or a network bridge.
- SSH access to the Vyatta device.
- Current active ThreatSTOP account.
Minimum hardware requirements
If you are installing Vyatta / VyOS onto hardware or a virtual machine, we recommend the following specifications.
- Memory 1GB for testing / 512MB or less can be used unless you are planning on using lots of features.
- Hard Drive 4GB should more than cover both the OS and the device integration.
Enabling SSH access on Vyatta
The Vyatta device should have ssh enabled on it. This can be setup by entering the following in the console:
configure
set service ssh
commit
exit
ThreatSTOP Communication Overview
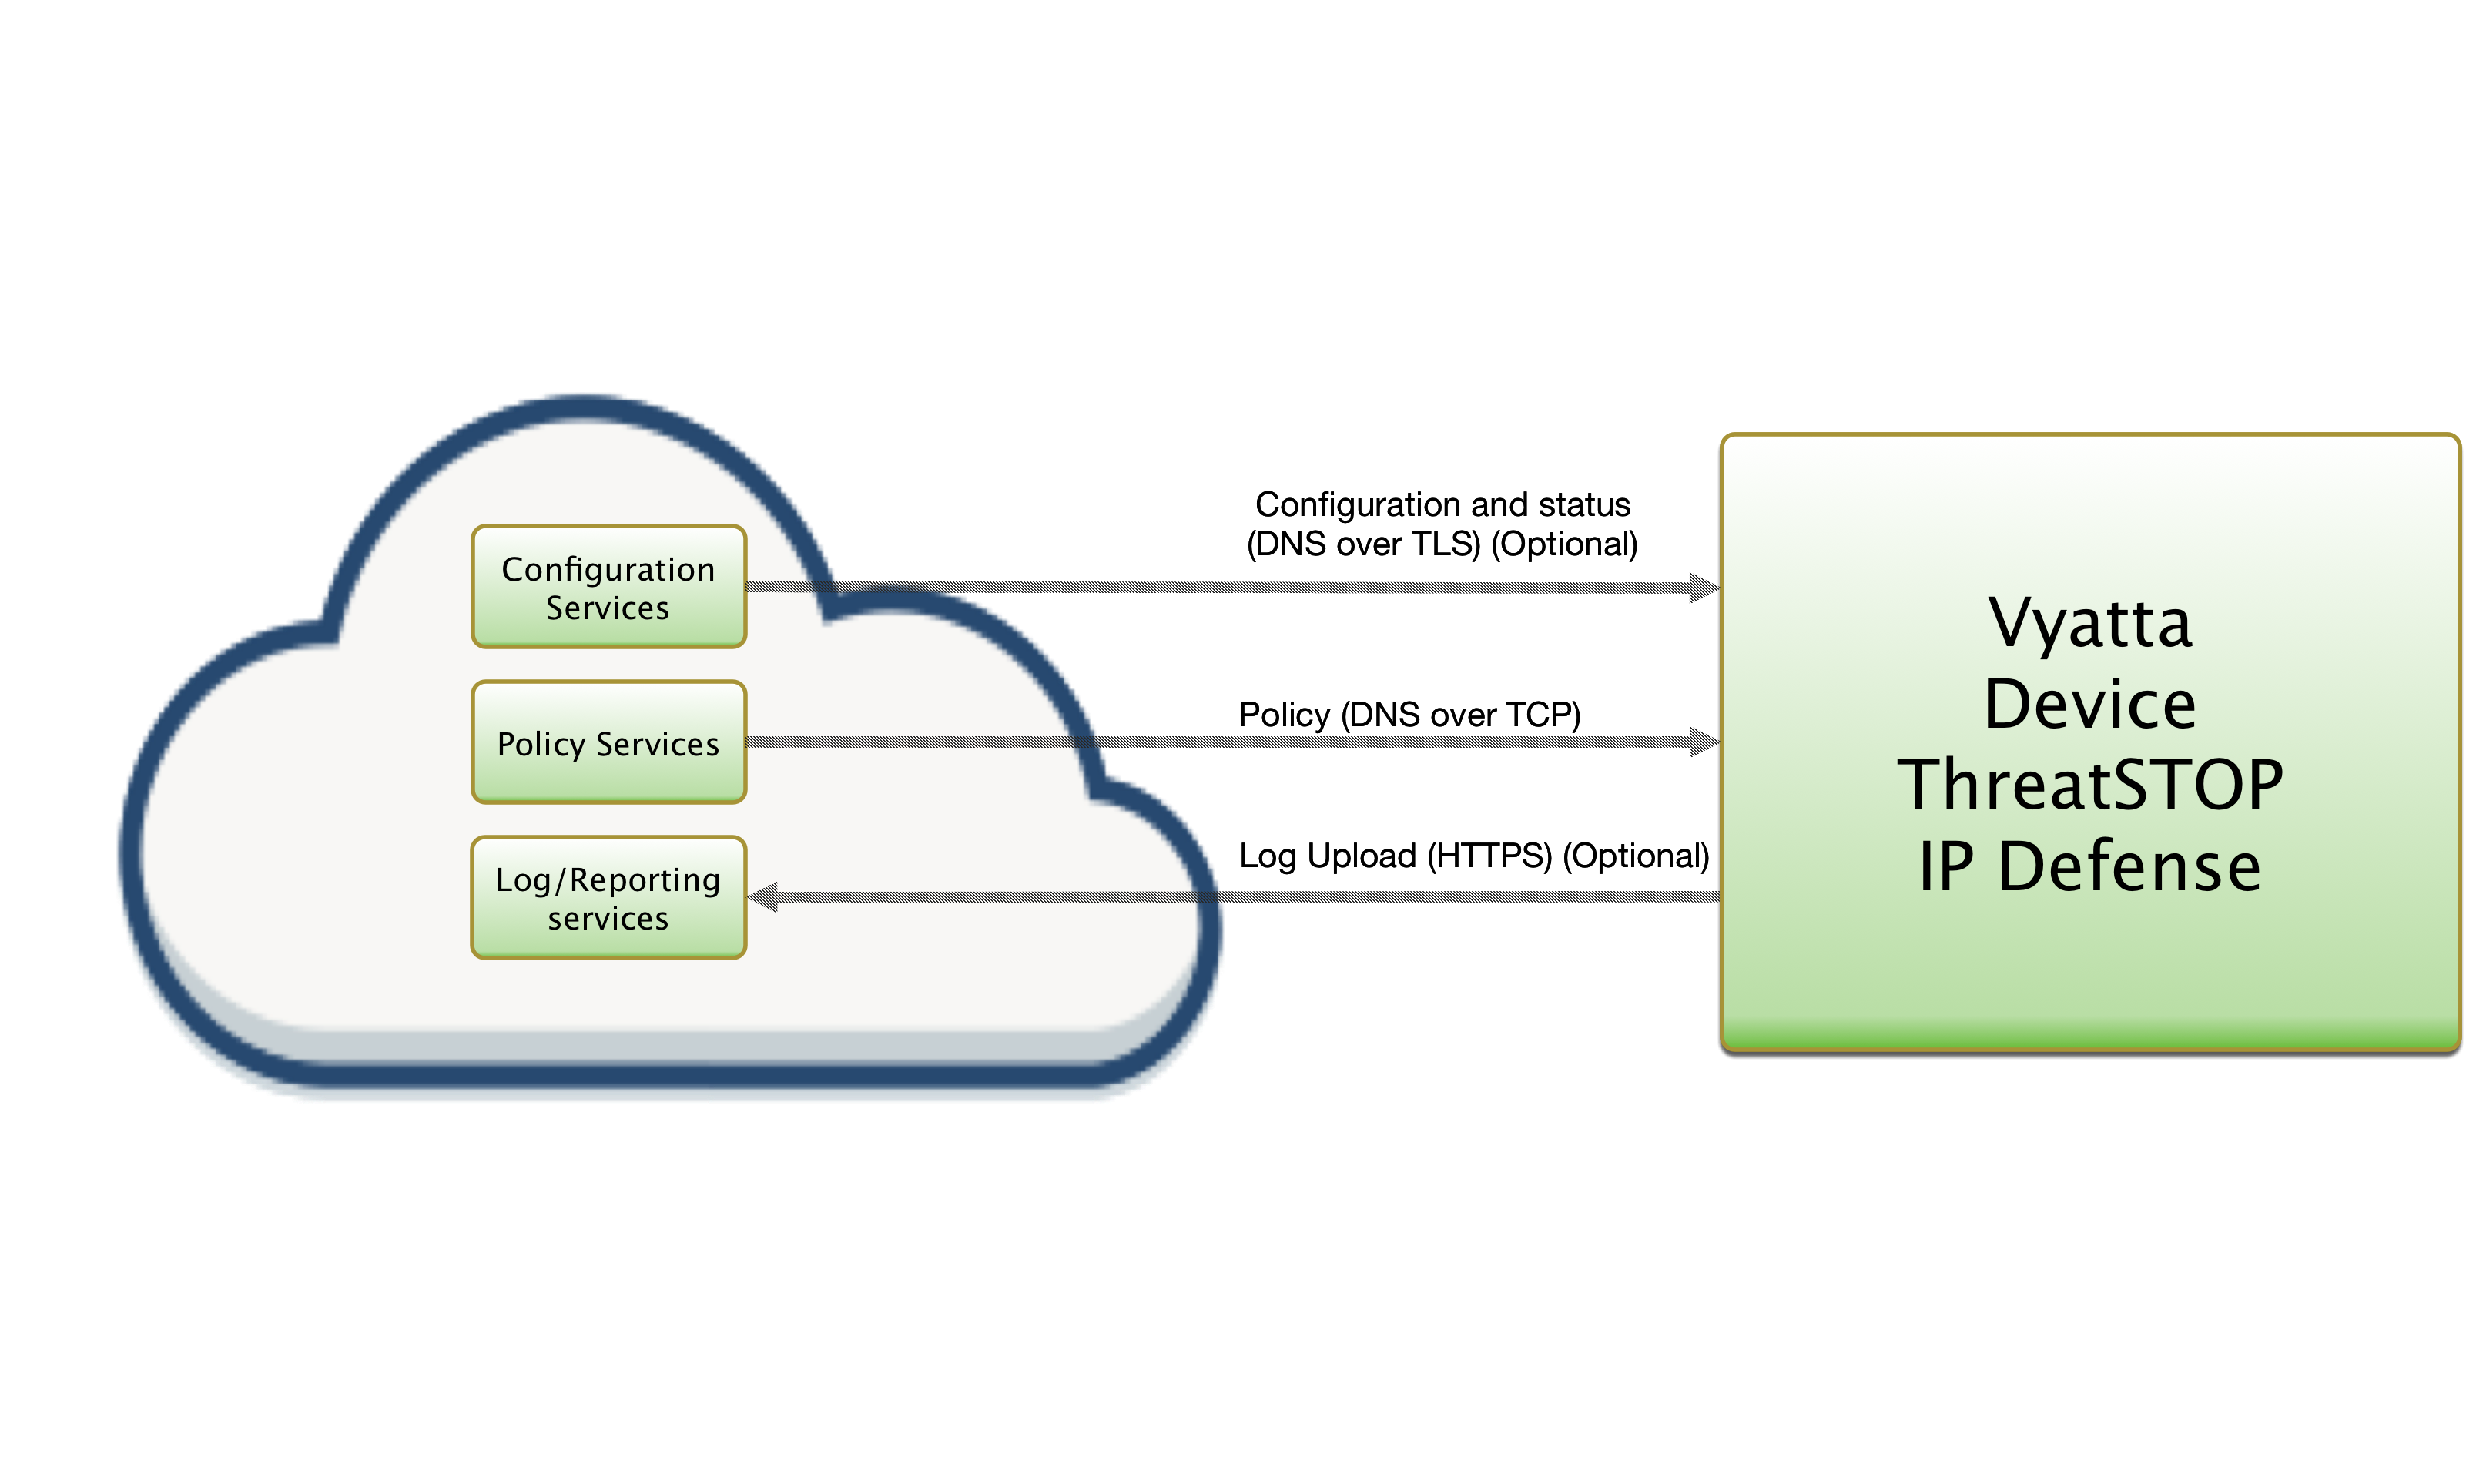
Connectivity
To retrieve its configuration and policy, and to upload log data, the device needs the following connectivity:
- DNS over TCP - Policy service
- Hostname: ts-dns.threatstop.com
- IP Range: 192.124.129.0/24
- Outbound TCP port 53 or 5353
- DNS over TLS - Configuration service
- Hostname: ts-ctp.threatstop.com
- IP Range: 204.68.97.208/28
- Outbound TCP port 5353
- HTTPS - Log service
- Hostname: logs.threatstop.com
- IP range: 204.68.99.208/28
- Outbound TCP port 443
- Direct Connection or via Proxy
- NTP
- Hostname: ntp.ubuntu.com
- Outbound UDP port 123
Setup
Step 1: Portal device configuration
During this step, you will create a device entry on the Admin Portal. You will select a device type and enter the configuration settings. A minimum configuration only requires a handful of settings but optional, advanced settings are also available.

To create a device entry:
- Log into the Admin Portal with your ThreatSTOP account
- Browse to the Device page and click Add Device
- Select the model:
- Type: IP Defense
- Manufacturer: Brocade
- Model: Vyatta
- Integration Type: On device with Web Automation
The Admin Portal will display a form to enter the device settings described below.
-
Nickname: this is a mnemonic name used to identify the device. It can be set to any string (A-Z, 0-9, - and _). If you create multiple device entries, each entry must have a unique nickname. The Nickname will be used to identify the device on the device and in the Reporting user interface.
-
Policy: select a pre-defined policy or a customized policy. It must be an IP Defense Policy.
-
IP Type: Access to the ThreatSTOP services is controlled in part using an ACL allowing the device IP to connect. If your device has a static public IP address (the most common case), select static. If your device has a dynamic public IP address, the ThreatSTOP services can lookup the IP address using a DNS fully-qualified name (FQDN).
-
Public IP address: In static mode, this is the public IP address of the device. It is possible to configure multiple device entries with the same public IP address.
-
Note: An optional field to store a note of your choice about the device - location, identifiers, model…
-
Inbound rule set name: This is the name we setup in the device for filtering inbound traffic. It’s recommended to keep this name short (less than 20 characters).
-
Outbound rule set name: This is the name we setup in the device for filtering outbound traffic. It’s recommended to keep this name short (less than 20 characters).
-
Local rule set name: This is the name we setup in the device for filtering local traffic. Local traffic is defined as traffic destined for the device itself. It’s recommended to keep this name short (less than 20 characters).
-
Rule set offset number: This rule offset number is used to position our block & allow rules in the policy. See Positioning firewall rules section above for more details.
-
Interface name: This is the interface you would like to apply the policy to. To see a list of available interfaces run
show interfaces. -
Interface type: This describes the type of interface defined above. To see a list of available interfaces types run
show interfaces ?. -
Prefix: This is a prefix we prepend to allow / block ipset groups. We recommend keeping this extremely short (no more than 5 characters).
-
Operation mode: This describes the current devices configuration, router or bridge.
-
Default actions for filewall rules: This setting allows you to choose whether we setup a default action for the firewall rule sets or not.
- Maximum Policy Size: Option limit on the number of entries in the policy. If the policy becomes larger than this setting, the device will truncate it down to the Maximum Policy Size.
Upon saving the form, a device entry will be created in ThreatSTOP’s cloud.
Advanced Settings
The device supports the following advanced settings, which cover uncommon ASA configurations or network environments.
-
DNS Port: The device uses TCP Port 53 (outbound connections) to retrieve policy data. If this port is blocked or filtered (for example, networks using a DNS Application Layer Gateway), use this setting to switch to TCP Port 5353.
-
Telemetry: This setting is used to control whether the device sends telemetry. It is recommded to keep the setting ‘enabled’ as we use this as a metric in early detection of possible issues.
-
PPPOE: This is the PPPOE instance / unit number if PPPOE is used. See PPPOE section above for more details.
Step 2. Setup software package repository
Adding the repository key
You’ll need to add the repository key as we sign the debian packages for safety and security.
| Download URL | SHA 256 |
|---|---|
| http://debian.threatstop.com/GPG-KEY.asc | afc9dbd5ca032613a7b0369e194b73f430a1e770a306144fb0a4015a2af8c25c |
# download the threatstop public repo key
wget http://debian.threatstop.com/GPG-KEY.asc
# compare the hash
shasum -a 256 GPG-KEY.asc
# add verified key to aptitude
sudo apt-key add GPG-KEY.asc
Adding the repository
Log into your device via SSH and start a configuration session by typing configure.
Type or copy & paste the following commands to add the ThreatSTOP software repository.
echo "deb http://debian.threatstop.com/ThreatSTOP/ squeeze main # squeeze #" > /tmp/threatstop.list;
sudo cp /tmp/threatstop.list /etc/apt/sources.list.d/;
sudo apt-get update;
Step 3. Install ThreatSTOP software via apt-get
The ThreatSTOP on device software will download via aptitude package manager. Depending on the OS release you may have other dependancies as well. We try to host all required dependancies such as dnsutils. However, if you are unable to install our service due to this, please contact support.
Install by running:
apt-get update
apt-get install ts-vyatta
After installation you will be able to configure the device via the tsadmin add command.
Step 4. Configure ThreatSTOP service on device
There are two main methods to configure the device.
- Manually using the CLI, using the
tsadmin addcommand will guide you through setting up the device via a series of prompts described here. - Web Automation, also using the
tsadmin add --type=autocommand along with some extra parameters will configure ThreatSTOP IP Defense service by fetching settings from our servers to complete integration on device.
This document covers 2.) the Web Automation method.
- SSH into the Vyatta device as the default admin account.
- To have the device pull down the configuration settings and install the service on your device, run the following command:
$ tsadmin add --type=auto --device_id=[Device ID] --auto_key=[Device Key]
Step 5. Test configuration / logging
To test your integration to ensure proper functionality we will attempt to ping a known test address added to most of our IP Defense policies (bad.threatstop.com / 64.87.3.133).
# 64.87.3.133 is ThreatSTOP's sample threat indicator bad.threatstop.com
ping 64.87.3.133
# after about 3-5 seconds quit the command by hitting CTRL+C
You should see traffic being properly filtered as shown below.
vyatta@brocade:~$ ping 64.87.3.133
PING 64.87.3.133 (64.87.3.133) 56(84) bytes of data.
^C
--- 64.87.3.133 ping statistics ---
3 packets transmitted, 0 received, 100% packet loss, time 2006ms
Now we will check to ensure we are logging that filtered traffic.
cat /var/log/user/threatstop.log
You should see some log lines reporting blocks similar to those shown below.
Jan 15 21:26:05 brocade kernel: [TS-local-13-D]IN=eth0 OUT= MAC=24:a4:3c:3d:20:e2:00:0c:XX:XX:XX SRC=64.87.3.133 DST=10.0.0.1 LEN=84 TOS=0x00 PREC=0x00 TTL=57 ID=56423 PROTO=ICMP TYPE=0 CODE=0 ID=5925 SEQ=1
Jan 15 21:26:06 brocade kernel: [TS-local-13-D]IN=eth0 OUT= MAC=24:a4:3c:3d:20:e2:00:0c:XX:XX:XX SRC=64.87.3.133 DST=10.0.0.1 LEN=84 TOS=0x00 PREC=0x00 TTL=57 ID=56606 PROTO=ICMP TYPE=0 CODE=0 ID=5925 SEQ=2
Jan 15 21:26:07 brocade kernel: [TS-local-13-D]IN=eth0 OUT= MAC=24:a4:3c:3d:20:e2:00:0c:XX:XX:XX SRC=64.87.3.133 DST=10.0.0.1 LEN=84 TOS=0x00 PREC=0x00 TTL=57 ID=56670 PROTO=ICMP TYPE=0 CODE=0 ID=5925 SEQ=3
If you see the logging lines and blocked traffic, Congratulations, you’ve successfully installed IP Defense! Your first logs should be visible on the portal in 15min to 2 hours depending on the cycle.
You can manually send logs by doing the following. Depending on your installed OS the output of the commands below may differ, but this should still serve as a general guide.
vyatta@brocade:~$ tsadmin logs
System Image upgrades / downgrades
Adding an image via the add system image command will prompt you to save your current configuration. However, it will not persist 3rd party software like our ThreatSTOP integration software.
After switching to another image, the installation steps will have to be completed again to re-install the integration. You may get a message during install that it detected a previous install. Follow the instructions to run the revert.sh script to remove remnants of the previous install before re-installing.
tsadmin sub commands
tsadmin has several sub commands to perform various functions outlined below. Sub commands are interpreted differently by the tsadmin & do not have a -- before them.
- add The add command install & configures the ThreatSTOP service on the device.
- remove This command removes the ThreatSTOP integration from the device.
- update This command forces the device to update its policy as well as check for new settings if web automation installation is used.
- show This command shows the configured settings.
- version This command shows the current version of ts-vyatta package.
- logs This command forces logs to be sent to ThreatSTOP as well as restarting logging facilities if needed.
Troubleshooting
To get a list of configured settings run:
tsadmin show
To get a full list of available command line parameters on the command line type:
tsadmin --help
If your installation is failing to retrieve settings, make sure that your devices clock is in sync. The install attempts to do this for you, but you can manually sync date/time with 1.pool.ntp.org ntp server by running the setup_auto_config_environment.sh script:
vyatta@brocade:/opt/threatstop$ /opt/threatstop/setup_auto_config_environment.sh
Setting up auto-configuration environment
Syncing time with 1.pool.ntp.org
[ ok ] Stopping NTP server: ntpd.
17 Jan 00:07:13 ntpdate[11098]: adjust time server 173.0.156.209 offset -0.000540 sec
[ ok ] Starting NTP server: ntpd.
vyatta@brocade:/opt/threatstop$
If you are not able to download the policy, run the following:
vyatta@brocade:~$ wget -qO - http://logs.threatstop.com/cgi-bin/validip.pl
Your IP address: 1.2.3.4
Address is in the list of authorized hosts
This will tell you if your public IP has been allowed to access the policy.
Version Changelog
ts-vyatta (3.04-01) urgency=low
 - removing stunnel dependency, ubiquiti 2.x compat

Released Tue, 07 Sep 2021 15:02:00 -0700
ts-vyatta (3.03-01) urgency=low
 - telemetry and lockfile bugfix
 - posix perms bugfix
 - telemetry bugfix

Released Mon, 03 May 2021 09:58:00 -0700
ts-vyatta (3.02-01) urgency=low
 - local permission, telemetry bugfix

Released Wed, 07 Oct 2021 16:48:00 -0700
ts-vyatta (3.01-04) urgency=low
 - Increase block size
 - VyOS 1.2.1+ compat
3.00   Wed Jan 16 13:12:01 PDT 2019
  - GS-1829 : Major refactor
  - .deb installation method
  - Added Web Automation installation capability
2.43   Tue Mar 28 08:25:39 PDT 2017
  - GS-1368 : make ipset size configurable
2.41   Mon Jun 27 17:11:49 MDT 2016
  - GS-794 : remove dependency upon Net::DNS
2.20   Tue Jul  7 11:23:32 PDT 2015
  - Introduction of changelog
  - Fixed logfile truncation bug (GS-214)
  - Cleaned up/standardized prompts
  - Reduced default DEBUG_LEVEL value
  - Improved input validation
  - Added log upload audit (tsuploads.log)
Uninstalling ThreatSTOP
Remove ThreatSTOP service integration from device
To uninstall the service you can run:
tsadmin remove
# which calls the script /opt/threatstop/revert.sh
The same script get triggered when removing the software via aptitude by running sudo apt-get remove ts-vyatta. In both cases your config file will be left behind in /opt/threatstop/threatstop.conf incase you wish to re-install.
Restore previous configuration
We create a backup of the configuration prior to installing our service located /opt/threatstop/threatstop_preinstall_vytatta_config_backup. To restore the configuration you run the following commands:
configure
load /opt/threatstop/threatstop_preinstall_vytatta_config_backup
save
exit