Integration type
This version of the integration between ThreatSTOP and Palo Alto NG Firewalls provides the ability of integrating ThreatSTOP IP policies directly on your device via HTTPS External Dynamic Lists. Logging can be sent via the Palo Alto built-in log export feature. This integration doesn’t require deploying our Virtual Machine Appliance ThreatSTOP Centralized Management (TSCM).
This integration provides two features:
- Load a ThreatSTOP policy in a PAN NGFW device.
- Optionally, upload logs of blocked traffic to report on hits against the ThreatSTOP policy.
Integration types
ThreatSTOP Policies can be integrated with PAN-OS devices with different methods:
- HTTP integration: no appliance VM is required (this document)
- TSCM CLI integration: requires an appliance VM, configured via CLI (documentation)
- TSCM with Web Automation integration: requires an appliance VM, configured via the ThreatSTOP Portal (documentation)
The HTTP integration and TSCM integrations (CLI and Web Automation) differs as follows:
| Feature | Integration type | Description |
| Policy updates | HTTP integration | Directly from the ThreatSTOP cloud over HTTPs |
| TSCM integration | Relayed by TSCM | |
| Policy size | HTTP integration | Up to 8 External Dynamic Lists |
| TSCM integration | Up to 29 External Dynamic Lists | |
| Device configuration | HTTP integration | Manually |
| TSCM integration | Automated by TSCM using PAN-OS API | |
| Log Upload | HTTP integration | Daily |
| TSCM integration | Hourly |
Notes
- If this is a new device and new policy, please wait about 30 minutes before attempting to apply the policy to the PAN device.
- This page only describes creating simple ThreatSTOP policies one for inbound and one for outbound traffic, but more complex configurations are possible.
Prerequisites
Recommended Versions
ThreatSTOP has been tested with major releases of PAN-OS up to 11.0.
- 6.1 is the minimum supported version
- The integration has currently been validated up to PAN-OS 11.0.
Connectivity
The PAN-OS NGFW must be able to connect to:
- https://panpolicies.threatstop.com (TCP port 443) for policy retrieval.
- ftp://logs.threatstop.com (TCP port 21 and 20) to upload logs (optional).
Setup
ThreatSTOP Admin Portal
Settings
During this step, you will create a device entry on the ThreatSTOP Admin Portal. You will select the PAN device type and enter your configuration settings.
To create a PAN-OS (HTTP) device entry:
- Log into the Admin Portal with your ThreatSTOP account
- Browse to the Device page and click Add Device
- Select the Check Point model:
- Type: IP Defense
- Manufacturer: Palo Alto Networks
- Model: PA Series
- Integration Type: Configuration
-
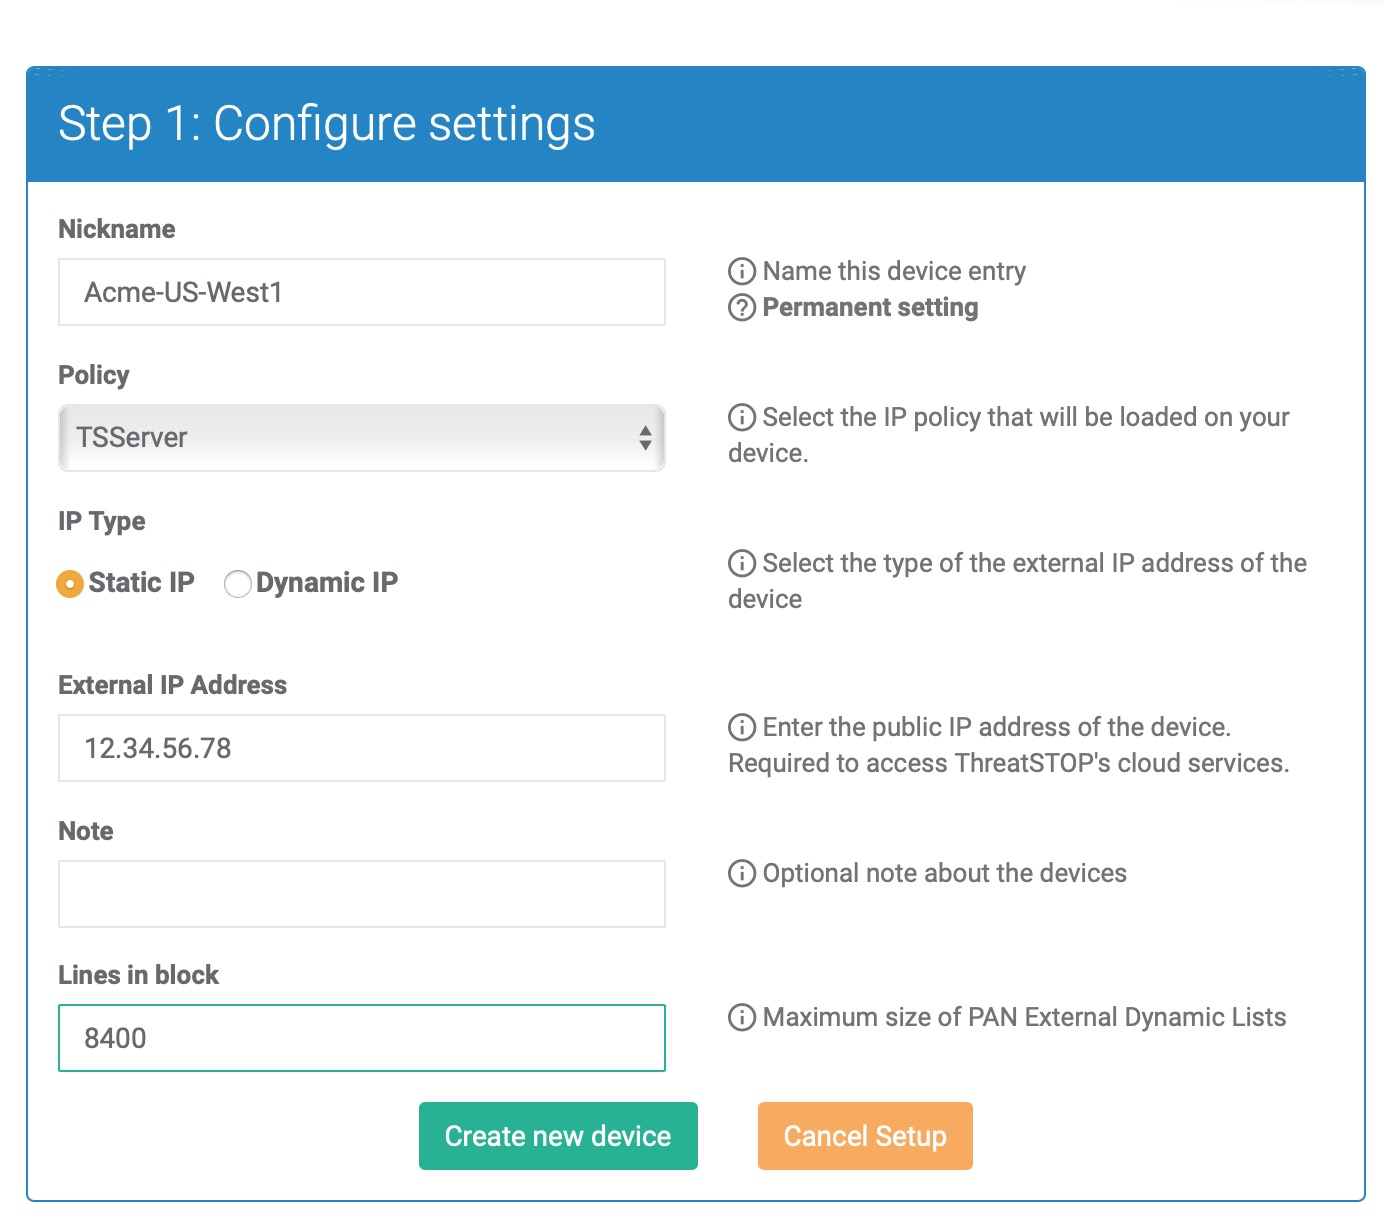
Nickname: this is a mnemonic name used to identify the device. It can be set to any string (A-Z, 0-9, - and _). If you create multiple device entries, each entry must have a unique nickname. The Nickname will be used to identify the device in the admin device portal and in the Reporting user interface.
-
Policy: select a pre-defined policy or a customized policy. It must be an IP Defense Policy.
-
IP Type: Access to the ThreatSTOP services is controlled in part using an ACL allowing the device IP to connect. If your device has a static public IP address (the most common case), select static. If your device has a dynamic public IP address, the ThreatSTOP services can lookup the IP address using a DNS fully-qualified name (FQDN).
-
External IP address: In static mode, this is the public IP address of the device. It is possible to configure multiple device entries with the same public IP address.
-
Domain name: (only if IP Type is Dynamic IP) In Dynamic mode, this is a DNS FQDN which must be kept up-to-date as an A record pointing to the device’s dynamic IP.
-
Note: An optional field to store a note of your choice about the device - location, identifiers, model…
-
Lines in block: The number of addresses in each Dynamic Block Lists / External Block Lists, derived from the capacity of your device. See Maximum Policy Size below.
Maximum Policy Size
Policies are loaded in PAN-OS External Dynamic lists (previously named External Blocks List, or EBL). The ThreatSTOP system splits the policy into 9 blocks: one for the Allow List and 8 for the Block List. If the Block list doesn’t fill all 8 blocks, the remain blocks will be available over HTTP but contain 169.254.0.0/16 (on some version of PAN-OS, the files used by external lists cannot be empty).
The maximum size of an EBL differs based on the PAN model number. PAN also recommends leaving a buffer of 300 unused entries. See https://knowledgebase.paloaltonetworks.com/KCSArticleDetail?id=kA10g000000ClVYCA0 (PAN login required).
- The limits are documented by Palo Alto Networks here. If you are using a newer PAN-OS (v9+), you can also find the capacity for your device in the Web UI: Select ObjectsExternal Dynamic Lists and click List Capacities.

- On PAN-OS v6,7,8 the following PAN-OS CLI command will show the maximum size for dynamic block lists:
show system state | match cfg.general.max-address
Calculation
We recommend setting the Lines in Block value as follows:
- Start with the maximum capacity for your device
- Substract the capacity (number of entries) needed by other EBLs, if you use any.
- Substract 300 for the buffer recommended by PAN.
- Divide the remaining capacity by 8 (number of ThreatSTOP block list files)
Examples
If your device supports 50,000 addresses and you are not using EBLs other than a ThreatSTOP policy, the calculation would be:
- 50,000 (total capacity) - 300 (buffer) is 49,700
- Size of each EBL (Lines in block) is 49,700 / 8 (# of lists) = 6212
If your device supports 100,000 addresses and you are not using 20,000 of them for lists other than a ThreatSTOP policy, the calculation would be:
- 100,000 (total capacity) - 300 (buffer) is 99,700
- After accounting for the other lists: 99,700 - 20,000 is 77,700 remaining capacity
- Size of each EBL (Lines in block) is 77,700 / 8 (# of lists) = 9712
Device configuration
If you are using a single VDOM, you can opt to use the command and copy and paste the commands below to create the EDL entries. If you are using multiple VDOMs the syntax slighting differs, please refer to the PAN-OS documentation.
#The following in CLI commands show how to create EDL(s)
configure


set external-list ThreatSTOP-Allow type ip description "ThreatSTOP Allow" url Your-allowlist-URL recurring hourly

set external-list ThreatSTOP-Block1 type ip description "ThreatSTOP Block" url Your-blocklist-URL-1 recurring hourly
set external-list ThreatSTOP-Block2 type ip description "ThreatSTOP Block" url Your-blocklist-URL-2 recurring hourly
set external-list ThreatSTOP-Block3 type ip description "ThreatSTOP Block" url Your-blocklist-URL-3 recurring hourly
set external-list ThreatSTOP-Block4 type ip description "ThreatSTOP Block" url Your-blocklist-URL-4 recurring hourly
set external-list ThreatSTOP-Block5 type ip description "ThreatSTOP Block" url Your-blocklist-URL-5 recurring hourly
set external-list ThreatSTOP-Block6 type ip description "ThreatSTOP Block" url Your-blocklist-URL-6 recurring hourly
set external-list ThreatSTOP-Block7 type ip description "ThreatSTOP Block" url Your-blocklist-URL-7 recurring hourly
set external-list ThreatSTOP-Block8 type ip description "ThreatSTOP Block" url Your-blocklist-URL-8 recurring hourly

#Please fetch actual URLs from the Portal > Devices > [Info] or view this document via the [Docs] button on the devices listing in the admin portal.
commit
-
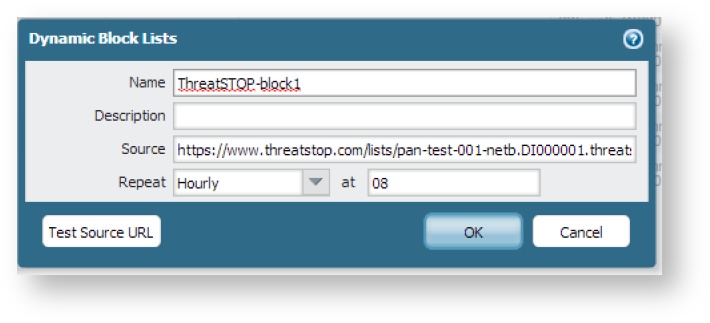
Connect to the PAN device using a web browser, login and select Objects and then Dynamic Block Lists and then add a new list.
-
Block List External Dynamic List creation
-
If you set ‘lines in block’, you should call the list ThreatSTOP-block1 and add the source URL as follows:
https://panpolicies.threatstop.com/<TDID>-<block list name>.<ThreatSTOP account ID>.threatstop.local(where TDID is the unique 8 digit device identifier, for tdid_abcd1234 it would be abcd1234) -
If you did not set ‘lines in block’, you should call the list ThreatSTOP-block1 and add the source URL as follows:
https://panpolicies.threatstop.com/<block list name>.<ThreatSTOP account ID>.threatstop.local -
Click on the Test Source URL button and confirm that the device is able to download the blocklists without errors. If successful set the Repeat pull down to Hourly and set the time to, 08, then press OK.
-
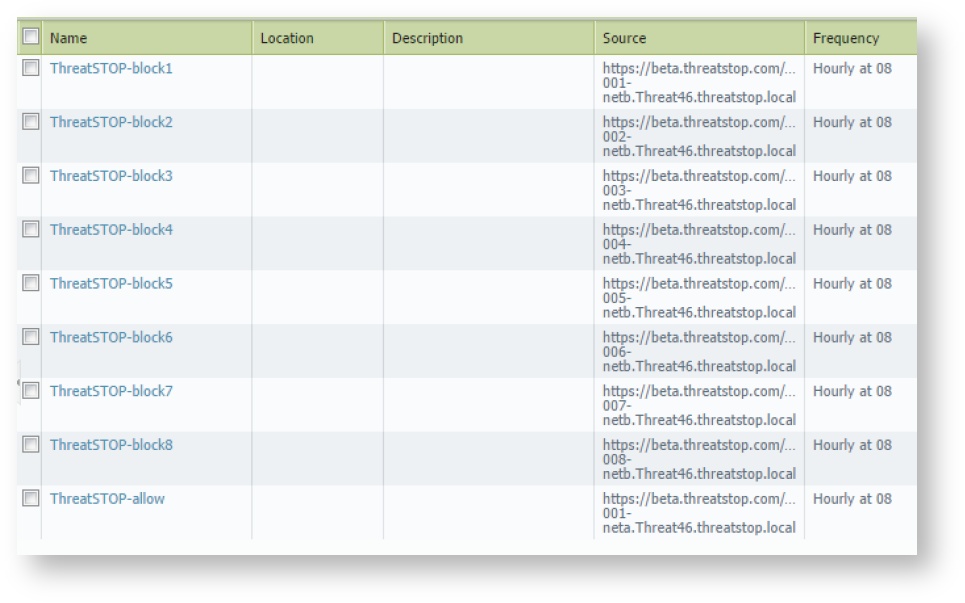
Now repeat the process to create additional block lists replacing the 001 in the URL with 002 to 008 and similarly replacing the ThreatSTOP-block1 with ThreatSTOP-block2 to ThreatSTOP-block8 in the name.
-
Once you’ve finished with the steps above we’ll create the Allow dynamic list(s) using the same method.
-
Allow List External Dynamic List creation
-
If you set ‘lines in block’, you should call the list ThreatSTOP-allow and add the source URL as follows:
https://panpolicies.threatstop.com/<TDID>-<allow list name>.<ThreatSTOP account ID>.threatstop.local(where TDID is the unique 8 digit device identifier, for tdid_abcd1234 it would be abcd1234). Again test to ensure success and if successful set the repeat to Hourly, the time to 08, and click OK. When this is done you should have objects similar to those in the image to the right. -
If you did not set ‘lines in block’, you should call the list ThreatSTOP-allow and add the source URL as follows:
https://panpolicies.threatstop.com/<allow list name>.<ThreatSTOP account ID>.threatstop.local. Again test to ensure success and if successful set the repeat to Hourly, the time to 08, and click OK. When this is done you should have objects similar to those in the image to the right.
-
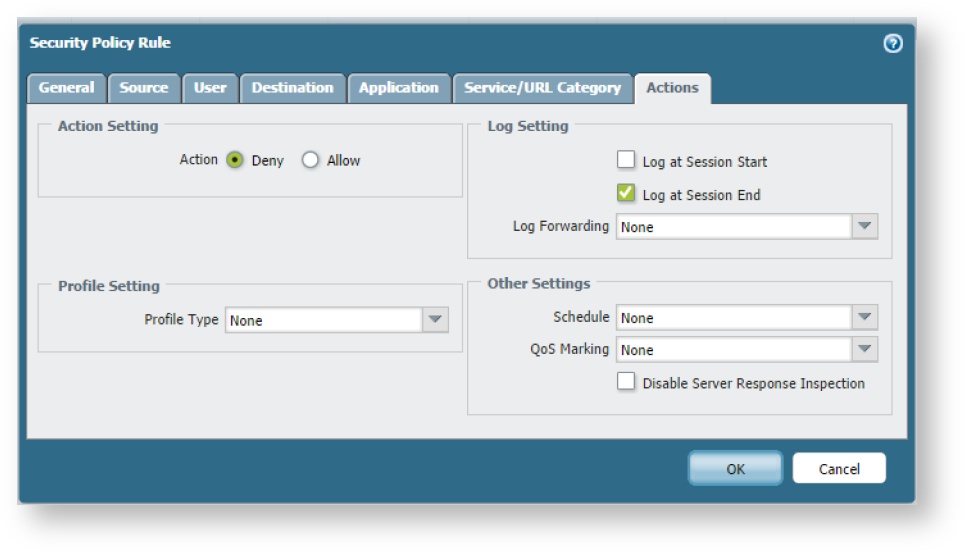
- Now go to Policies, and add an inbound policy that permits traffic originating with the ThreatSTOP-allow list (source) in the untrust zone to anything in the trust zone.
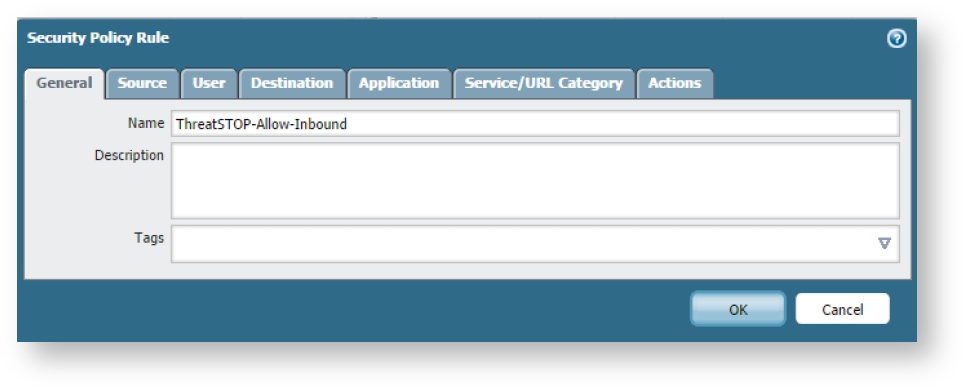
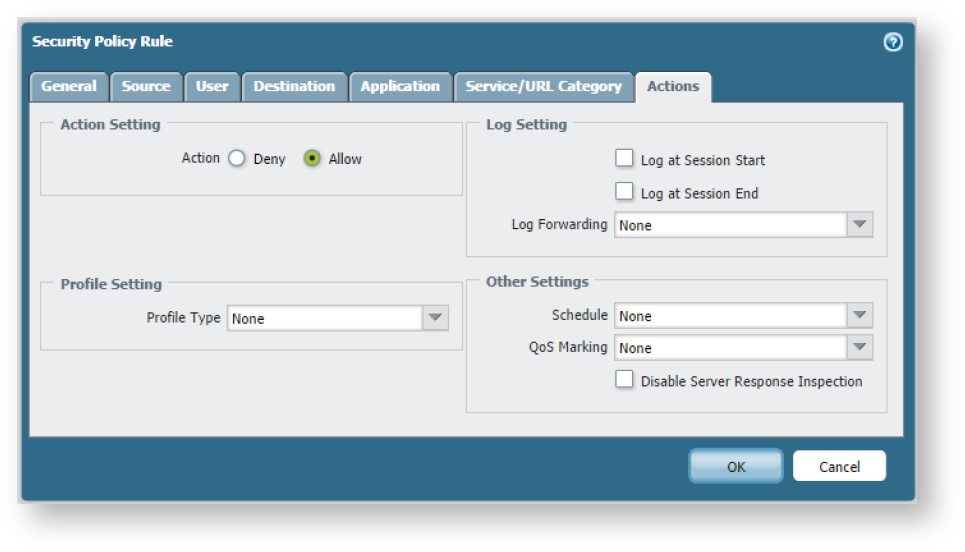


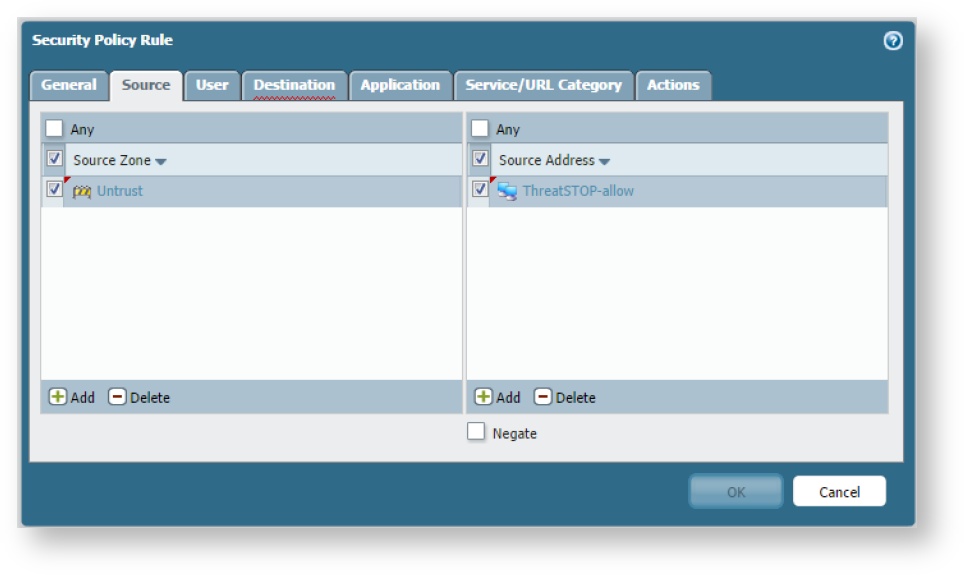
- Then below this add a second inbound policy that denies traffic originating with the eight ThreatSTOP-block objects (source) in the untrust zone to anything in the trust zone.

- Now repeat these steps for outbound traffic (i.e. destinations are the ThreatSTOP lists in the untrust zone and the source is all traffic from the trust zone). When this is done you should have policies similar to those in the image below.
Caution: Your list names need to include the hyphens. Omitting these will prevent your logs from being processed. The format to follow is:
inbound_allow="ThreatSTOP-Allow-Inbound"
inbound_block="ThreatSTOP-Block-Inbound"
outbound_allow="ThreatSTOP-Allow-Outbound"
outbound_block="ThreatSTOP-Block-Outbound"
Once these policies have been committed, your network is protected with ThreatSTOP.
Log Upload
- The Scheduled Log Export uploads logs to ThreatSTOP once a day with the logged connections the previous 24-hours. This is an optional feature if you would like to use the ThreatSTOP reporting features.
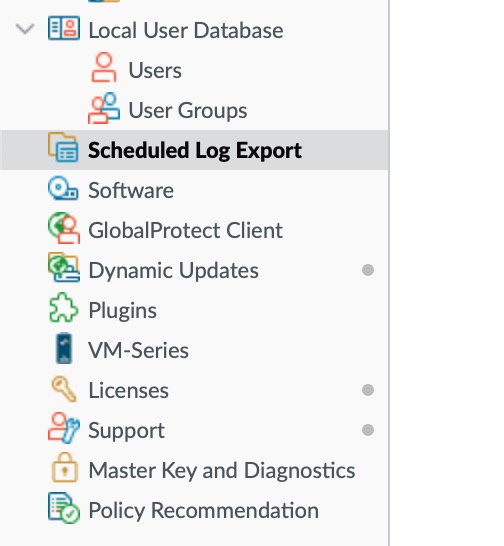
Connect to the PAN device using a web browser, login and select Device and then “Scheduled Log Export” and then add a new entry.
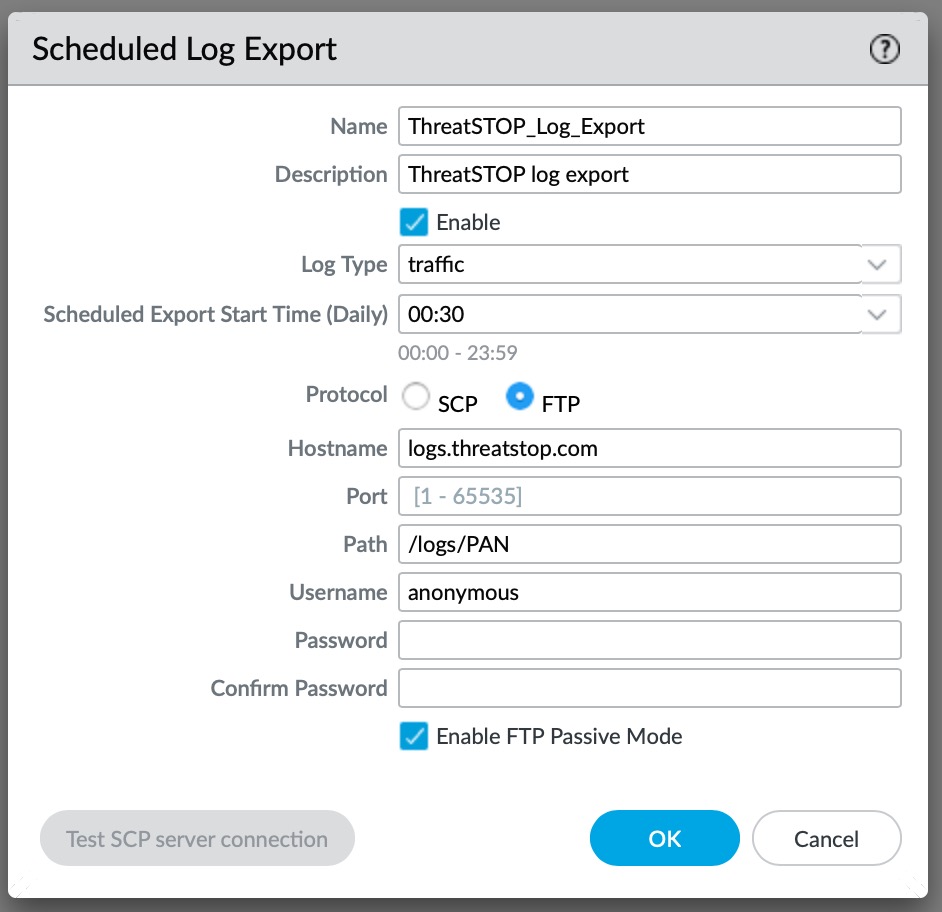
In the dialog, set the following:
- Log Type to “traffic”
- Protocol to FTP
- Hostname as “logs.threatstop.com”
- Path to “/logs/PAN”
- Username to “anonymous”
- No password is required and FTP Passive Mode should be enabled unless blocked in your network.
Logs must be sent using the IP address registered in the device configuration.
Certificate Profiles
Starting with PAN-OS v10.0+, PAN-OS can enforce a Certificate Profile when retrieving External Dynamic Lists. This is an optional setting and the device will correctly retrieve ThreatSTOP Policies without adding a profile, but this will generate a warning when commiting the configuration.
The warning indicates “External Dynamic List ThreatSTOPList-001 is configured with no certificate profile. Please select a certificate profile for performing server certificate validation.”.

Adding a Certificate profile is done in three steps:
- uploading our certificate chain to the PAN device
- creating a Certificate Profile
- assigning the Certificate Profile to the External Dynamic Lists.
Our certificate is renewed once a year, the GoDaddy Root CA and Intermediate certificates update on their own schedule. As new Root CA or Intermediate certificates expire or are updated we’ll make them available on the site and attempt to notify customers who have opted in for notifications. The device can continue to retrieve the policy even if you have not yet uploaded the new certificate (configurable setting). You can email our support team to request a notification when the certificate is renewed.
Certificate upload
The certificate chain for panpolicies.threatstop.com is available for download here as a ZIP archive. It contains certificate files: GoDaddy G2 Intermediate & Root CA Certificates.
To upload the certificates:
- Login into the Admin GUI
- Open the Device tab
- Open the Certificate Management > Certificates menu
- Click on Import
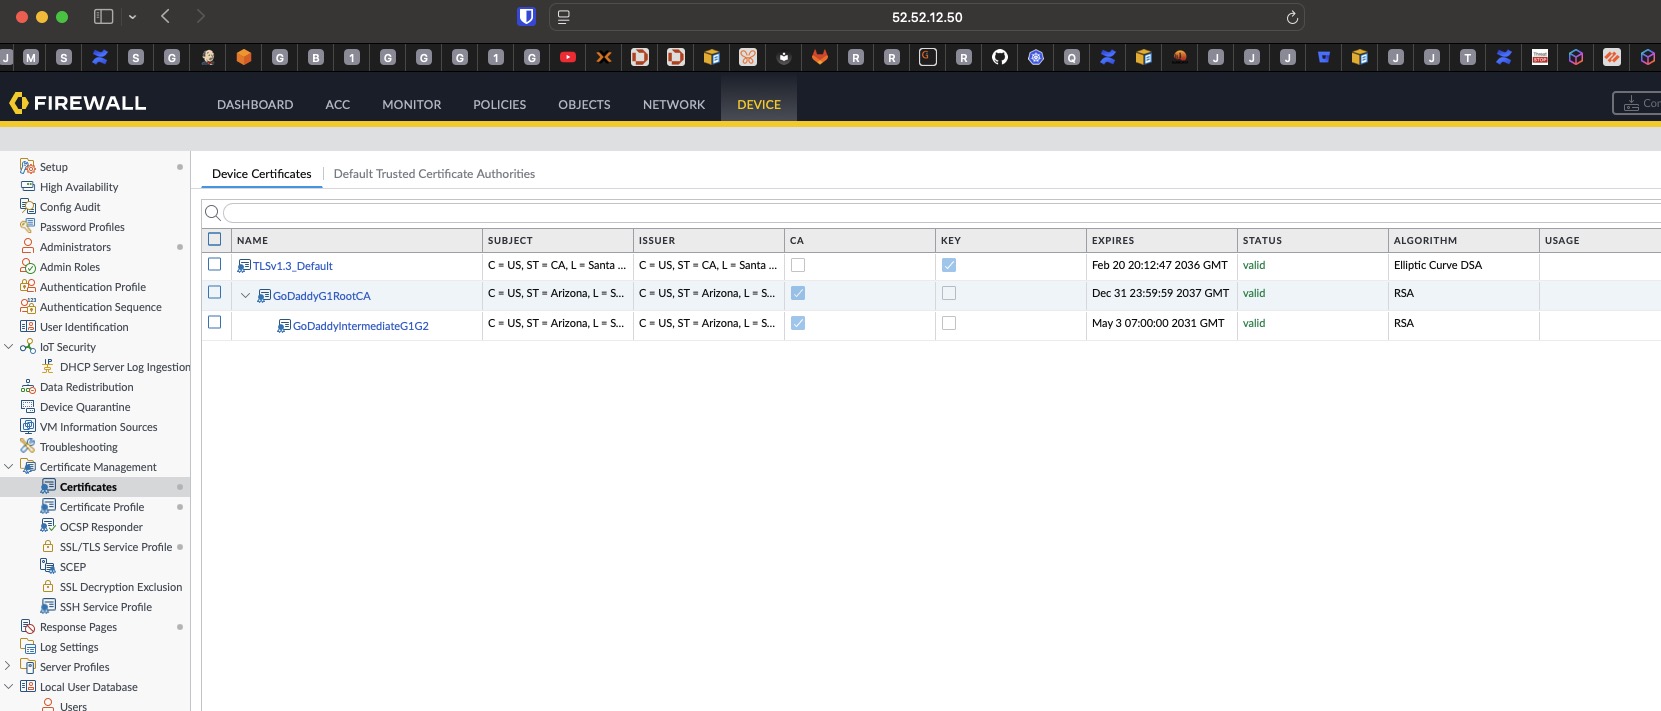
- Import the
Go Daddy Root Certificate Authority - G2.pemcertificate- Certificate Type: Local
- Certificate Name: GoDaddy RootCA G2 (or a name of your choice)
- File Format: Base64 Encoded Certificate (PEM)
- Leave the other settings blank
- Click Ok
-
Repeat this step for the GoDaddy Intermediate Certificate (
gd_bundle-g2.crt, proposed name: GoDaddy G2 Intermediate Cert) - Upon completion, the certificates should be displayed as shown in this screenshot (named as you configured):
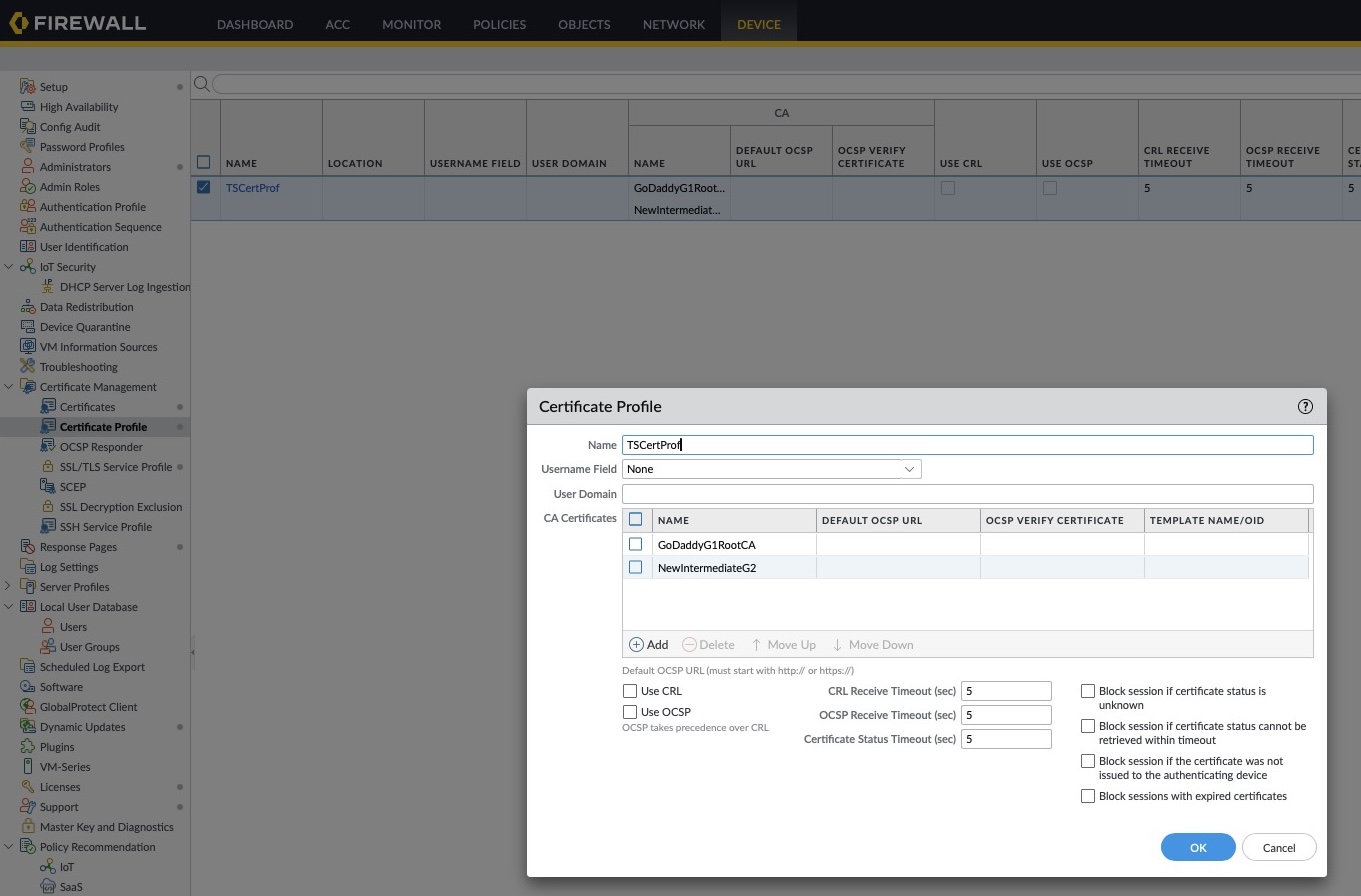
Certificate Profile creation
- Click on the Certificate Management > Certificate Profile menu
- Click Add to create a new profile
- In the popup, enter a name of your choosing, e.g. ThreatSTOPCertProfile (spaces are not allowed)
- Click Add and select the GoDaddy Intermediate Certificate. Leave the other settings empty.
- Click Add second time and select the GoDaddy G2 Root Certificate. Leave the other settings empty.
- It is not needed to add the PANPolicies certificate to the profile.
- Optionally, you can enable Block Sessions with expired certificates but policy updates will stop until you update it after our renewal.
- Leave the other settings empty.
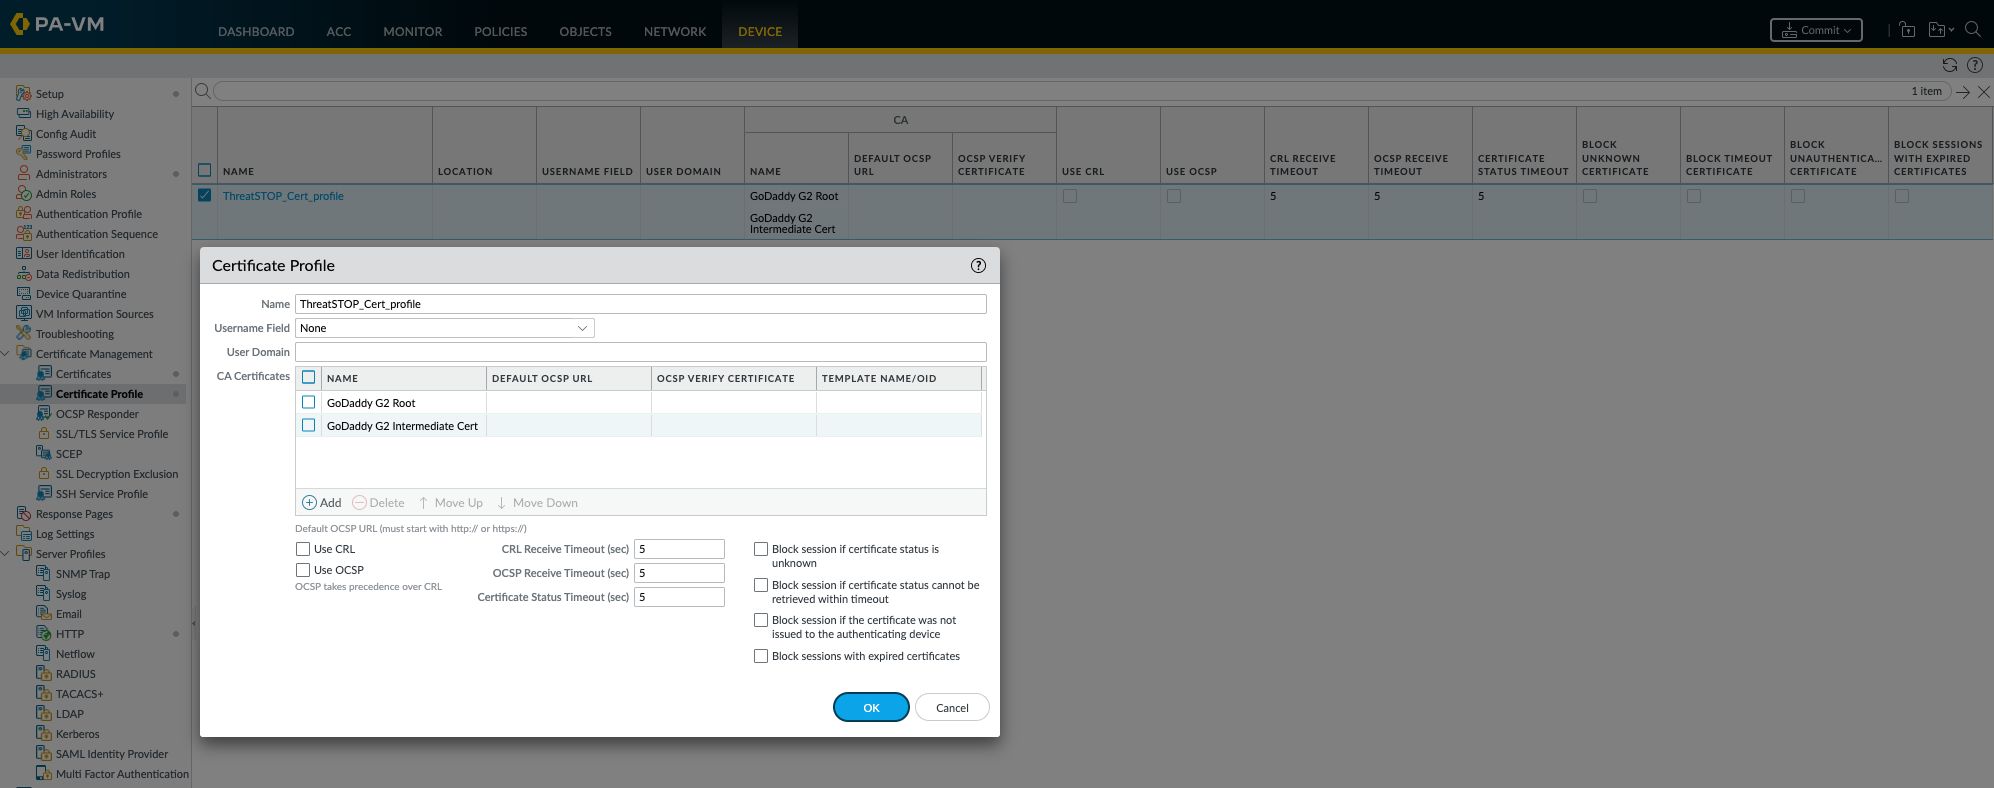
Assigning the profile
- If you have already created the External Dynamic List object, you can edit them to add the Certificate Profile.
- Otherwise, select the profile while creating them.
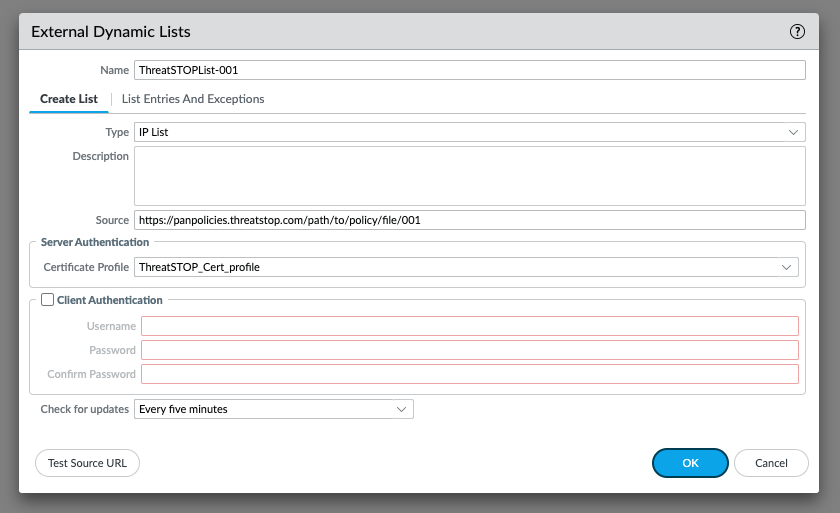
- To select the profile, open the drop-down under Server Authentication and locate the name of the profile created above.
- Note that Test Source URL doesn’t perform the validation of the Certificate Profile and will succeed even if it is not correctly configured.
- Repeat for each ThreatSTOP External Dynamic List.
Note that one some versions of PAN-OS, enabling a profile will highlight the authentication settings. These settings are not required.
Once the certificate profile has been created and assigned, commit the configuration. The Certificate Warning should disappear.
Troubleshooting
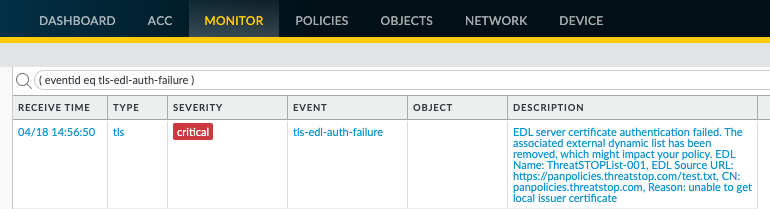
To check that the profile is correctly working:
- Look for Server Authentication failure errors in the log
- Open the Monitor tab
- Click on Logs > System
- Set a filter for ( eventid eq tls-edl-auth-failure )
- By default, the device updates the policy every 5 minutes. You can trigger a refresh using the shell console:
- Login into the console with an admin account
- Run request system external-list refresh type ip name List_name
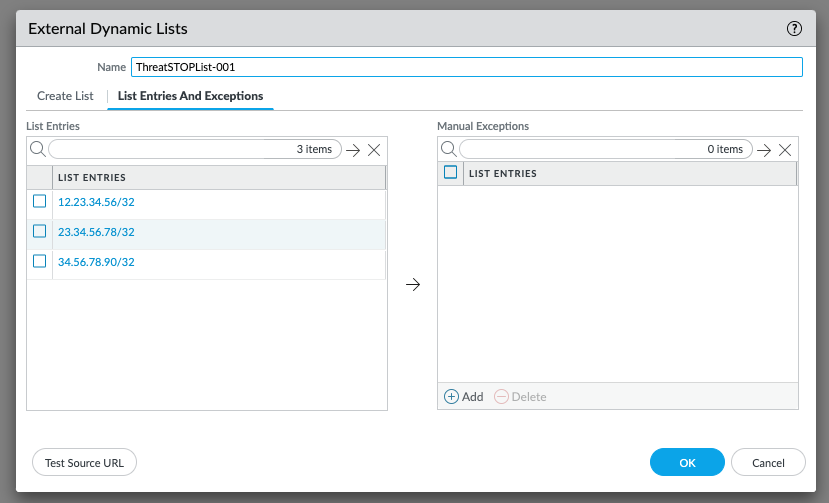
- To confirm that the list is loaded correctly after adding the certificate, you can view its contents. Click on the Dynamic List object in the Objects > External Dynamic List menu and select List Entries and Exceptions. If the list is not downloaded correctly, it will contain a pseudo entries for 0.0.0.0/0. The correct configuration would list entries, e.g.
Uninstalling
- To remove the integration between ThreatSTOP and your PAN-OS device
- Remove all instances of the External Dynamic List entries from your PAN-OS configuration.
- If you are using the log upload feature, the lkog forwarding profile and syslog server profiles will also need to be manually deleted.
-
If you delete the device entry in the ThreatSTOP Portal, the block lists files will be removed from ThreatSTOP servers which will cause an error fetching policies on the device. We recommend removing the corresponding ThreatSTOP External Dynamic Lists from the device before removing the device in the ThreatSTOP Admin Portal.
- If you create a Certificate Profile for the ThreatSTOP domain, you can delete it and then delete the corresponding imported certificates.