Overview
Device entries are used to identify the device that are integrated with ThreatSTOP and implementing a filtering policy. Device entries control the configuration (most importantly, the policy that will be loaded on the device).
They are organized by:
- The type of device:
- IP Devices, which implement an IP policy to filter traffic from/to malicious IP addresses (firewalls, routers, bridges…). IP policies are built with IP targets only and can filter inbound and outbound IP traffic.
- DNS servers, which implement a DNS Policy to block DNS lookups of records associated with malicious domains. DNS Policies can use both domain and IP targets and filter outbound DNS lookup.
- Roaming devices, Roaming devices, which represent one or more Windows or MacOS laptops where DNS policies are implemented on the device itself.
- The manufacturer and model of the device, which should match the actual device you are using or intend to use, to ensure proper functionality.
- The integration type:
- Web Automation integration: the entire configuration of the device agent is performed from the ThreatSTOP Admin Portal. This is the easiest, fastest and most recommended way of integrating ThreatSTOP.
- CLI integration: the configuration of the ThreatSTOP agent is performed on the device itself.
- Configuration-based integration: no agent is needed and the integration is done by configuring existing features of the device.
The highlest level of protection can be achieved using the ThreatSTOP platform with all three device types: IP Devices filter inbound and outbound IP traffic; DNS devices filter outbound DNS lookups to filter traffic even as malicious actors are changing IP addresses of their infrastructure by updating their DNS records; Roaming devices protect laptops that leave your ThreatSTOP-secured corporate networks.
High-Availability clusters
If you are applying a ThreatSTOP policy to multiple devices in the same HA cluster, you might need to create multiple device entries, depending on your firewall. Some firewalls will replicate configuration (including ACLs) automatically; in that case, the ThreatSTOP integration only needs to run on the primary device. Other firewalls only provide a failover mechanism between devices, but the configuration needs to be updated separately on each device in the cluster. In this case, you will need to setup a device entry for each. Please review the device-specific documentation, which includes a section on HA configurations when applicable.
Roaming devices
Unlike firewalls and DNS devices, which are managed individually to protect networks, Roaming device entries manage multiple end user devices, typically Windows or MacOS laptop users. You can use the product key of a Roaming device entry for as many devices as allowed by your license. The end user devices will share the same configuration and policy (with the exception of local whitelisting, if enabled) but the reports will differentiate each device (see the Roaming settings section below). Multiple Roaming device entries can be used to implement differentiated filtering policies and agent permissions for various user/endpoint groups.
Device identification
The device entry also links the actual device to the ThreatSTOP services, controlling access to the policy and log services.
- The external IP address must be correct for the device to access the services. The device entry must be updated if the device is assigned a new IP address. This does not apply to Roaming devices.
- The device identifies itself by providing its device ID (ThreatSTOP Device ID, tdid) and TSIG Key (DNS and Roaming) when accessing the services. These identifiers are generated by the ThreatSTOP systems when adding a device.
Device list
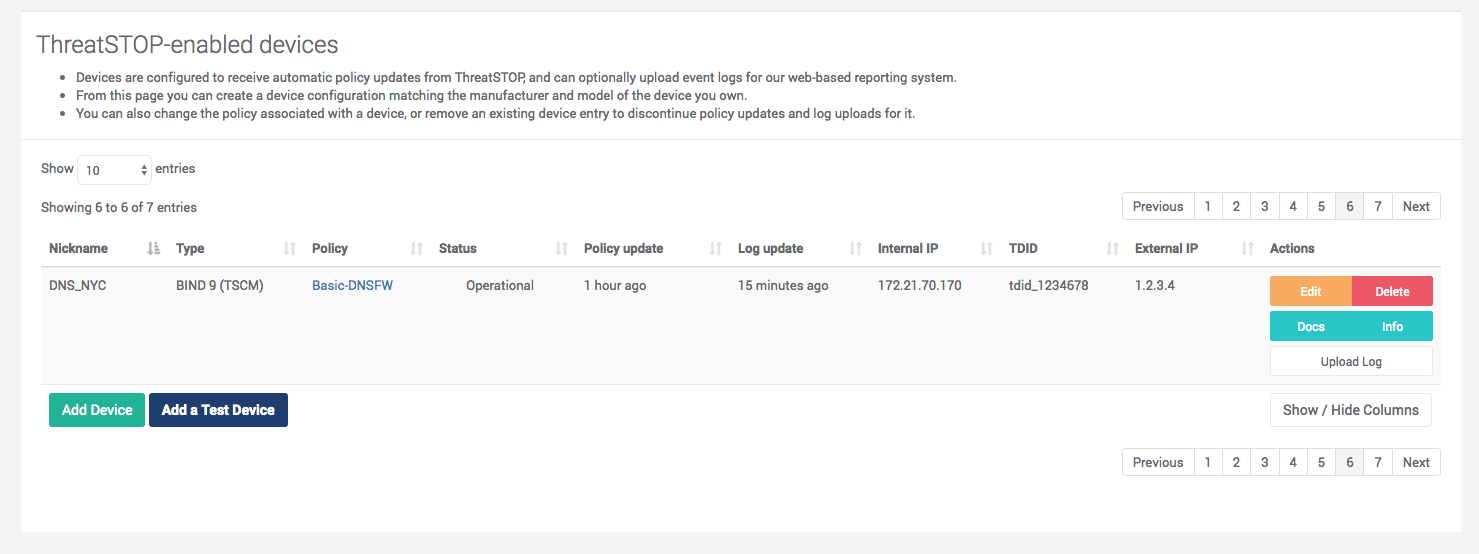
The list of devices currently configured in your account is accessed using the Devices link in the menu. The list can show the following information:
- The device type.
- The device model.
- Policy assigned to the device.
- Device status. One of the following statuses will be shown. Please note that it can take up to one hour for the status to be updated after the device performs an operation. If an error condition persists, please check the connectivity of the device or contact ThreatSTOP support.
- Operational: the device is retrieving policies and uploading logs (if enabled) as expected.
- Error configuring device: the device failed to update settings.
- Never Updated: the device has not retrieved a policy yet.
- Error downloading policy: the device retrieved hasn’t retrieve an updated policy in more than 24 hours.
- Error Upload logs: the device encountered an error while attempting to upload a log file.
- The internal IP address of the device (used to identify the device in your LAN) - when applicable.
- The external IP address of the device (its IP address as seen from the ThreatSTOP Servers) - when applicable.
- Policy update: the time the device last connected to the ThreatSTOP cloud systems to retrieve a policy update.
- Log update: the time the device last uploaded a log.
- The ThreatSTOP Device ID (TDID), used to identify the device.
The following actions can be performed:
- Edit: changing the settings of the device.
- Delete: deleting the device entry. A deleted device will not be able to retrieve policies, upload logs or be visible in reports. This operation can’t be reverted and reconnecting the device requires creating a new entry and reconfiguring the agent.
- Docs: a link to the documentation for the specific device integration. When read through the portal, the documentation will include the settings of your device (e.g. Device IDs, Keys, Policy details).
- Info: displays the settings required for configuring the device agent.
- Log upload: upload logs manually if your device is not configured to upload logs automatically. This feature is not available for Roaming devices.
Adding a device
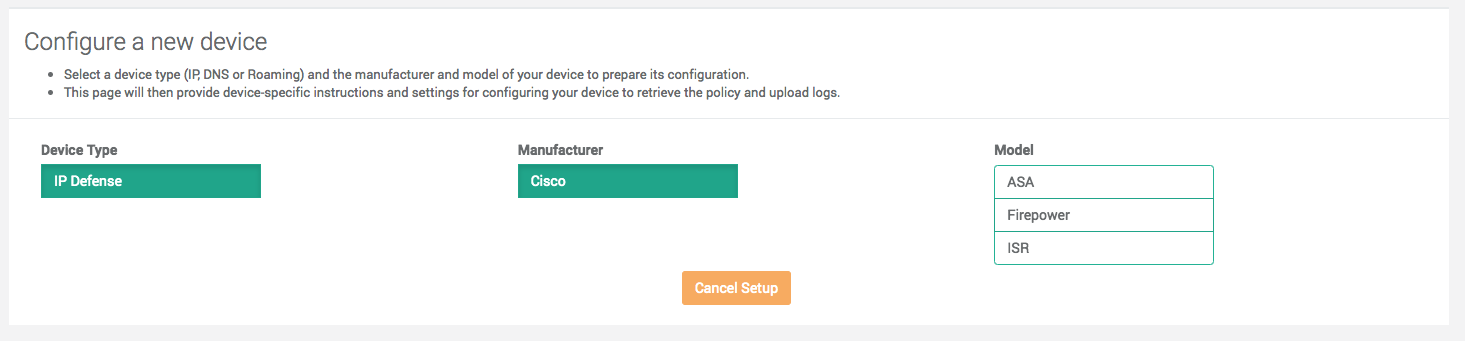
You can add a device by clicking on the Add Device button on the Device list page (See Subscription requirements below for limitation). The Portal will present a list of selections:
- The device type you want to add.
- A list of manufacturers and models. If you don’t find your device, please contact our support team.
Integration types
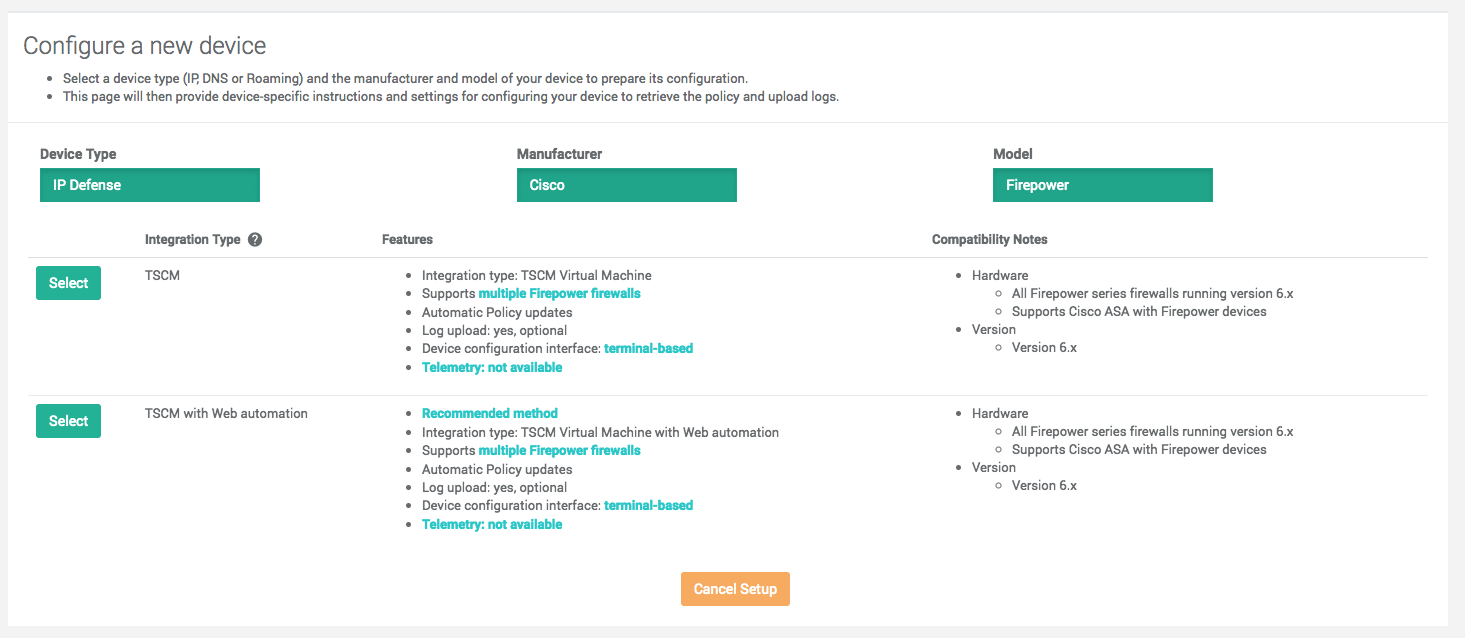
After selecting the model, the Portal will show the integrations available for the device, including a description of the supported revisions and available features. Depending on the architecture and capabilities of the device, multiple integration types are possible:
- TSCM (ThreatSTOP Centralized Manager): A virtual machine image to be deployed in your network that will retrieve policy updates and apply them to the device, typically over SSH or HTTP APIs. A single image can manage many devices, of the same or different types.
- On device: A small agent that will be installed on the device itself to perform the policy updates. An agent needs to be installed on each device.
- Configuration: device that provides features to retrieve policies remotely and doesn’t require an agent.
- Desktop: Application (Roaming devices).
- Live ISO: bootable image (used for test devices).
The TSCM and On device integrations are typically available in two variants:
- Web Automation: in this mode, the entire integration configuration is maintained via the Admin Portal. Configuration changes are reflected automatically on the ThreatSTOP-integrated device. This also supports advanced telemetry features, where the device will report run-time problems such as problems downloading or applying a policy. This is the recommended option when available: it provides the most automated and complete integration possible.
- CLI: the portal is only used to manage the ID and policy assignment. The integration settings specific to the device must be configured via the device’s ThreatSTOP agent command line. Any changes to the policy selection must be manually updated on the device as well.
Features
Device integrations perform the following functions:
- All integrations
- Retrieve and apply policy updates.
- Log upload (optional).
- Maximum Policy size enforcement (IP devices) - see below.
- Web Automation only
- Advanced telemetry (reporting of integration run-time errors) (optional).
- Device-type specific
- Device pre-configuration (e.g. Syslog setup, ACL groups).
Device specs and Maximum Policy Size
Depending on multiple factors , the size of your ThreatSTOP policy could vary from a few thousands IOCs to several hundred thousands. Typical DNS servers can load a very large ThreatSTOP DNS Policy. The main requirement is a system with enough RAM (~250 bytes per record). The impact on DNS resolution speed is minimal, varying from imperceptible to less than a 10% increase for large policies.
The maximum recommended size of an IP Policy is very dependent on the hardware and software: RAM available to store ACLS as well as the implementation of ACL-based filtering are most impactful. Older firewalls with small amounts of memory will often support policies in the 10,000 subnet range, while newer large models have been tested with more than 500,000 subnets (a thorough policy will have between 50,000 and 100,000 subnets).
The maximum policy size setting will truncate the number of records that the ThreatSTOP integration will load on an IP device, in the event your policy become larger than anticipated (e.g. spike in IOCs attached to a target). Please read the documentation for the integration matching for your device and check with your firewall vendor for the recommended maximum ACL entries for your device. The number of IOCs in a policy over time will fluctuate based on attacker activity. It is recommended that policies not exceed 90% of the maximum ACL capacity of the device to account for the dynamic nature of target sizes.
Configuration and Deployment
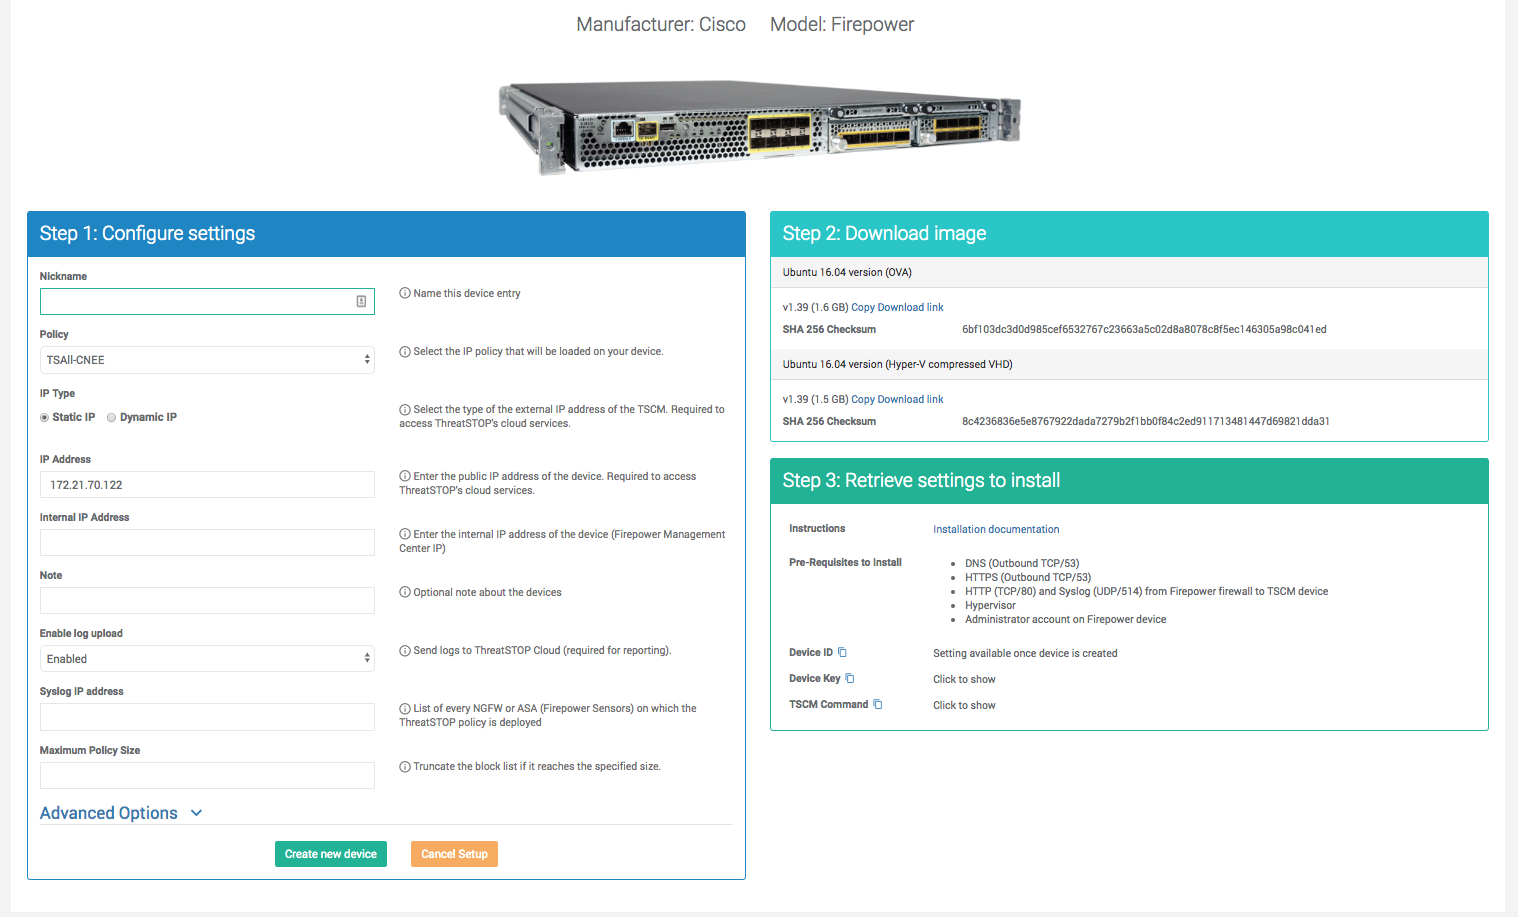
After selecting the device model and integration type, the Portal will display a form to enter the device settings. Devices share a common set of settings (see the Common settings section below) and also require a set of device specific settings (refer to the model-specific documentation).
Once the settings are provided and the configuration is saved, you can move forward with the deployment:
- Download and install the TSCM image or agent (if required for integration). The download links are listed in the device page in Section 2.
- Configure the agent as documented in the integration documentation. The settings needed to complete the installation (e.g. Device ID, TSIG Key) are available in 3 locations:
- Section 3 (Settings) of the device edit page (only after the device entry has been successfully created).
- By clicking the Info button on the device list page.
- When accessing the documentation through the links on the portal, the documentation will automatically fill-in your device settings.
Editing a device
To make configuration changes to the device, find the entry in the device list page and click the edit button. You can edit settings and click save to commit changes.
- Settings changes made to Web Automation devices will be typically reflected on the devices within 5 minutes.
- CLI devices can be updated from the CLI after the initial configuration. The important exception is a change to the policy assignment, which must be reflected on both the portal and the device itself. Changes to the policy content (e.g. bundles, targets, user-defined lists) don’t require a change on the device itself.
Deleting a device
You can delete a device entry at any time. While technically not required, we advise also uninstalling the device integration if you want to full remove integration of a device with ThreatSTOP. The order of removal (portal or device itself) is not important.
Once a device entry is deleted on the portal, the device will not be able to retrieve a policy update or upload new logs.
Common Settings
Devices often have settings specific to their model. These settings are documented in the device integration documentation. The following section describes settings shared by all models.
Required settings
- External IP address: This is the device’s public IP address (as seen by a server on the internet). This setting is used to control access to the ThreatSTOP services (policy, log upload). If you are not sure what the IP address is, you can run the following command: curl -s ip.addr.es. Note: for TSCM-based deployment, the communications with the ThreatSTOP services are performed by the TSCM; use its IP address if it’s different from the address of the device. You can use the same IP address for multiple devices within the same organization account, but device IP addresses can’t be reused across accounts. Not required for Roaming devices.
- Internal IP address: For TSCM based deployment, this is the internal IP address of the device, as seen by the TSCM. This is used to communicate with the device (e.g. open a configuration session), or restrict access to the policy configuration from within your LAN (HTTP policy download).
- Dynamic IP address: most firewalls and DNS servers have a static public IP address. If your device has a dynamic IP address, it will lose access to the ThreatSTOP services when the IP address changes. To prevent a manual update of the device configuration, use the Dynamic IP setting using a DNS FQDN. The ThreatSTOP cloud service will resolve the FQDN and updates its ACL as long as the A Record for the FQDN resolves to the correct IP address.
- Policy: the name of the policy that the device will load. This must be updated on both the portal and the device for CLI-based integrations.
Optional Settings (Web-Automation)
- DNS Port: ThreatSTOP uses DNS (Outbound TCP Port 53) to communicate with its policy service. If this port is blocked in your network, you can switch communications to use TCP port 5353.
- Log upload: The typical integration of a network device with the ThreatSTOP platform includes the automated upload of the device log files (connections blocked by the ThreatSTOP policy being enforced). The log files are parsed and matched against the ThreatSTOP Threat Intelligence database to power your reports. You can choose to configure the device integration to not upload log files automatically - for example, if you already have a SIEM solution in place. In this scenario, you can upload log files manually on-demand using the Log upload button on the device list page.
- Log file size: ThreatSTOP integrations upload log files every 15 minutes, or whenever the log file reaches the size configured here - whichever comes first. You can decrease the size if you firewall generates a large amount of logs and you would like to upload them more frequently.
- Proxy: Provide your proxy’s IP and port if the TSCM can’t reach the ThreatSTOP log upload service (hosted at https://logs.threatstop.com) directly. This only supports HTTP proxies.
- Telemetry: Web-automation integrations report run-time issues downloading and applying policy updates. This setting can be used to disable the feature.
Test devices
You can also add a test device entry, which can be used to test ThreatSTOP features using a bootable ISO image instead of a production device. See the Guided Setup and Live ISO device configuration documentation to learn more about this device type.
Subscription requirements
The type (IP, DNS, Roaming) and maximum number of devices available for you to create and integrate with ThreatSTOP is controlled by your subscriptions:
- Your account might not have access to every device type. The model selection will only show types enabled for your account.
- Once you reach the maximum number of devices allowed on your account, it will not be possible to add another one. Please contact us if you need additional device entries.