Overview
This document will provide instructions on integrating ThreatSTOP IP Defense onto your Juniper SRX, EX, MX line device.
Current Version
| Current Version | Released |
|---|---|
| 5.01-01 | 04-01-2020 |
Install Methods
On Device CLI Install
Installing On-Device via CLI, which this document covers, will have you run through a series of prompts asking for setting particular to your install. The following sections will cover the settings in detail.
On Device Install via Web Automation

Installing On-Device with Web Automation allows you to easily configure settings on our Portal web interface. After configuring the settings on our portal, you will run a command on the device to pull down the configuration. From that point forward your device will sync its configuration updates made on the portal.
Quick settings
Quick settings are provided below for expert installers who have already read through the documentation and understand what they are doing.
# Below are a set of copy & pastable commands to get your system up and running.
root@JUNOS# mkdir -p /var/home && cd /var/home && curl -O http://downloads.threatstop.com/ts-juniper.tar.gz && tar zxvf ts-juniper.tar.gz && chown -R root:wheel threatstop && cd threatstop
% /bin/sh tsadmin add -d [Device ID] -a [allow list] -b [block list] **WARNING - THIS IS NOT A VALID COMPLETE COMMAND**
Install Parameters
Please make note of the following settings while going through the installation prompts or setting up options for the semi-automated install.
| Setting | ts-setup flag | Value |
|---|---|---|
| ThreatSTOP Device ID (TDID) | -d | Retrieved from the device settings page |
| Policy (Block List) | -b | Retrieved from the device settings page |
| Policy (Allow List) | -a | Retrieved from the device settings page |
| Maximum Policy Size | -m | This should be set to the largest policy size supported your device. See note below for more details |
| Firewall mode | -f | ‘filter’ is currently the only supported mode |
Compatibility
We have tested compatibility with the following:
| Juniper Line | Version | IP Defense Supported | Web Automation |
|---|---|---|---|
| SRX | 12.3 | Yes | Yes † |
| EX | 12.3 | Yes | Yes † |
| MX | 15.1 | Yes | No |
† Requires the dig network utility, usually found on latest firmware builds. Please ensure you are on the latest recommended firmware for your hardware platform.
Please see the manufacturers recommendation for your specific hardware version.
Installation Overview
This document will go over installation and integration of ThreatSTOP via web automation directly on to your Juniper device. The basic steps are as follows:
- Add & Configure device in Admin Portal
- Download software
- Configure ThreatSTOP service on device
- Test configuration / logging.
Upgrade Overview
If you are able to uninstall the previous integration first, that is the preferred method. However for those who need to upgrade in place please follow the instructions below.
In the steps below we’ll pretent we installed into /var/home/threatstop
- Backup the current installation directory.
tar czvf /tmp/previous_install.tgz /var/home/threatstop. - Untar the contents of the new tar file directly into the installation directory.
tar xzvf ts-juniper.tar.gz -C /var/homewhich will expand thethreatstopfolder and contents overwriting currently installed files. - Run
chown -R root:wheel threatstopto ensureroot:wheelownthreatstopdirectory - Run
/bin/sh ts-upgradeto update the configuration file to work with the latest build. - Run
/bin/sh tsadmin showand verify you see your devices settings (device id, block list, port, etc..). - Run
/bin/sh tsadmin updateto test updating the policy to ensure this completes without error.
Prerequisites
- Juniper running supported firmware.
- Juniper added & configured via the admin portal.
- SSH access to the Juniper.
- Access to
rootaccount. - Current active ThreatSTOP account.
- For web automation you will need to have your time synced
Although not required, we highly recommend you create a backup configuration before installing our service.
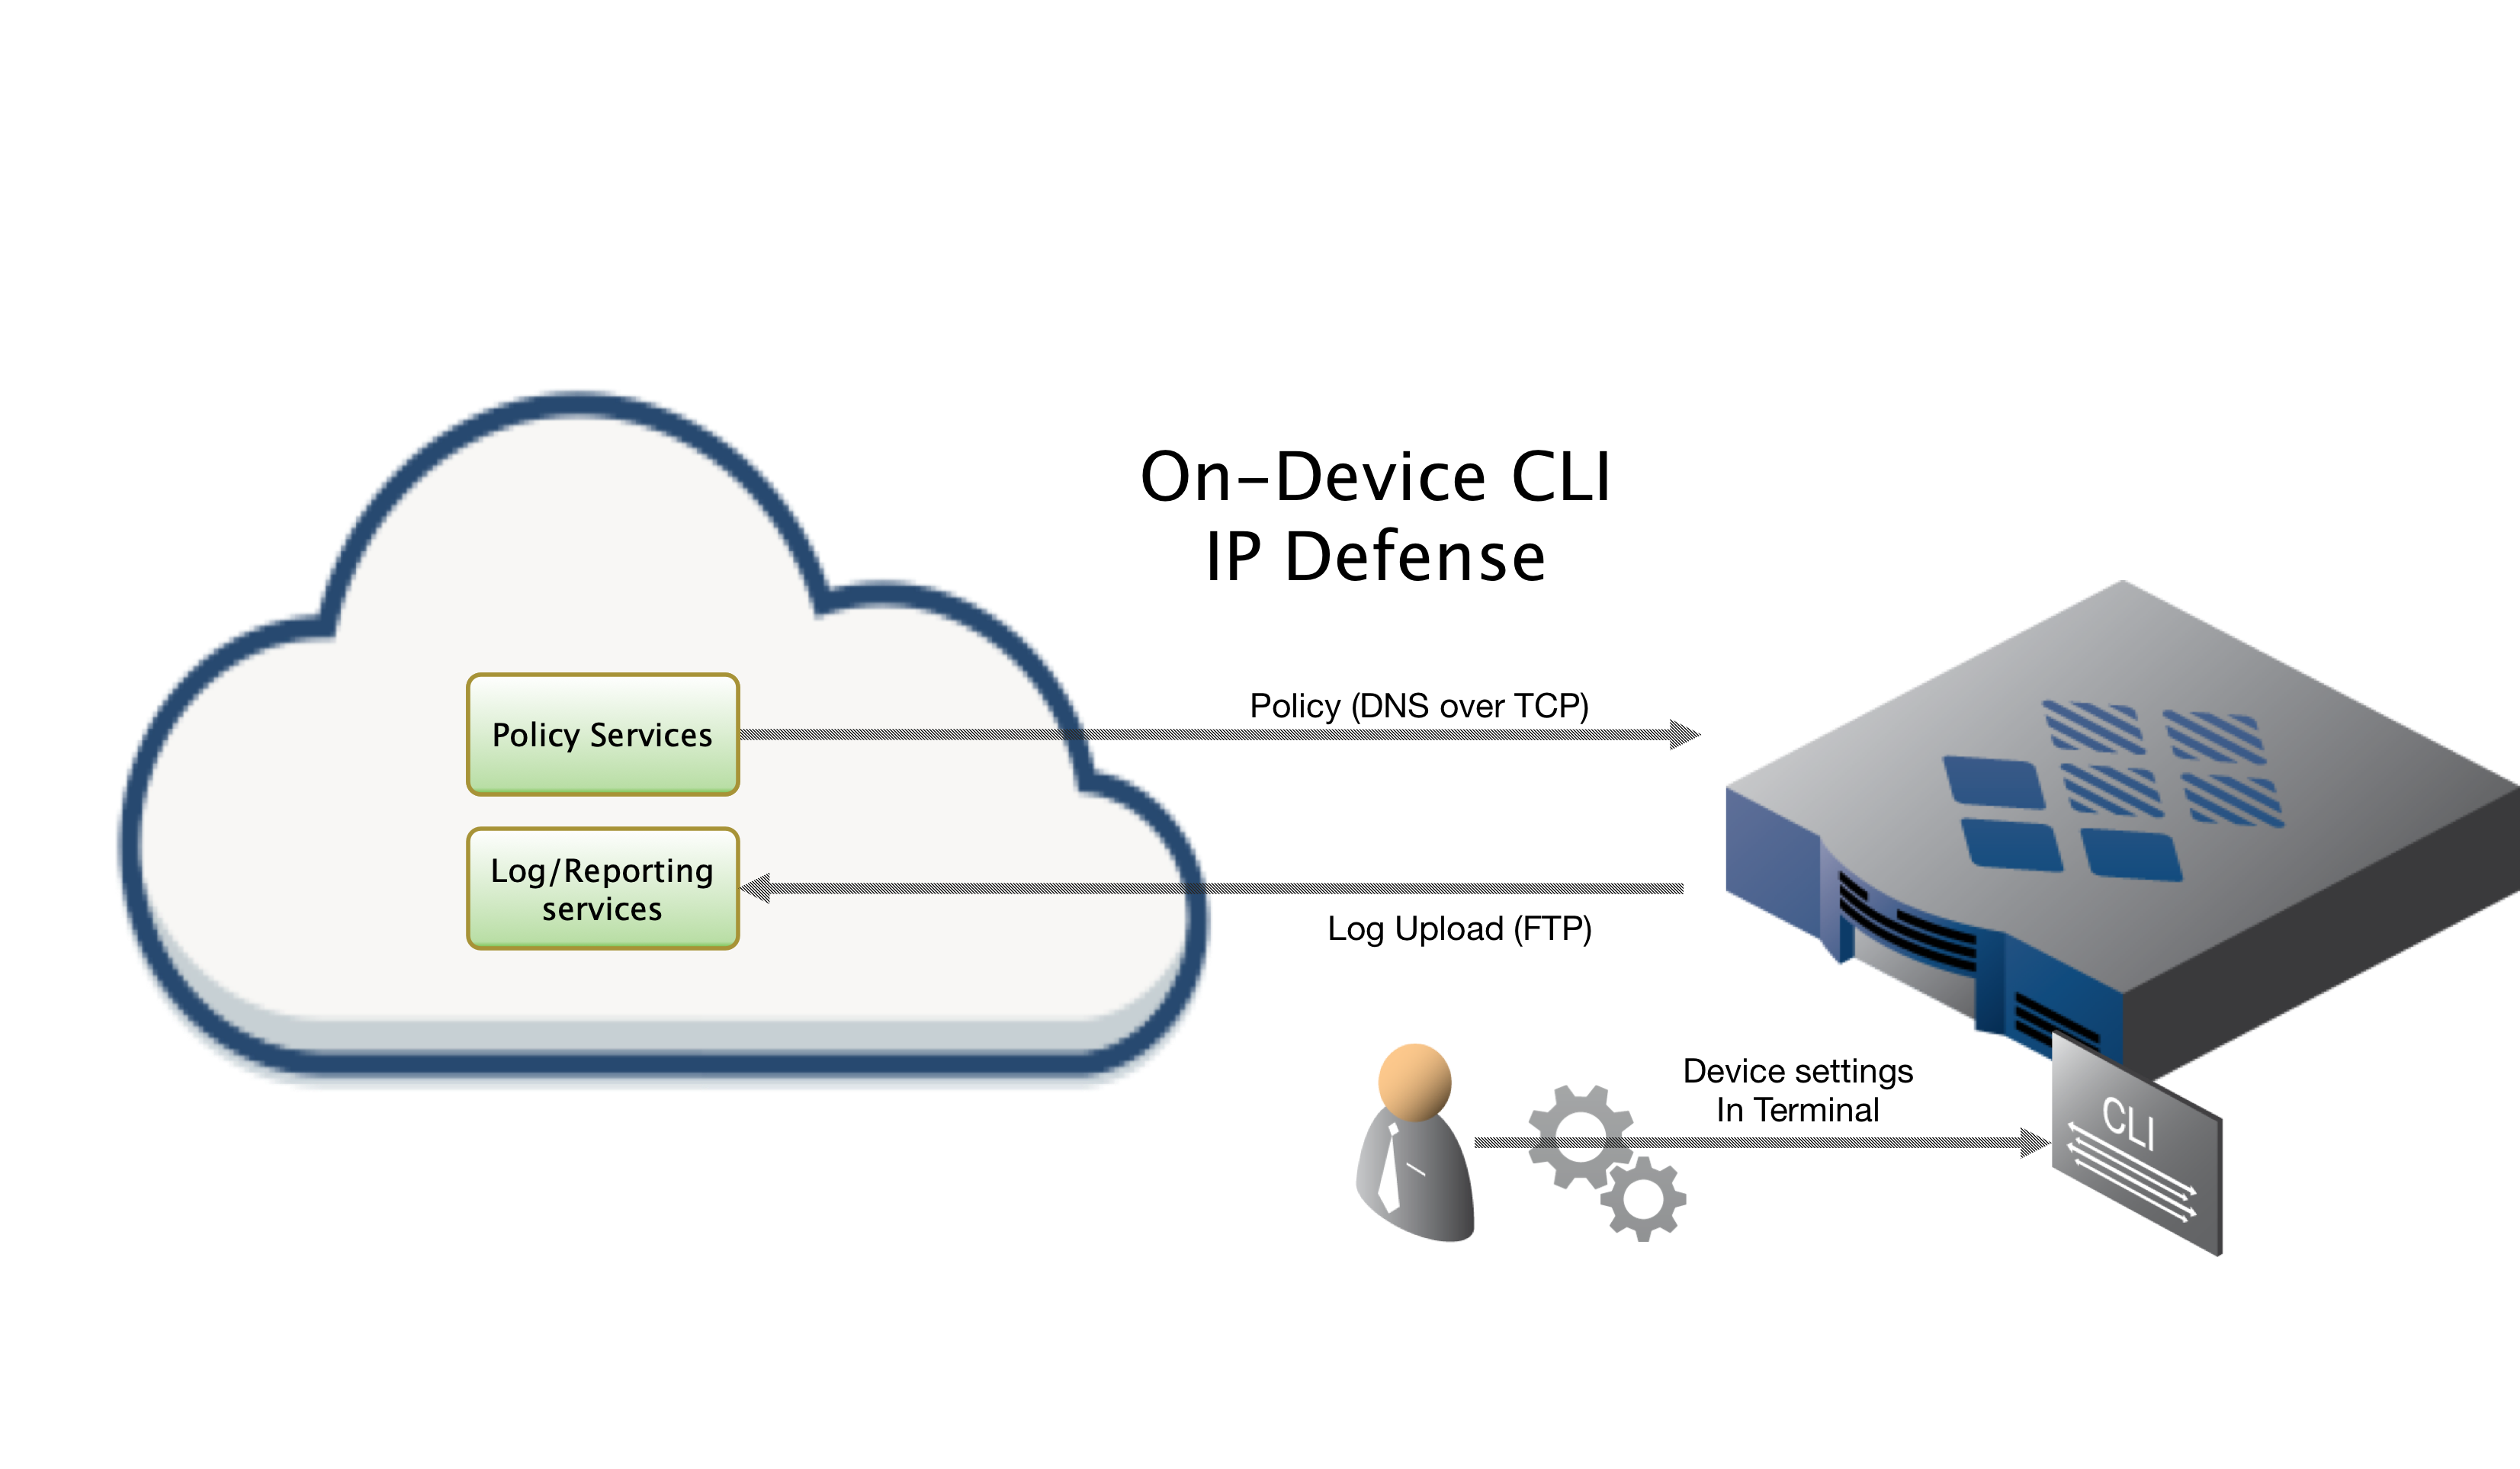
ThreatSTOP Communication Overview
Connectivity
To retrieve its configuration and policy, and to upload log data, the device needs the following connectivity:
- DNS over TCP - Policy service
- Hostname: ts-dns.threatstop.com
- IP Range: 192.124.129.0/24
- Outbound TCP port 53 or 5353
- FTP - Log service
- Hostname: logs.threatstop.com
- IP range: 204.68.99.208/28
- Outbound TCP port 21 / Inbound TCP port 20 (Active FTP) / Negotiated Outbound (passive FTP).
- Direct Connection
- NTP
- Hostname: time.nist.gov
- Outbound UDP port 123
Setup
Step 1: Portal device configuration
During this step, you will create a device entry on the Admin Portal. You will select a device type and enter the configuration settings. A minimum configuration only requires a handful of settings but optional, advanced settings are also available.

To create a device entry:
- Log into the Admin Portal with your ThreatSTOP account
- Browse to the Device page and click Add Device
- Select the model:
- Type: IP Defense
- Manufacturer: Juniper
-
Model: SRX EX MX - Integration Type: On device (CLI)
The Admin Portal will display a form to enter the device settings described below.
-
Nickname: this is a mnemonic name used to identify the device. It can be set to any string (A-Z, 0-9, - and _). If you create multiple device entries, each entry must have a unique nickname. The Nickname will be used to identify the device on the device and in the Reporting user interface.
-
Policy: select a pre-defined policy or a customized policy. It must be an IP Defense Policy.
-
IP Type: Access to the ThreatSTOP services is controlled in part using an ACL allowing the device IP to connect. If your device has a static public IP address (the most common case), select static. If your device has a dynamic public IP address, the ThreatSTOP services can lookup the IP address using a DNS fully-qualified name (FQDN).
-
Public IP address: In static mode, this is the public IP address of the device. It is possible to configure multiple device entries with the same public IP address.
-
Note: An optional field to store a note of your choice about the device - location, identifiers, model…
Step 2. Download Software
# Step 1. ssh into the juniper
# Step 2. make sure /var/home directory exists & cd into it.
mkdir -p /var/home && cd /var/home
fetch -p ftp://ftp.threatstop.com/pub/ts-juniper.tar.gz
# Step 3 validate integrity via sha256 on another machine
shasum -a 256 ts-juniper.tar.gz
# Step 4. tar extract the threatstop directory into /var/home/threatstop
tar zxvf ./ts-juniper.tar.gz
# You should now have a threatstop directory in /var/home. This directory should be kept in place.
| filename | sha256 hash |
|---|---|
| ts-juniper.tar.gz | 123f684aaf598298dbf08ba55782d47780da40396a00e93ef1b079384822929b |
Step 3. Configuration
-
SSH into the Juniper device with an admin account, switch users to root by running
su -. You can verify you arerootby runningwhoami. -
To begin configuring the device, run the following command:
% /bin/sh tsadmin add -d [Device ID] -a [allow list] -b [block list] **WARNING - THIS IS NOT A VALID COMPLETE COMMAND**Note: Setup can be performed semi-automatically through the command line by supplying all required configuration options (-a, -b, -t, -m). A fully manual procedure is also available and detailed in the Manual Installation section. -
The CLI installation will prompt you for the following settings along with device id, block & allow list fully qualified names available here.
-
Device ID: This is the device id or TDID given in the Install Parameters section or referenced in the portal > device > info page.
-
Block list: This is the ThreatSTOP block list given in the Install Parameters section or referenced in the portal.
-
Allow list: This is the ThreatSTOP allow list given in the Install Parameters section or referenced in the portal.
-
Maximum Policy Size: Option to limit the number of entries in the policy. If the policy becomes larger than this setting, the device will truncate it down to the Maximum Policy Size.
Important: The Max policy size may allow you to set a much larger policy than your hardware can support. Please ensure your device with existing traffic load can support the memory/resources required by this setting.-
Number of Prefix Lists: As of v5.01 you will be prompted to specify how many prefix lists to use for blocking purposes. This setting drives generation and distribution of targets into multiple prefix lists to be assigned to the same ‘ThreatSTOP’ group. The main benefit here is support larger policies.
-
Number of addresses per Prefix List: You will be prompted to specify how many addresses each prefix list can contain before it spills over into a subsequent prefix list. This option is only applicable when multiple block prefix-lists are used. The default of 85,000 as mentioned here but your device’s specific memory concerns may drive the need to adjust this setting. We do not recommend going over 85,000 unless you are sure your device can support this. For example, if this setting is set to 20k per prefix list & a max policy size of 80k is set but the policy contains 100k+ items. The policy will first be truncated at 80k, then distributed into four 20k prefix-lists.
Important: Multiple prefix list support has been tested on our MX, SRX, EX lines, however your device firmware must support this feature. Please check with the firmware/device documentation and/or contact your device support to ensure it is available to you with your current traffic load. The Max Policy size setting will always take precident. For example if you device can support 300k policies and you could simply use 4 prefix lists, leaving the default 85k addresses per prefix lists which gives you effectively 340,000 address capacity for blocks.Advanced Settings
To access advanced settings add the
--advancedflag.-
DNS Port: The device uses TCP Port 53 (outbound connections) to retrieve policy data. If this port is blocked or filtered (for example, networks using a DNS Application Layer Gateway), use this setting to switch to TCP Port 5353.
-
FTP Mode: This setting allows you to set passive vs. active (default) ftp.
-
-
Finally, you will be asked if you wish to download the policy now. It is safe to do so if its been more than 15 minutes since you’ve added the device in the portal. If you choose not to download the policy now, it will be automatically downloaded in one hour via the crontab entry.
Step 4. Applying the ThreatSTOP Configuration
Since every firewall configuration is different, ThreatSTOP does not automatically apply the filter it has created. Normally the filter is applied on the input side to all interfaces that receive traffic from the Internet or may send traffic to the Internet. If you have grouped interfaces in a range it is simpler to apply the filter to the entire range at once. In the example to the right there is one external interface (ge-0/0/0.0)
To apply the configuration:
- SSH into your device.
- Enter CLI mode.
- Enter Configuration mode.
- Set the system’s syslog policy to apply the group named ThreatSTOP set system syslog apply-groups ThreatSTOP.
- Set the system’s policy options to apply the group named ThreatSTOP set policy options apply-groups ThreatSTOP.
- Set the system’s firewall policy to apply the group named ThreatSTOP set firewall apply-groups ThreatSTOP.
- commit the changes.
cli
configure
set system syslog apply-groups ThreatSTOP
set policy-options apply-groups ThreatSTOP
set firewall apply-groups ThreatSTOP
commit
Step 5. Applying the Filter to the Interface
The last step is to enable the filter on your interface.
- Set the interface and unit to use the inet family and filter the input using the ThreatSTOP group. For example: set interfaces ge-0/0/2 unit 0 family inet filter input ThreatSTOP
- commit the change.
set interfaces ge-0/0/2 unit 0 family inet filter input ThreatSTOP
commit
If you are using multiple prefix list support and are having trouble applying a large policy, you may have to adjust your max policy size to suit your devices needs.
root@mx104# commit
[edit groups ThreatSTOP firewall]
  'filter ThreatSTOP'
    Maximum term size reached building tlvs for filter 'ThreatSTOP'
commit-check failed
  commit-check failed
error: configuration check-out failed
In this case you can simply edit threatstop.conf and adjust your maxpolicysize setting down and re-run /bin/sh tsadmin update which will again attempt to load a fresh policy.
Step 6. Testing Configuration
To ensure your device is properly blocking and logging traffic, test traffic to a known blocked host from your policy.
root@juniper% cli
# replace tdid_XXXXX with your actual ThreatSTOP Device ID
root@juniper> show log tdid_XXXXX.log
# First see if bad.threatstop.com is in your ThreatSTOP-block prefix-list
root@juniper> show configuration | display set | match ThreatSTOP-block | match 64.87.3.133
# If it is not listed you can test with another /32 in the policy
root@juniper> show configuration | display set | match ThreatSTOP-block | match /32
# In the example below we will attempt to curl 64.87.3.133 (bad.threatstop.com)
root@juniper> exit
root@juniper% tail /var/log/tdid_XXXXX.log
Mar 18 23:23:16 SRX300-00 newsyslog[65212]: logfile turned over due to -R from eventd
# Now ping the address from a device on the inside / trusted network segment
root@juniper% ping 64.87.3.133
root@juniper% tail -f /var/log/tdid_XXXXX.log
<158>1 2019-03-19T00:00:25.791Z SRX000-00 - - - - PFE_FW_SYSLOG_IP: FW: ge-0/0/0.0   D icmp 64.87.3.133 10.0.0.77     0     0 (1 packets)
<158>1 2019-03-19T00:00:28.787Z SRX000-00 - - - - last message repeated 3 times
If you see the log lines indicating a successful block, you’re done.
Be sure to read our Portal Guide to get the most out of our advanced reporting features.
High Availability / HA / Cluster installs
In a high availability (HA) cluster environment, the ThreatSTOP software should be installed on all cluster nodes. The basic premise is we install the software on all nodes in the same location & ensure the scheduled tasks exist. This way if any secondary nodes are promoted to act as the primary, they immediately kick in producing updates.
Secondary Node Installation
You should complete & verify the standard installation on the primary node before attempting installation on any secondary nodes. Due to how SRX clusters work, the secondary nodes may not be able to access the Internet. In this scenario follow the steps below to ensure your secondary node is properly configured to act as a primary.
- Copy the threatstop directory and contents from primary node to secondary nodes. In the example below we use tar to copy over SSH.
- Ensure the scheduled tasks are setup by running
/bin/sh /var/home/threatstop/install_cron.sh - Test the installation went well on secondary node(s)
 # In this example 10.0.0.1 will represent the primary node
 # In this example 10.0.0.2 will represent a secondary node
ssh root@10.0.0.1
root@primary% cd /var/home
root@primary% tar -cvf - threatstop | ssh root@10.0.0.2 "cd /var/home && tar -xvf -"
root@primary% ssh root@10.0.0.2 "/bin/sh /var/home/threatstop/install_cron.sh"
[20:06:30] Adding update of policy address lists to cron
[20:06:31] Ensuring block/allow updates will happen after a reboot
# To test the install was successful you should see at least ts-update listed, possibly ts-update-settings if using web automation
root@primary% ssh root@10.0.0.2 "crontab -l"
# ThreatSTOP cron
09 */2 * * * /bin/sh /cf/var/home/ts-update 2>/dev/null 2>&1
All other firewall setup should have been copied over as part of the ongoing clustering configuration syncing between nodes.
Using Passive vs Active FTP
Active FTP mode is used by default, to setup the logging using passive FTP mode supply the --advanced flag to the tsadmin command during installation to get some additional prompts normally skipped.
Other Operations
Upgrading
If you are upgrading from an older version of the Juniper software, you must uninstall the previous software completely before installing the latest version.
How to check your version
% /bin/sh tsadmin version
5.01
Command Manual
tsadmin has several sub commands to perform various functions outlined below. Sub commands are interpreted differently by the tsadmin & do not have a -- before them.
- add The add command install & configures the ThreatSTOP service on the device
- -a
the allow list name including the Account ID - -b
the block list name including the Account ID - -t
this is the ThreatSTOP Device ID (usually beginning with 'tdid_') - -f filter This will always need to be set to filter
- -n number of block prefix lists to use †
- -c number of addresses (capacity) each prefix lists uses when multiple prefix-lists are used. The max policy size will always take precident.
- -m
This should be set to match the Maximum Policy Size supported by your device - –device_id
this is the ThreatSTOP Device ID (usually beginning with 'tdid_'), used with Web automation installation - –auto_key
the secret key used for auto configuration use with Web automation installation - –advanced This optional flag enables special prompts to customize port and ftp modes
- –debug This optional flag enables debugging information
- -a
- remove This command removes the ThreatSTOP integration from the device
- update This command forces the device to update its policy as well as check for new settings if web automation installation is used
- show This command shows the configured settings
- help This command shows usage information
- version This command shows the current version of installation package
† - Your device must support this functionality. Please check your device / firmware documentation or contact the manufacturer to verify this feature is available to you.
Troubleshooting
To get a list of configured settings run:
root@junos% cd /var/home/threatstop
root@junos% /bin/sh tsadmin show
To get a full list of available command line parameters on the command line type:
root@junos% cd /var/home/threatstop
root@junos% /bin/sh tsadmin help
If you are not able to download the policy, run the following:
admin@device# wget -qO - http://logs.threatstop.com/cgi-bin/validip.pl
Your IP address: 1.2.3.4
Address is in the list of authorized hosts
This will tell you if your public IP has been allowed to access the policy.
Not all traffic is being blocked / everything is being blocked:
The most likely reason is that you have not correctly applied the ThreatSTOP filter (see “Applying the Filter” above). If you need help with verifying the filter configuration please contact ThreatSTOP support.
Other firewall rules do not appear to work:
The most common reason for this is the same as 2) above, namely that the ThreatSTOP filter has been incorrectly set up. If you had additional filters then you may have replaced them with the ThreatSTOP filter if you apply it using the “… filter input ThreatSTOP” command. As noted above, if you already have one of more filter on the interface you should use the ‘input-list’ alternative and put the ThreatSTOP filter before your other filters.
No Logs Uploaded:
- verify the logging was properly setup:
# replace tdid_XXXXX with your own Device ID
root@JUNOS> show configuration | display set| match syslog
set groups ThreatSTOP system syslog file tdid_XXXXX.log firewall any
set groups ThreatSTOP system syslog file tdid_XXXXX.log archive size 100k
set groups ThreatSTOP system syslog file tdid_XXXXX.log archive transfer-interval 60
set groups ThreatSTOP system syslog file tdid_XXXXX.log archive archive-sites "ftp://ftp@logs.threatstop.com/logs"
You should also confirm that the file /var/log/tdid_XXXXX.log exists.
The logs are transferred to ThreatSTOP using FTP. If you require passive ftp, rerun the setup with the --advanced flag to see some additional options. You will be able to set the ftp to passive vs. active (default) FTP mode.
- ALG and SRX devices
To allow the device to FTP the logs to us on SRX devices, the FTP Application Layer Gateway (ALG) may or may not need to be enabled. By default, the FTP ALG is enabled. To see the status of the FTP ALG, run:
show security alg
If it is not listed, then it is disabled. If it is listed, you can disable it by running:
delete security alg ftp
commit
Additional Information
Version Changelog
5.01   Wed Feb 26 2020
  - Added Multiple block prefix-list support
5.00   Wed Mar 16 2019
  - Added Web Automation installation capability
4.02   Fri Apr 29 2016
  - refactored to unified software build for EX, SRX, MX lines
Uninstalling ThreatSTOP
Remove ThreatSTOP service integration from device
ThreatSTOP can be removed in a non-destructive manner by simply removing the ThreatSTOP Group, and uninstalling the integration software. First, delete the configuration steps you steps performed in “Applying the ThreatSTOP Configuration”, generalized steps included below:
- SSH into the device.
- Enter CLI mode by entering cli.
- Enter Configuration mode by entering configure.
- Delete the ThreatSTOP filter from the interface.
- Delete interfaces ge-0/0/2 unit 0 family inet filter input ThreatSTOP
- Delete the ThreatSTOP syslog entry.
- Delete system syslog apply-groups ThreatSTOP
- Delete the association between the policy and the ThreatSTOP group.
- Delete policy-options apply-groups ThreatSTOP
- Delete the firewall configuration’s reference to the ThreatSTOP group.
- Delete firewall apply-groups ThreatSTOP
- commit the changes.
This will remove the policy enforcement from the network device.
cli
configure
delete interfaces ge-0/0/2 unit 0 family inet filter input ThreatSTOP
delete system syslog apply-groups ThreatSTOP
delete policy-options apply-groups ThreatSTOP
delete firewall apply-groups ThreatSTOP
commit
Next, we run the shortcut /bin/sh tsadmin remove from within the installation directory. This will remove the ThreatSTOP group and scheduled configuration from the device.
root@junos% cd /var/home/threatstop
root@junos% /bin/sh tsadmin remove
Backuping up configuration
Starting with V5.0 our software automatically creates a backup of the configuration called ‘pre-threatstop’ on first run. We still recommend you create a backup of your Juniper device’s current configuration in case of any device/version specific failures. Please reference your manufacturers guide for up-to-date information as it may be newer than ours:
- SSH into the device (if you are not currently SSH’ed in).
- Enter CLI mode
- Enter Configuration mode
- Save the current configuration with an explanatory name, e.g. juniper_x100_config_2020-01-30
- Exit Configuration and CLI modes by entering exit twice.
root@junos% cli
root@junos> configure
root@junos# save backup_Config_2019-12-31
root@junos# exit
root@junos> exit
We recommend you transfer this backup configuration off device for safe keeping.
Restore previous configuration
We create a backup of the configuration prior to installing our service located /opt/threatstop/pre-threatstop. To restore the configuration you run the following commands:
root@junos% cli
root@junos> configure
root@junos# load override /opt/threatstop/pre-threatstop
root@junos# commit
root@junos# exit
root@junos> exit
If you specifically want to revert back to the configuration just before installing the threatstop service:
root@junos% cd /var/home/threatstop
# first make sure you've uninstalled the service
root@junos% /bin/sh tsadmin remove
# now to revert to the configuration backup the software created just before installing the service run
root@junos% /bin/sh tsadmin revert