Overview
DNS Defense Roaming protects laptops and phones with ThreatSTOP’s DNS Defense by adding DNS-over-HTTPs (DOH) support to DNS Defense Cloud.
Features
If you are new to ThreatSTOP, you can read an overview of our platform here.
DNS Defense Roaming offers the same features as ThreatSTOP’s on-premise DNS Firewall:
- Filtering of DNS requests with your customizable policy.
- Policies can include all ThreatSTOP targets (lists of malicious domains and IP addresses) and customizable lists of domains and IP addresses.
- Filtering triggers: filtering by domain, IP address in responses and name servers.
- Filtering actions: block, redirect, drop and whitelist.
- Logging and reporting of policy hits.
DNS Defense Roaming does not log DNS queries. Only hits again the filtering policy are logged and made available through the reporting features.
Query Logging
Query logging of DNS Defense Cloud traffic is an optional feature which can be enabled or disabled in the service configuration. It allows our systems to dynamically analyze your traffic for potential malicious threats, enabling real-time protection against cyber attacks. This data also powers our machine learning models, allowing us to not only stay ahead of emerging threats but also continuously improve our ability to identify and mitigate risks. By opting in to DNS query logging, you also enable ThreatSTOP to provide faster and more effective assistance in the event of a security incident.
Compatible devices
To access the DNS service, the device must support DNS-over-HTTPs. ThreatSTOP has tested compatibility with the latest versions (as of September 2023) of the following Operating Systems.
| Vendor | Operating System | Compatibility |
|---|---|---|
| Android | Requires third-party application (*) | |
| Apple | IOS | Compatible since IOS 14 |
| Apple | MacOS | Compatible since MacOS Big Sur (v11.x) |
| Microsoft | Windows 10 | Requires third-party application |
| Microsoft | Windows 11 | Compatible |
| Microsoft | Windows Server 2022 | Compatible |
(*) As of 2023, native DOH support in Android 13 can not be configured with third-party DNS services.
Other operating systems may be compatible natively or require a DOH client. The requirements for compatibility are:
- DNS-over-HTTPs support
- Configurable URL for the DOh server.
Deployment
Windows 11 configuration can be performed using logon scripts, while Windows 10 requires deploying a DOH client.
Initial setup
You will need two configuration settings to configure a device, both retrieved in your ThreatSTOP account.
- the service URL
- the service IP address(es), to bootstrap the DoH connection.
The service URL for your endpoint is available from the device settings in the Admin portal.
The service IP addresses are 207.167.126.80 and 207.167.127.80. If your client only supports one address, you can use any of these two.
Service Configuration
New accounts
To setup your DNS Defense Roaming service:
- Create a ThreatSTOP account with the early access code provided by your your ThreatSTOP Sales representative and login to the Admin Portal.
- You will enter a short guided setup that will let you customize your service URL for the DOH endpoint.
- A default policy will be assigned to your endpoint. It can be customized after the endpoint has become active.
- It will take a few seconds to provision your DNS Defense Romaing service. Once the portal indicates that the service is ready, you can make test queries.
Existing accounts
The feature must be enabled on your account before you can add a DOH endpoint. Please contact <a href=mailto:support@threatstop.com>support@threatstop.com</a> for assistance.
Once the feature has been enabled, you can create a DNS Defense Roaming endpoint by:
- logging in the Admin Portal.
- Going to Devices > Add device > Roaming > ThreatSTOP > DNS Defense Roaming.
- Selecting a policy and URL path fragment.
- Click Create. The service will take a minute to be provisioned.
Testing with curl (CLI)
Sinve version 7.62.0, curl allows you to test DoH queries quickly. It’s available:
- as a download for Windows
- as part of MacOS. If you’re using an older version of MacOS, you may need to install a newer version (for example with Homebrew).
- as a package for most versions of Unix
Once curl is installed, you can check that you are able to make DNS queries. A successful query will return the HTML for the home page of example.com. If the DNS query fails, the DoH response will contain a 404 error, and curl will indicate that it couldn’t resolve host name.
curl -v --doh-url https://service-url https://example.com

> POST /path-for-your-account HTTP/2
Host: SERVICE_IP
Accept: */*
Content-Type: application/dns-message
Content-Length: 29

* We are completely uploaded and fine
< HTTP/2 200
< server: threatstop/ddr
< date: Mon, 20 Nov 2023 23:28:46 GMT
< content-type: application/dns-message
< cache-control: max-age=156
< content-length: 57

* a DoH request is completed, 0 to go
* DoH Host name: example.com
* TTL: 156 seconds
* DoH A: 93.184.216.34
[...]
Next, try accessing http://ddc-test.threatstop.com which will only resolve when access through ThreatSTOP DNS Defense services.
curl -v --doh-url https://service-url http://ddc-test.threatstop.com

[...]
* a DoH request is completed, 0 to go
* DoH Host name: ddc-test.threatstop.com
* TTL: 84 seconds
* DoH A: 64.87.26.150
* CNAME: garden.threatstop.com
* CNAME: garden.threatstop.com
*   Trying 64.87.26.150:80...
* Connected to ddc-test.threatstop.com
> GET / HTTP/1.1
> Host: ddc-test.threatstop.com
> User-Agent: curl/8.1.2
> Accept: */*
>
< HTTP/1.1 200 OK
< Server: nginx
< Date: Mon, 20 Nov 2023 23:46:16 GMT
< Content-Type: text/html
< Transfer-Encoding: chunked
< Connection: keep-alive
Next, you can test that our test domain is being blocked. You shoud get a Bad RCODE error and failure to resolve.
curl -v --doh-url https://service-url https://bad.threatstop.com

> POST /path-for-your-account HTTP/2
Host: SERVICE_IP
Accept: */*
Content-Type: application/dns-message
Content-Length: 36

< HTTP/2 200
< server: threatstop/ddr
< date: Mon, 20 Nov 2023 23:38:20 GMT
< content-type: application/dns-message
< content-length: 36
<
* a DoH request is completed, 0 to go
* DoH: Bad RCODE type A for bad.threatstop.com
* DoH: Bad RCODE type AAAA for bad.threatstop.com
* Closing connection 0
curl: (6) Couldn't resolve host name
Testing with a browser
If you prefer to test using the service for web browsing, most browsers will let you configure a DoH server.
- Chrome (version 119)
- Open the settings and go to the Security page.
- Scroll to the Use Secure DNS section and enable it.
- Select Custom and enter your service URL.
- If you’re able to access http://ddc-test.threatstop.com, Chrome is correctly configured.
- Firefox (version 119)
- Open the settings and select the Privacy and Security tab.
- Scroll to the “DNS over HTTPS” section
- Select Max Protection
- Select Custom provider and enter your service URL.
- If you’re able to access http://ddc-test.threatstop.com, Firefox is correctly configured.
- Edge
- Open the settings and select the Privacy, search and services tab
- Scroll down to Use secure DNS and enable the feature
- Select Choose a service provider
- In the text box, enter your service URL.
- If you’re able to access http://ddc-test.threatstop.com, Edge is correctly configured.
- If the server returns NXDOMAIN, you have successfully completed the setup.
- If the command times out, check that the IP address you entered in the configuration is correct.
- If the command returns an IP address, check that you are using SERVICE_IP as the DNS server.
Configuration
Service URL
The service URL has the following syntax: https://doh.threatstop.com/org_id/path_fragment/device_identifier
- The protocol and FQDN are always https://doh.threatstop.com
- org_id is your organization’s account id, generated when the account is created
- The path fragment allows you to customize the service URL. It is an alphanumerical string up to 16 characters.
- the device_identifier is an optional id which can be used to identify specific devices in the reports (See reports below).
You can have multiple DNS Defense Roaming endpoints in your account, as configured through your ThreatSTOP subscriptions.
You should keep your service URL secure to prevent access to the DNS service. If you need to change the path fragment, each endpoint can have multiple path fragments. This allows you to change the path fragment without disabling access to the devices configured to use it, e.g. to rotate the service URL.
Settings
There are only two settings for your DNS Cloud Roaming service. Both of them can be configured via the device settings on the Devices page of the Admin Portal:
- The policy, which can be customized
- The path fragment(s). You can have multiple values separated by commas.
DNS-over-HTTPS caveats
Name servers in the local network
- The Windows 11 and Windows Server implementation of a DOH client send all DNS queries to the DOH servers, including queries for search domains configured by DHCP. This will prevent resolving DNS records only available to local networks.
- Android apps that we have tested show the same behavior
- MacOS and IOS devices will send DNS requests matching the search domain to the configured DNS servers.
DOH in browsers
Many browsers implement a DNS-over-HTTPS client and avoid the operating system settings.
- Chrome on MacOS will not use the DOH server configured in the DOH by default, and will continue to use the DHCP-provided settings unless configured to use DOH directly.
- Chrome on Windows, Edge and Firefox will use the DOH server configured in the OS, unless configured to use an alternate DOH server.
- Safari doesn’t have DOH settings and will use the DOH settings of the OS.
The configuration steps needed to use DNS Defense Roaming in Chrome, Edge and Firefox are documented in the testing section.
Identifying the device in reports
DNS queries that match filtering rules are logged and made available through the reporting features of the Admin Portal. No configuration is necessary. Reporting features are described here.
By default, reports will not identify the specific device.
DNS Defense Roaming supports an experimental feature to add a unique identifier of your choice to the service URL, e.g. https://doh.threatstop.com/org_id/fragment/unique_id
This id will be used to identify the device in policy hits. This feature might be removed during the beta period.
This feature requires a different service URL for each device, which may not be compatible with your MDM/UEM solution (see Automated Deployment).
If set, the hardware ID must be a string up to 64 characters long, and can include alphanumerical characters and underscores.
Configuring Operating Systems
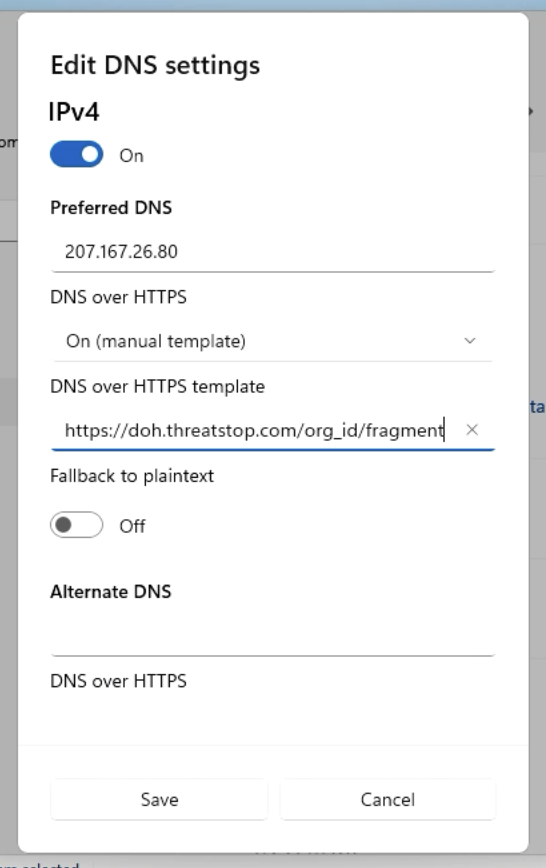
Windows 11
Windows 11 supports DOH natively and can be configured in a
- Open Settings > Network and Internet.
- Select Properties.
- Set DNS to Manual.
- Set the IPv4 Preferred DNS to one of the DNS Defense Roaming service IP addresses.
- Set DNS over HTTPs template to On (manual template).
- Set the template to your service URL.
- Using a browser (such as Edge or Firefox which use the OS settings), open http://ddc-test.threatstop.com. If the page loads successfully, your Windows system is correctly configured!
To remove the ThreatSTOP DNS settings, revert to DHCP settings.
Windows 10
Native DOH support was removed from Windows 10 by Microsoft. Using a DOH service requires installing an application. We recommend:
Linux
Linux can be configured to use DOH using a client application. We recommend dnsdist version 1.7 or later. Our ThreatSTOP-DDR package automates the dnsdist configuration.
- Install dnsdist
- Create a configuration file (sample below)
- Start dnsdist
- Check that you are able to perform DNS lookups, e.g. dig @127.0.0.1 ddc-test.threatstop.com
- Set your resolver to 127.0.0.1 (via /etc/resolv.conf, netplan or systemd-resolved)
Sample configuration:
addLocal("127.0.0.1", { reusePort=true })
setACL({'127.0.0.0/24'})
newServer({address="1:443", tls="openssl", subjectName="doh.threatstop.com", dohPath="/org_id/fragment", validateCertificates=true, pool="threatstopddr", checkInterval=5})
 addAction({"127.0.0.1"}, PoolAction("threatstopddr"))
Linux relay
You can also use dnsdist to use DNS Defense Roaming for your company networks.
- Install dnsdist on a server in your local network
- Change the sample config to listen on one or more network interfaces
- Change the ACL to match your local network
- Set endpoints to use the DNSDist IP address as their DNS servers, e.g. via DHCP.
- Optionally, setup an HA configuration by creating two dnsdist instances and configuring both of their IP addresses via DHCP.
MacOS
To configure MacOS to use DOH, you will need to create a Configuration Profile (mobileconfig), sign it and load it in the environment of each user on the device.
Configuration Profile
You can use the following template for your Configuration Profile. You will need to set the Server URL and both Payload UUID keys. The reference documentation is available here.
<plist version="1.0">
<dict>
	<key>PayloadContent</key>
	<array>
		<dict>
			<key>DNSSettings</key>
			<dict>
				<key>DNSProtocol</key>
				<string>HTTPS</string>
				<key>ServerAddresses</key>
				<array>
					<string>207.167.126.80</string>
					<string>207.167.127.80</string>
				</array>
				<key>ServerURL</key>
				<string>https://doh.threatstop.com/org_id/fragment</string>
			</dict>
			<key>PayloadDescription</key>
			<string>Configuration for ThreatSTOP DNS Defense Roaming</string>
			<key>PayloadDisplayName</key>
			<string>ThreatSTOP DNS Defense Roaming</string>
			<key>PayloadIdentifier</key>
			<string>com.apple.dnsSettings.managed</string>
			<key>PayloadOrganization</key>
			<string>ThreatSTOP DNS Firewall</string>
			<key>PayloadType</key>
			<string>com.apple.dnsSettings.managed</string>
			<key>PayloadUUID</key>
			<string>[Generate with uuidgen]</string>
			<key>PayloadVersion</key>
			<integer>1</integer>
			<key>ProhibitDisablement</key>
			<false/>
			<key>PayloadScope</key>
			<string>System</string>
		</dict>
	</array>
	<key>PayloadDescription</key>
	<string>ThreatSTOP DNS Defense Roaming</string>
	<key>PayloadDisplayName</key>
	<string>ThreatSTOP DNS Defense Roaming</string>
	<key>PayloadIdentifier</key>
	<string>com.threatstop.apple-dns</string>
	<key>PayloadRemovalDisallowed</key>
	<false/>
	<key>PayloadType</key>
	<string>Configuration</string>
	<key>PayloadUUID</key>
	<string>[Generate with uuidgen]</string>
	<key>PayloadVersion</key>
	<integer>1</integer>
</dict>
</plist>
-
The mobileconfig file should be signed, although the step can be skipped for testing. To sign it, you will need an SSL certificate. As an example, you can follow the steps below; more information is available here.
-
With an SSL certificate in PEM format (certificate.crt) with a password and its private key also in PEM format (private.key), create a PKCS12 file. You must set an export password when prompted.
openssl pkcs12 -export -clcerts -inkey private.key -in certificate.crt -out cert.p12 -name "Your Org"
- import the PKCS12 in Keychain (double click, enter its password.)
- sign the profile (ddr-profile.mobileconfig) with this command. You will need to enter your account password. “your-cert-common-name” should be set to the CN field of your certificate.
security cms -S -N your-cert-common-name -i ddr-profile.mobileconfig -o ddr-profile-signed.mobileconfig -v
MacOS configuration
The steps below are for MacOS Sonoma (v14). The location of the profiles and DNS filters differs on older MacOS versions. Manual installation requires the user to open the profile and enter their credentials. The deployment can be automated without user involvement using MacOS compatible MDM/UEM applications (see Automated Deployment).
- Open the signed profile
- Open the System Settings app, and click on the Privacy and Security menu.
- Scroll down to the Profiles section
- Select the ThreatSTOP profile and double-click it
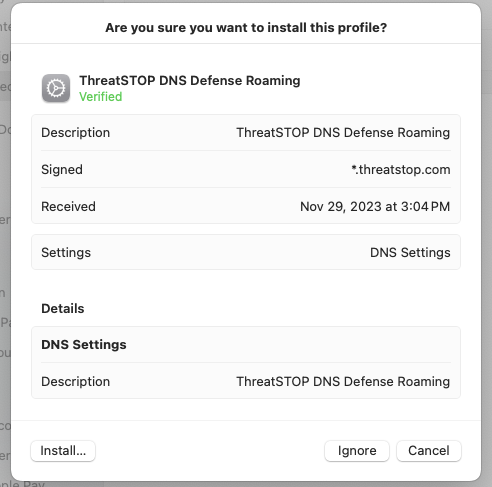
- Click install and enter your password to proceed
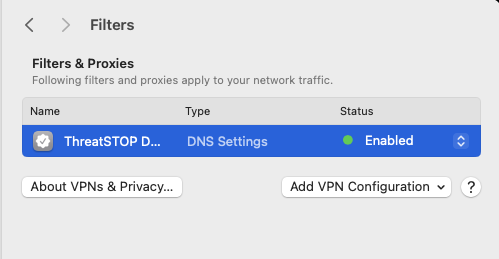
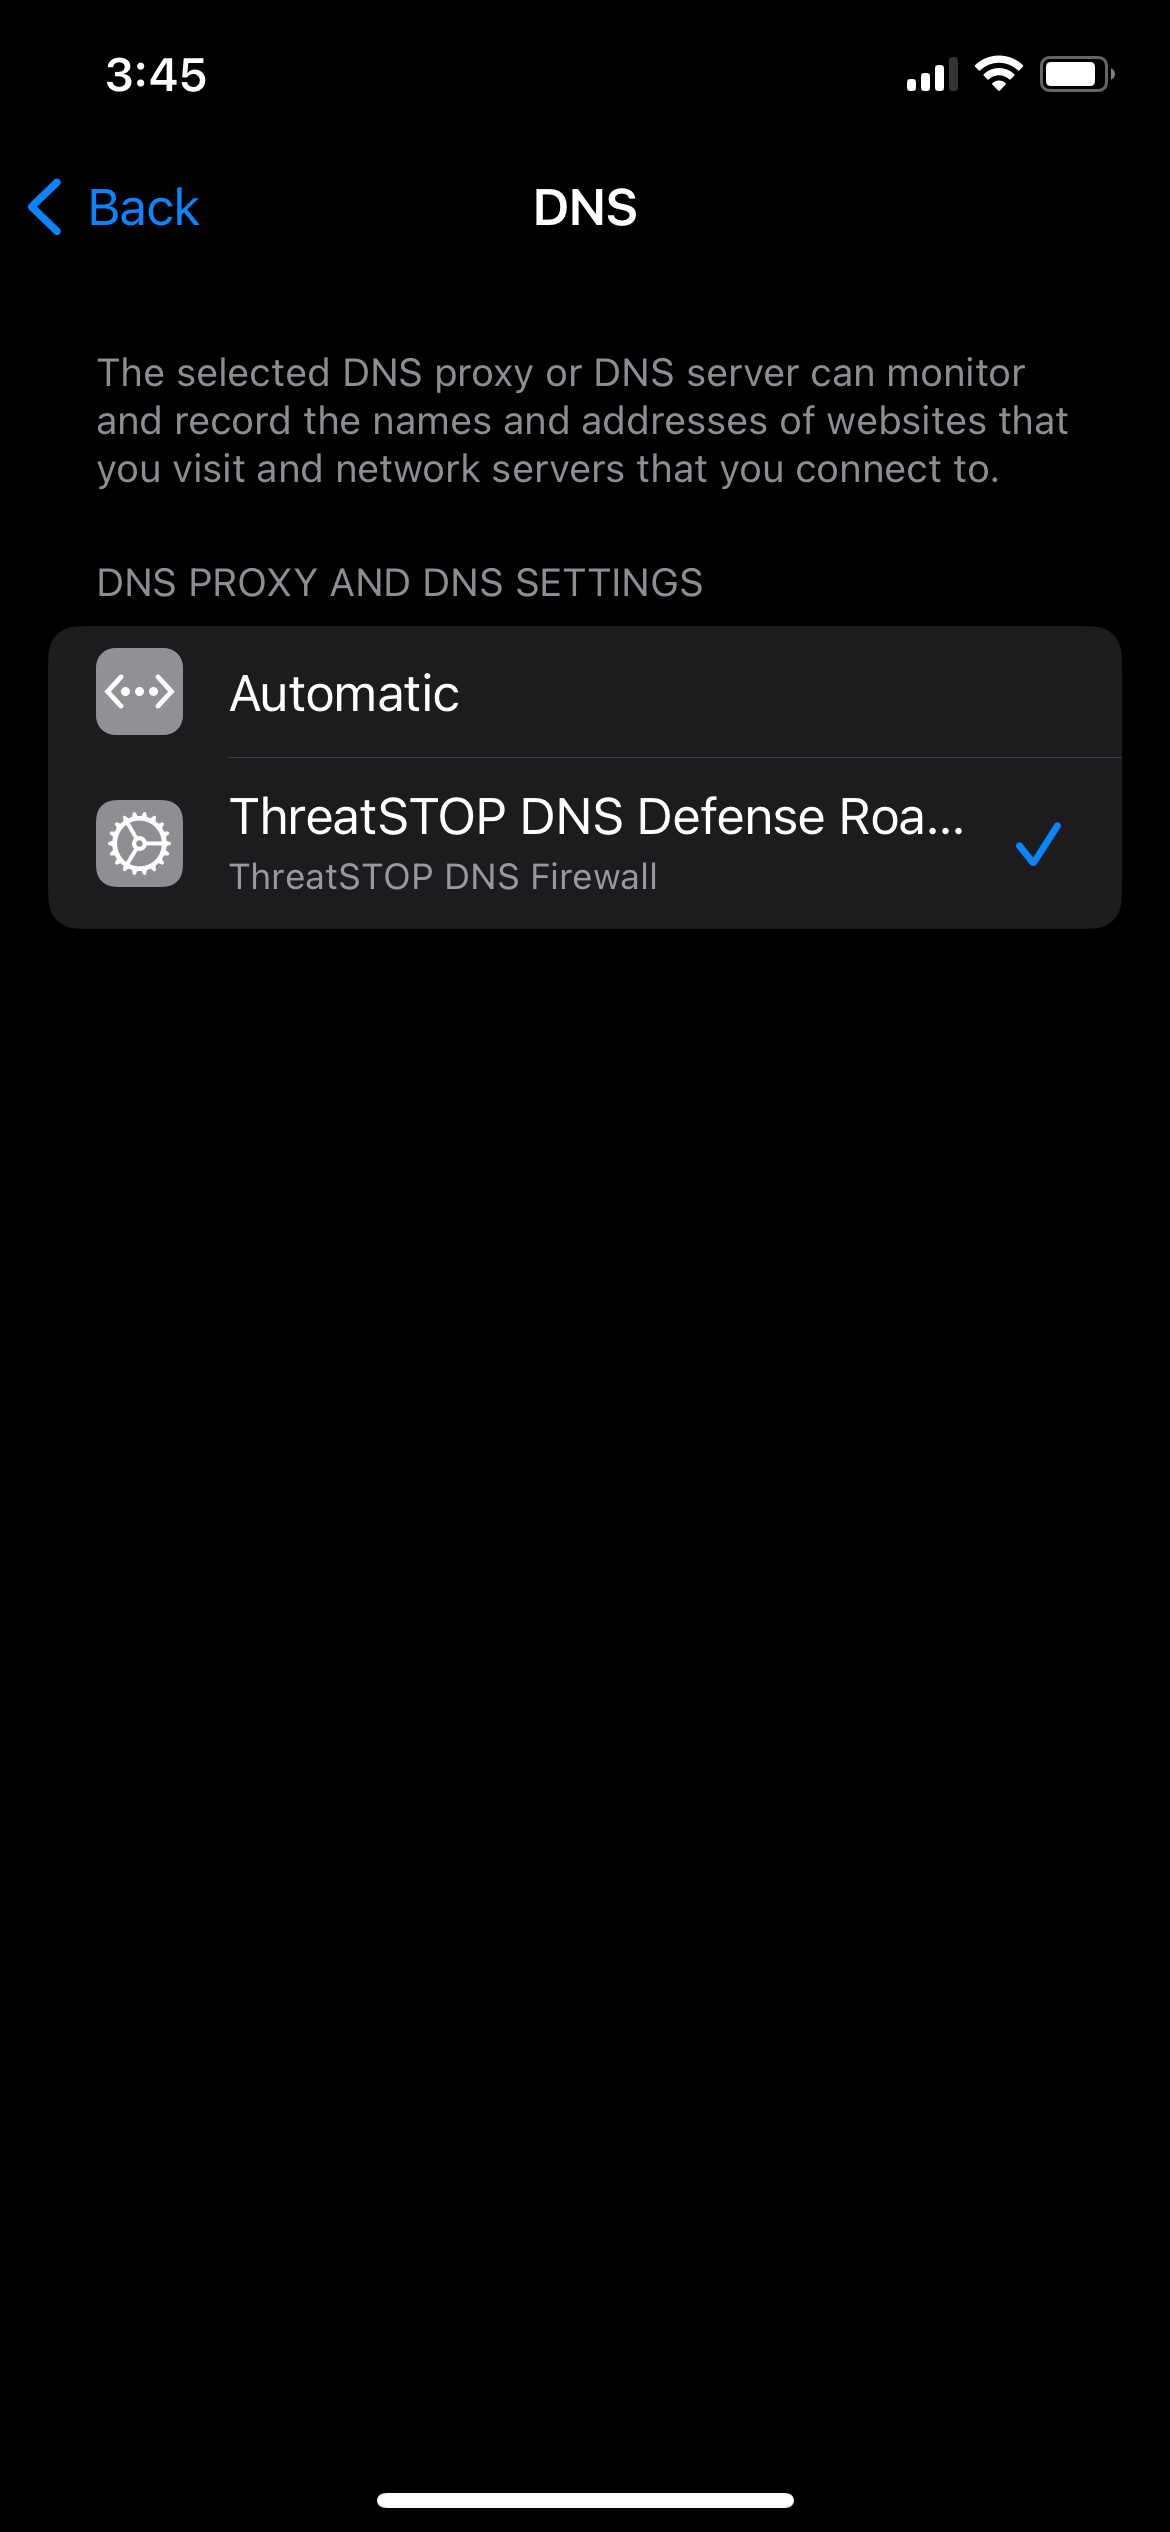
- The DNS settings will appear under Network > Filters where they can be toggled on and off.
- You can open the test URL http://ddc-test.threatstop.com in Safari - we recommend Safari as it will always use the OS settings. If the page loads successfully, your Mac is correctly configured!
To remove the ThreatSTOP DNS settings, the profile can be removed in the System Settings > Privacy and Security > Profiles panel.
IOS
As with MacOS, a manual installation requires the user to open the profile and enter their pin code.
To configure an IOS device to use DNS Defense Roaming:
- Create and sign a mobileconfig profile using the same steps as MacOS. The profile file is identical for MacOS and IOS.
- Copy the file to a location accessible from your device, such as a web server or a cloud-based drive (e.g. GoogleDrive)
- Open the mobileconfig profile (enter its URL or browse to its location)
- Open the settings and go to General > VPN & Device Management
- Click the ThreatSTOP profile
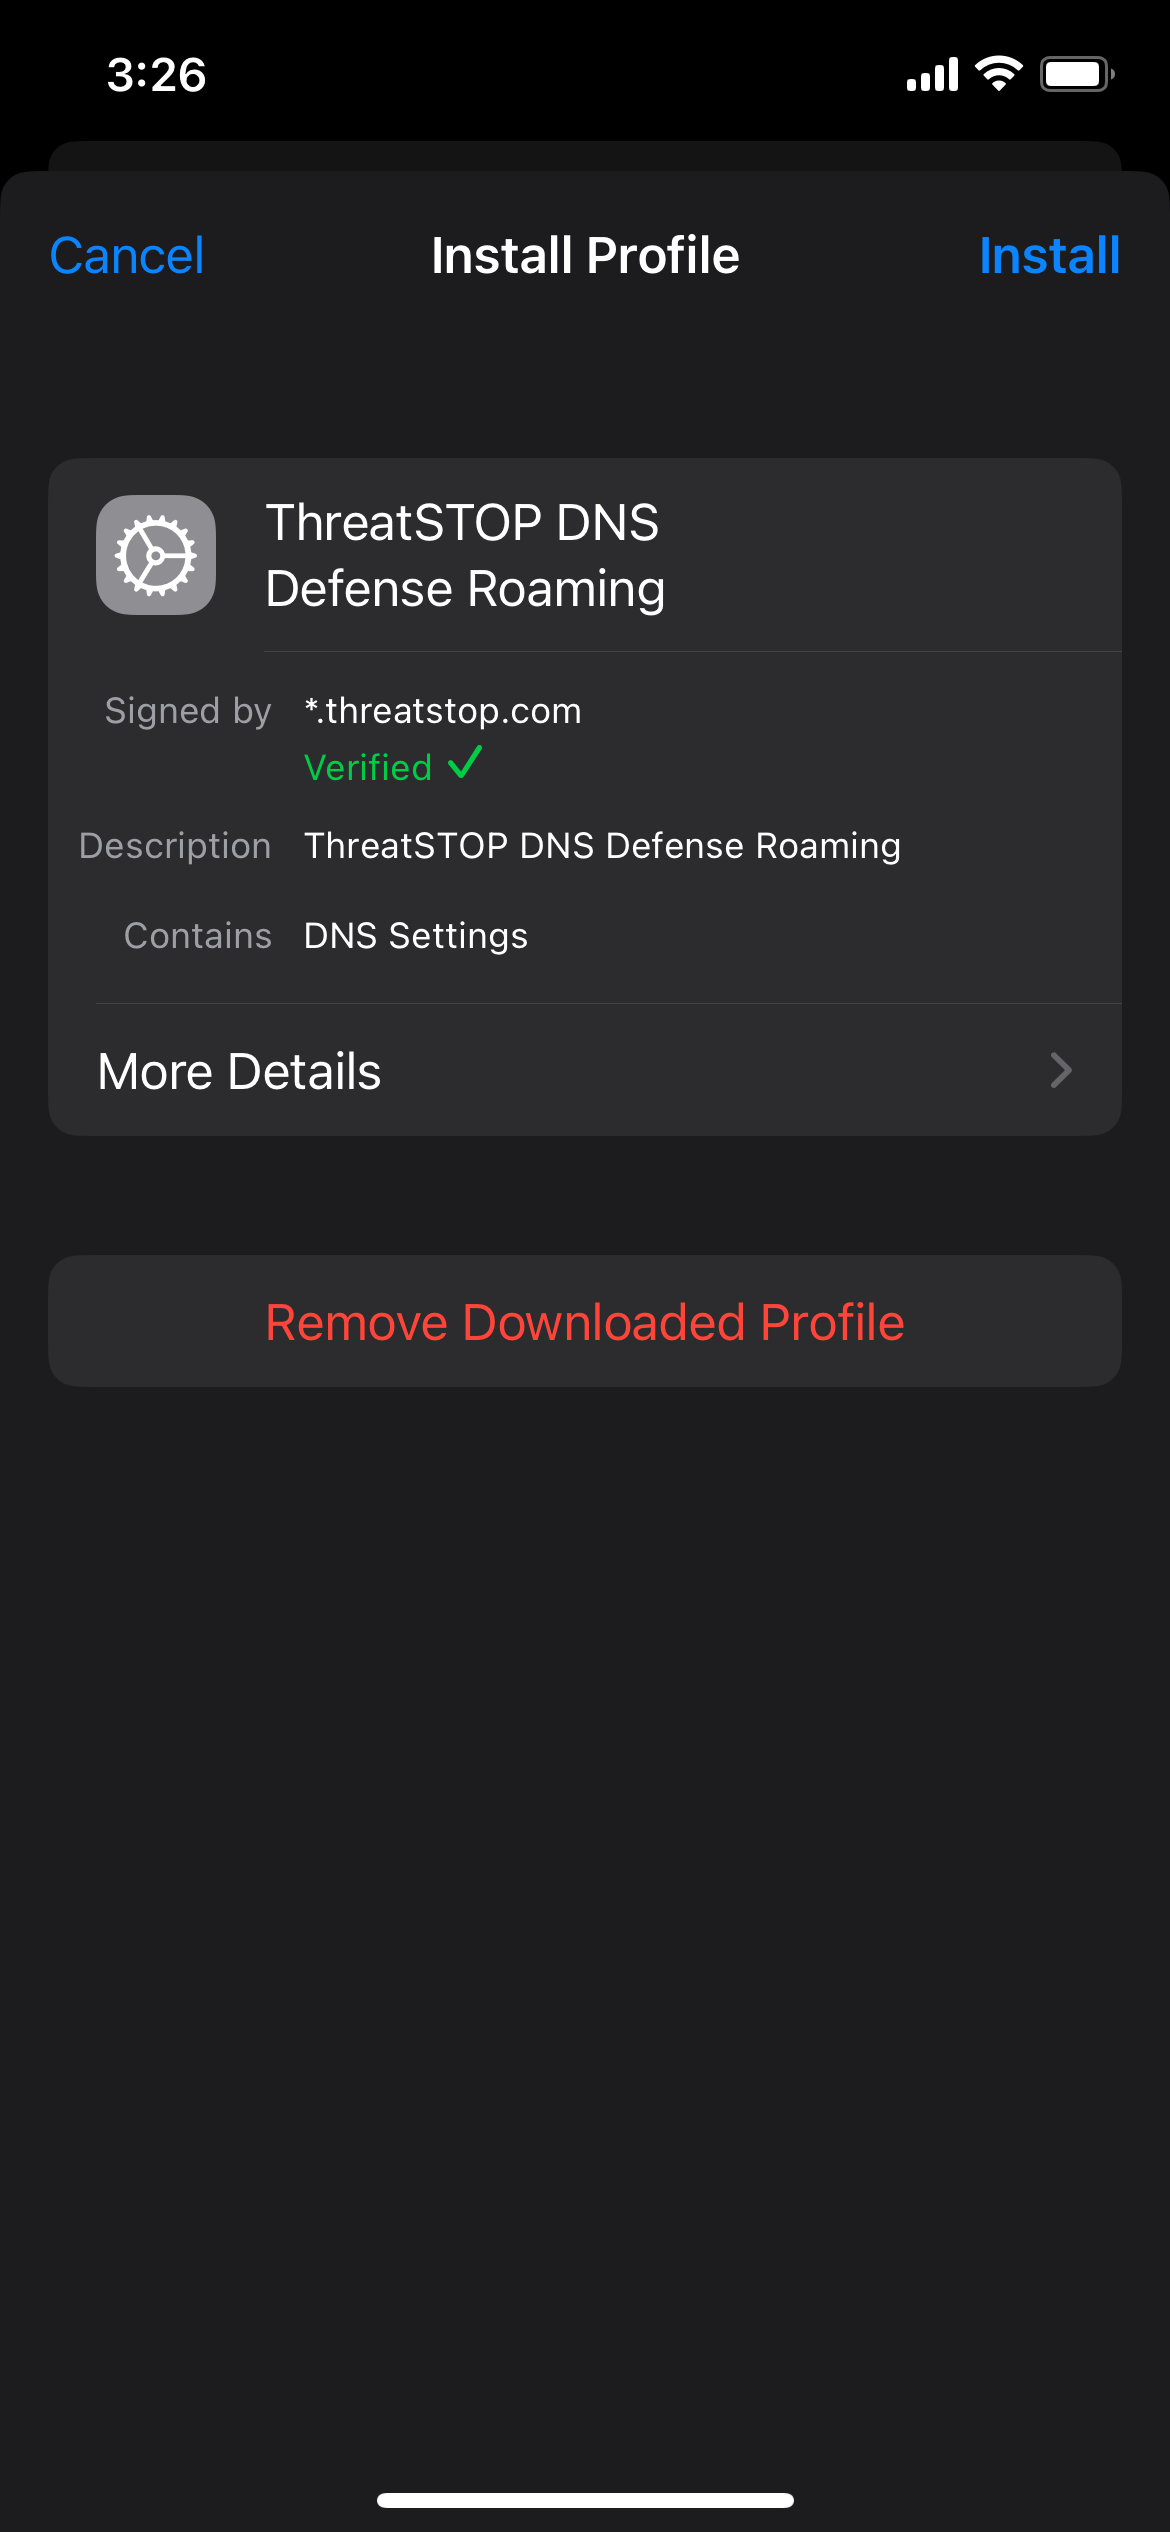
- Click Install and enter your pin code
- The VPN & Device Management will show that a DNS filter is in place in the Restrictions and Proxies section, where it can be toggled on and off.
- You can open the test URL http://ddc-test.threatstop.com in a browser. If the page loads successfully, your device is correctly configured!
To remove the ThreatSTOP DNS settings, the profile can be removed in the VPN & Device Management panel.
Android
Native support is limited to Android 13, and Google/Cloudflare’s DOH services. To use DNS Defense Roaming, we recommend using a DOH client, such as:
- DoH Guard. To configure DoH Guard, you will need a DNS Stamp generated with your service URL. The device setting section in the ThreatSTOP portal will display the DNS Stamp for your DNS Defense Roaming endpoint, or you can create one manually using DNSCrypt.
- Trust DNS
Automated deployment: Operating systems
We strongly recommend using an endpoint management solution for configuring clients at scale. Note that DOH settings can be overriden by end users when using BYOD devices.
Windows 11
Adding a DOH server can be scripted and requires two step:
- #1 Adding an template entry for the custom DOH server.
- #2 Applying the settings to each network interface via registry keys.
Below is a Powershell script adapted from https://github.com/helgeklein/Win-DNS-DoH-PoSh
#requires -RunAsAdministrator

# service IP
$ipv4a = "207.167.126.80"
$ipv4b = "207.167.127.80"

# EDIT the DoH query template
$template = "https://doh.threatstop.com/org_id/fragment"

# Remove existing DoH entries (there is no cmdlet to create *and/or* update entries)
Remove-DnsClientDohServerAddress -ServerAddress $ipv4a -Erroraction Ignore | Out-Null

# Add new DoH entries
Add-DnsClientDohServerAddress -ServerAddress $ipv4a -DohTemplate $template -AllowFallbackToUdp $False -AutoUpgrade $True
Add-DnsClientDohServerAddress -ServerAddress $ipv4b -DohTemplate $template -AllowFallbackToUdp $False -AutoUpgrade $True

$interfaces = Get-NetIPConfiguration | Where-Object InterfaceAlias -match "^Wi-Fi|^Ethernet"
foreach ($interface in $interfaces)
{
   # Set the configured DoH addresses as DNS servers
   Set-DnsClientServerAddress -InterfaceIndex ($interface).InterfaceIndex -ServerAddresses $ipv4a, $ipv4b

   # Add a last crucial registry value that the cmdlets as well as netsh.exe are missing
   # Without this, the newly added servers show up as unencrypted in the settings UI

   # Get the network interface GUID
   $interfaceId = $interface.NetAdapter.DeviceID

   # Build the registry paths to the interface's DoH settings
   $regpathbase  = "HKLM:\SYSTEM\CurrentControlSet\Services\Dnscache\InterfaceSpecificParameters"
   $regpathipv4  = "$regpathbase\$interfaceId\DohInterfaceSettings\Doh"
   $regpaths     = @()
   $regpaths     += "$regpathipv4\$ipv4a"
   $regpaths     += "$regpathipv4\$ipv4b"

   # Process each registry key (IPv4 primary/alternate DNS server)
   foreach ($regpath in $regpaths)
   {
      if (-not (Test-Path $regpath))
      {
         # Registry key does not exist yet -> create
         New-Item -Path $regpath -Force | Out-Null
      }

      # Add the crucial missing registry value
      New-ItemProperty -Path $regpath -Name "DohFlags" -Value 1 -PropertyType QWORD -Force | Out-Null
   }
}
This script can then be deployed as a logon script.
Windows 10
Automating deployment on Windows 10 will require distributing the DOH client of your choice and configuring it. The client should be configurable through configuration files that would be deployed using your endpoint management solution.
MacOS and IOS
You can distribute the mobileconfig profile to selected endpoints. The profile will be applied without requiring end users to take action. The profile will be signed through the UEM/MDM solution using its Apple MDM Push Certificate.
Android
We are not aware of a DOH client that can be configured with an endpoint management solution.
Automated deployment: Web Browsers
We also recommend locking the configuration browsers so they use DNS Defense Roaming as well.
The section below describes settings needed in Group Policies or Endpoint Management configuration to setup Chrome, Firefox and Edge. No configuration is required for Safari. Other browsers that provide enterprise management features / ADMX templates should be configurable as well.
Chrome on Windows
- Download the Chrome ADMX bundle
- Import it in the Windows Group Policy Editor or your Endpoint Management Solution
- Create a new policy (Settings Catalog)
- Set the DnsOverHttpsTemplates setting to your service URL. You must include the dns template variable, i.e. https://doh.threatstop.com/org_id/fragment{?dns}
Chrome on MacOS
Google’s documentation is here
- Create a plist with the DOH settings. The file must be named com.google.Chrome.plist.
<?xml version="1.0" encoding="UTF-8"?>
<!DOCTYPE plist PUBLIC "-//Apple//DTD PLIST 1.0//EN" "http://www.apple.com/DTDs/PropertyList-1.0.dtd">
<plist version="1.0">
<dict>
  <key>DnsOverHttpsMode</key>
  <string>secure</string>
  <key>DnsOverHttpsTemplates</key>
  <string>https://doh.threatstop.com/org_id/fragment</string>
</dict>
</plist>
- Using Python and mcxToProfile, generate a mobileconfig with the Chrome settings. mcxToProfile requires the pyobjc package.
python ./mcxToProfile/mcxToProfile.py --plist Configuration/com.google.Chrome.plist --identifier com.google.Chrome
- Distribute the mobileconfig profile using your endpoint management solution.
Firefox on Windows
Firefox’s DOH policy settings are documented here and set the network.trr.mode and network.trr.uri preferences.
- Download the Firefox ADMX bundle
- Import it in the Windows Group Policy Editor or your Endpoint Management Solution
- Create a new policy with the following settings:
- Software\Policies\Mozilla\Firefox\DNSOverHTTPS\Enabled: 0x1 (Enabled)
- Software\Policies\Mozilla\Firefox\DNSOverHTTPS\ProviderURL: your service URL
- Software\Policies\Mozilla\Firefox\DNSOverHTTPS\Locked: 0x1 (prevent user from making changes)
Mozilla also provides an example for deploying the configuration with Microsoft Intune.
Firefox on MacOS
Mozilla provides documentation for the Firefox DOH settings and admin profiles.
- Create a plist with the DOH settings.
<?xml version="1.0" encoding="UTF-8"?>
<!DOCTYPE plist PUBLIC "-//Apple//DTD PLIST 1.0//EN" "http://www.apple.com/DTDs/PropertyList-1.0.dtd">
<plist version="1.0">
<dict>
    <key>EnterprisePoliciesEnabled</key>
    <true/>
    <key>DNSOverHTTPS</key>
    <dict>
        <key>Enabled</key>
        <true/>
        <key>ProviderURL</key>
        <string>https://doh.threatstop.com/org_id/fragment</string>
        <key>Locked</key>
        <true/>
    </dict>
</dict>
</plist>
- Using Python and mcxToProfile, generate a mobileconfig with the Firefox settings. mcxToProfile requires the pyobjc package.
python ./mcxToProfile/mcxToProfile.py --plist org.mozilla.firefox.plist --identifier org.mozilla.firefox
- Distribute the mobileconfig profile using your endpoint management solution.
Edge on Windows
- Use Windows 11 Administrative Templates (ADMX) and Edge available from Microsoft.
- Using your Endpoint Management solution, setup a configuration profile
- Platform: Windows 10 and later
- Profile type: Settings Catalog
- Locate the DNS settings for Edge
- Enable Control the mode of DNS-over-HTTPS and Specify URI template of desired DNS-over-HTTPS resolver
- Set the URI, which must include the dns template variable, i.e. https://doh.threatstop.com/org_id/fragment{?dns}
- Select Enable DOH without insecure fallback
- Distribute the policy to your endpoints.
Once the configuration is deployed to a device, Edge will show that the DNS settings are managed by your organization (Edge > Settings > Privacy, search and services > use secure DNS).