Overview
This document describes general integration examples for ThreatSTOP DNS Defense using Response Policy Zones (RPZ) on F5®’s BIG IP/IQ devices. There are a few limitations with this method listed below.
Compatibility
Connectivity
| Service | Port | Direction | IP Address/CIDR Range | Protocol | Notes |
|---|---|---|---|---|---|
| DNS | 53/5353 | Outbound | 192.124.129.0/24 | UDP & TCP | We accept DNS requests via standard port 53, but also support port 5353 as an alternative |
| DNS notifications | 53 | Inbound | 192.124.129.0/24 | UDP | *optional Used for DNS notify for faster policy updates (see doc for more details) |
Supported Devices
| Device | Validated |
|---|---|
| F5® Big-IP/IQ® | 2020 † |
† Due to F5®’s Response Policy Zone (RPZ) implementation geared towards performance, only limited functionality available when setting up as Response Policy Zones. See Integration Limitations below.
Integration Limitations
- F5®’s RPZ is not a true full implementation of the Response Policy Zone Spec.
- With F5®’s RPZ you override all policy actions with one of two provided by F5® (walled garden, nxdomain) regardless of what the policy says the action should be.
- Filtering only for fully qualified domain names (FQDN). RPZ-IP, NSIP or NSDname records are not supported.
- Logging, and subsequently reporting is not available.
Quick Settings
Use the settings below for configuring the ThreatSTOP Response Policy Zone policy on your F5® device.
| Setting | Value |
|---|---|
| Zone Name | * Settings shown when accessing through Devices > Docs |
| Zone Type | Slave |
| Device ID | * Settings shown when accessing through Devices > Docs |
| Master Zone IP Address | Zone masters retrieved from device settings |
| Zone TSIG Key Name | * Settings shown when accessing through Devices > Docs |
| Zone TSIG Key Secret | * Settings shown when accessing through Devices > Docs |
| Notify IP Address | 192.124.129.0/24 (allows faster policy updates) |
Response Policy Zones via F5® DNS Cache
ThreatSTOP Portal setup
The following steps will be performed on the ThreatSTOP admin device portal.
Step 1 - Add & configure F5® device
- If you want to use a custom DNS Firewall policy, please read DNS Firewall Policies
- Create a new Device Entry: Click on Devices and then on Add Device.
- The Manufacturer is: F5®
- The Model is: Big-IP/IQ®
- Select the DNS Firewall policy - either a pre-defined policy or a custom policy
F5® Device setup
The following steps will be performed on the F5® device.
Step 2 - Setup Zone
Create TSIG
- In the ‘DNS’ section on the menu navigate to > Delivery > Keys > TSIG Key List (+)
- Click [Create] and enter in the settings as shown below
| Setting | Value |
|---|---|
| Name | * Settings shown when accessing through Devices > Docs |
| Algorithm | HMAC MD5 |
| Secret | * Settings shown when accessing through Devices > Docs |
- Click Finish to save
Create Nameserver
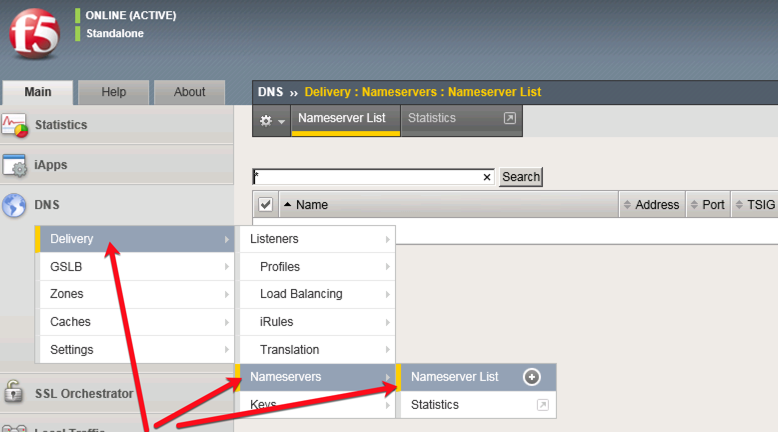
- In the ‘DNS’ section on the menu navigate to > Delivery > Nameservers > Nameserver List (+)
- Click [Create] and enter in the settings below
| Setting | Value |
|---|---|
| Name | ThreatSTOP DNS Defense |
| Address | * Settings shown when accessing through Devices > Docs |
| Service Port | 53 or 5353 |
| TSIG Key | select the TSIG key created on the previous step |
- Click [Finished] to save
Create Zone
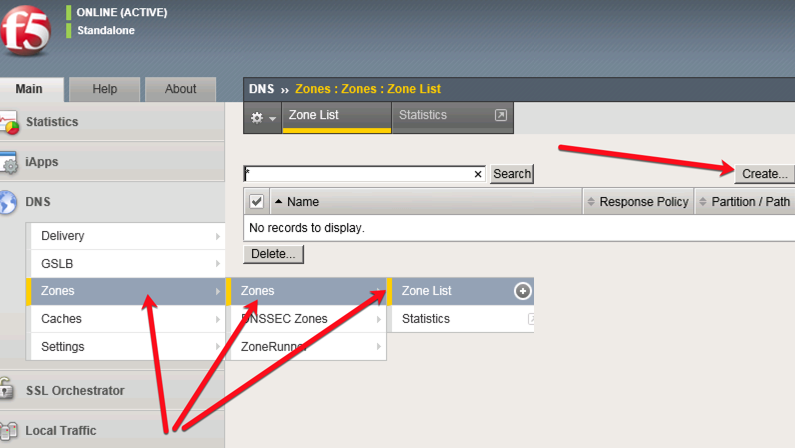
- In the ‘DNS’ section on the menu navigate to > Zones > Zones > Zone List (+)
- Click [Create] and enter in the settings below (note: ignore DNS Express settings if you are not licensed for it).
| Setting | Value |
|---|---|
| Name | * Settings shown when accessing through Devices > Docs |
| Server | ThreatSTOP DNS Defense |
| State | Enabled |
| Notify Action | Consume |
| Allow NOTIFY From | 192.124.129.0/24 |
| Verify Notify TSIG | -unchecked- |
| Response Policy | -checked- |
| Nameservers | ThreatSTOP DNS Defense |
| Server Key | * Settings shown when accessing through Devices > Docs |
- Click [Update] to save
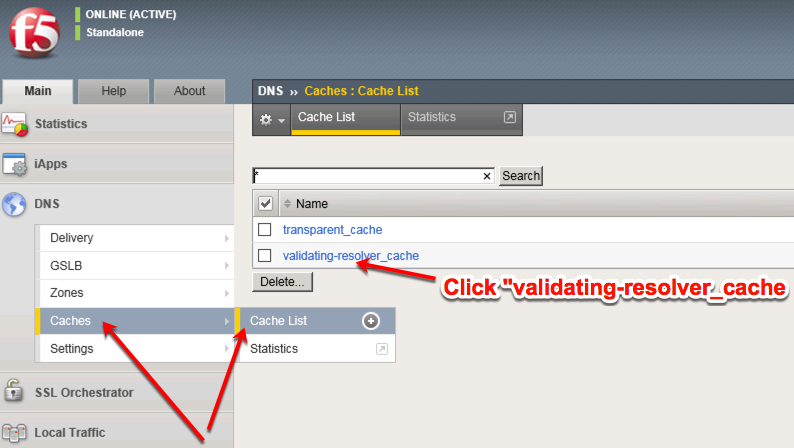
Step 3 - Setup DNS cache
You can setup the RPZ to work with either transparent or resolver caches. If in doubt, choose resolver or validating resolver if using DNSSEC. Read more about F5® Caches here.
- In the ‘DNS’ section on the menu navigate to > Caches > Cache List (+)
- Click [Create] and setup the cache as your system resources permit
- Click on the newly created cache and select ‘Response Policy Zones’ along the top tabs > [Add]
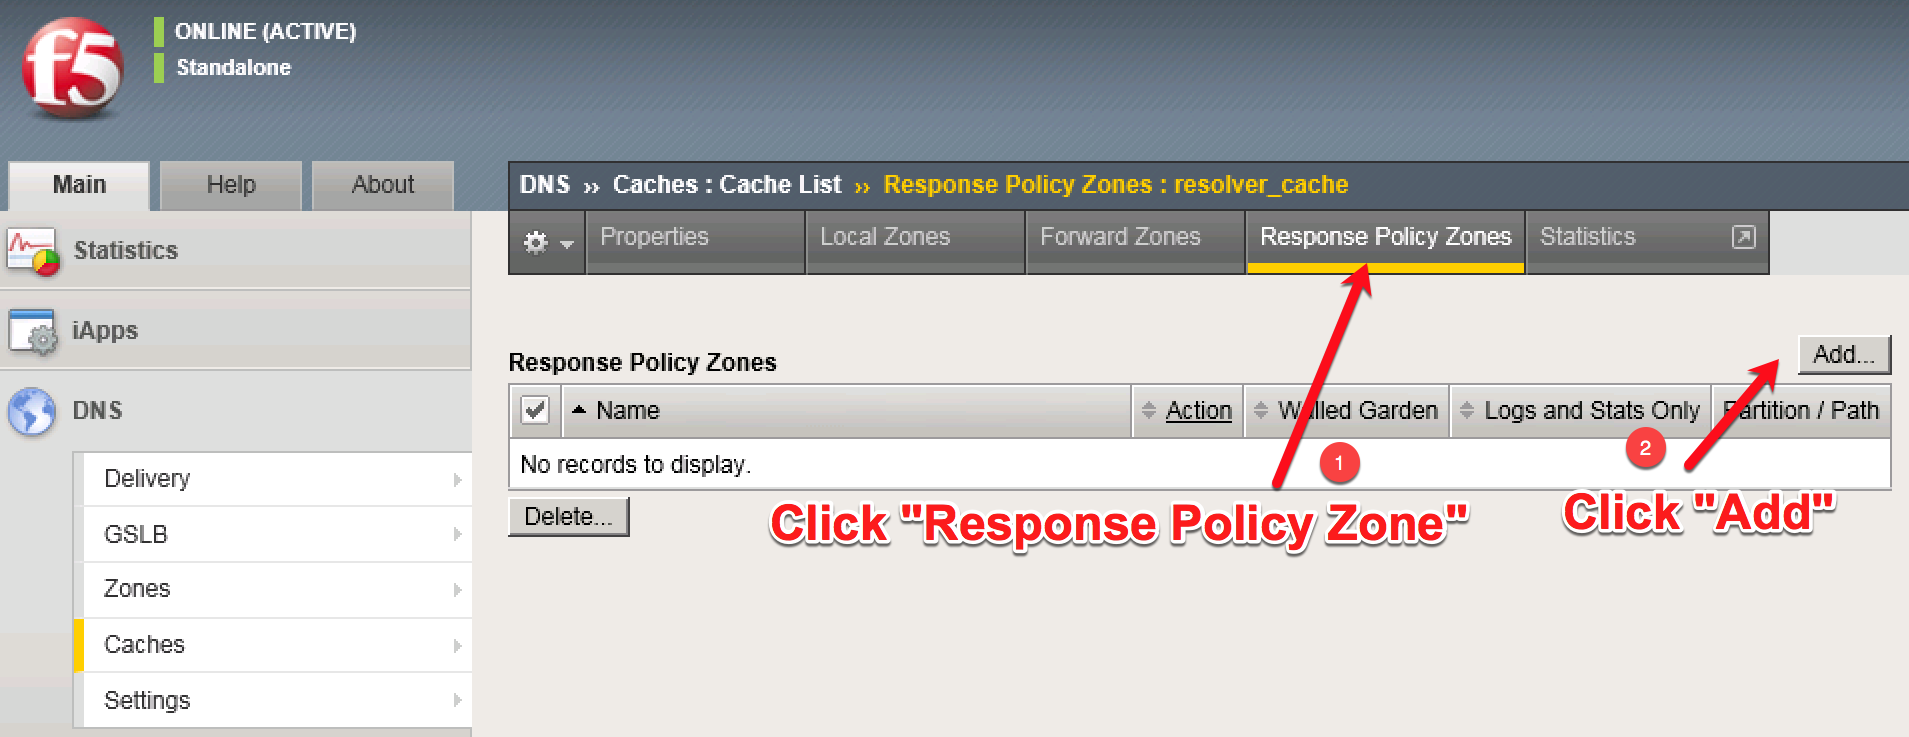
- Select the action to be performed by ALL supported records in your DNS Defense Policy.
- Leave Logs and Stats Only unchecked.
- Click [Finished] to save
For help setting up a walled garden, see the following F5® RPZ Lab
Step 4 - Setup DNS Profile
- In the ‘DNS’ section on the menu navigate to > Delivery > Profiles > DNS (+)
- Click [Create] and set DNS Cache > Enabled, DNS Cache Name > the cache setup on the previous step.
- You may want to set Process Recursion Desired > Enabled if using this as a resolver.
- Adjust all other settings to your environments needs and hit [Finished] to save.
Step 5 - Setup DNS listener
- In the ‘DNS’ section on the menu navigate to > Delivery > Listeners > Listener List (+)
- Click [Create] and setup a DNS listener as shown in the guide
- Make sure to select the DNS Profile we created in the previous step.
- Hit [Finished] to save
Step 6 - Test configuration
To verify the installation was successful, we must test it. Point any client with access to the newly created DNS listener and try resolving a few addresses.
We will show some example commands using the dig utility, but can be easily adapted for nslookup. See more from F5® here
- Test
dig @<IP Address of DNS Listener> ts-dns.threatstop.com, which should succeed and return the IP Address. - Test
dig @<IP Address of DNS Listener> bad.threatstop.com, which should return whatever action you setup (walled garden or NXDOMAIN).
Next you’ll want to verify a client outside of the listeners network is not reproduce similar results.