Overview
This document covers the integration process for ThreatSTOP’s IP Defense service on a Cisco ASA via Rest API. This integration requires a ThreatSTOP Centralized Manager (TSCM) Virtual Machine (VM) stood up in any environment with access to the ASA’s REST API. Once configured the TSCM will routinely update the ASA ACL refreshing based on the policy you select. It will also collect logs for upstream analysis and data reporting.
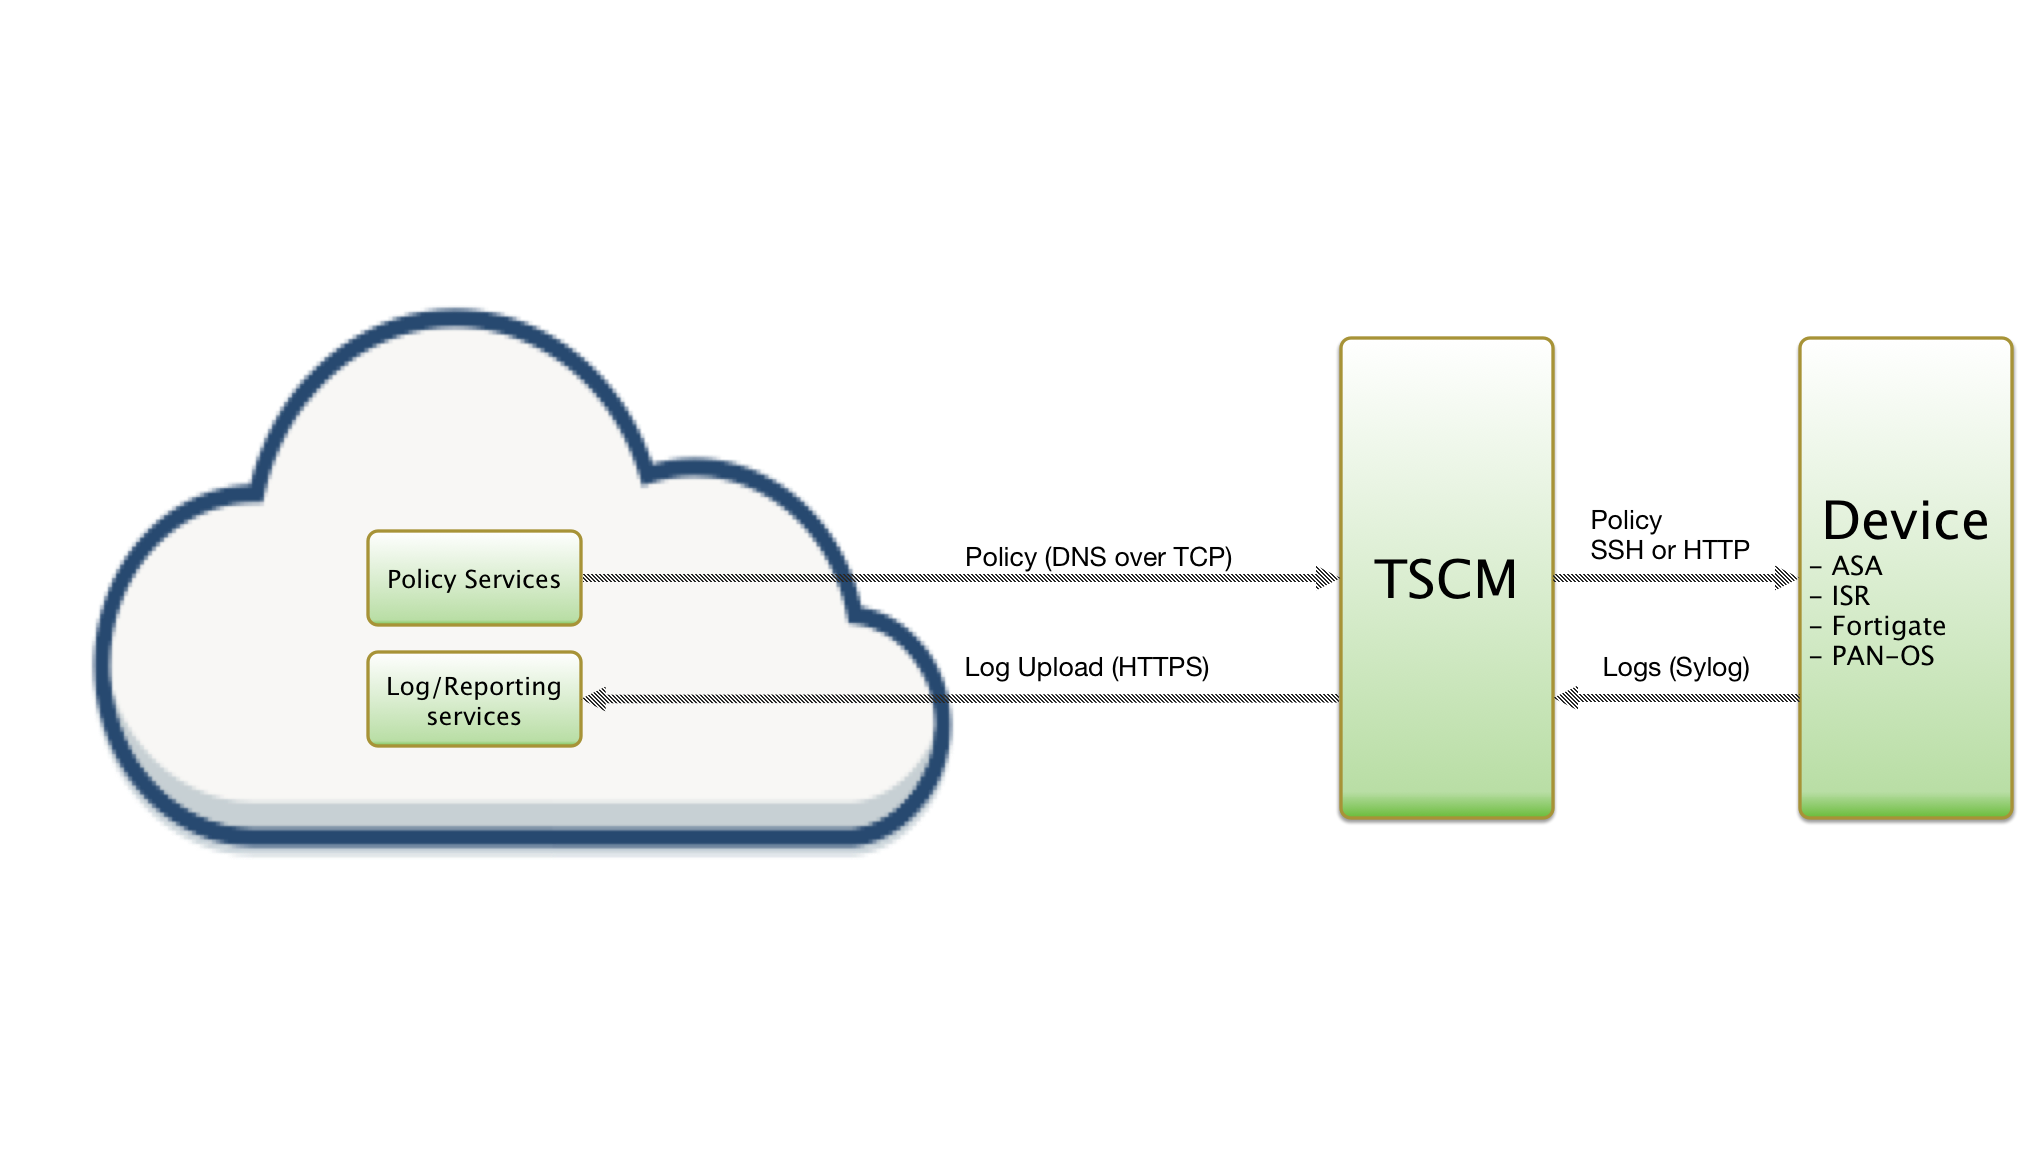
ThreatSTOP Data Flow Diagram
Compatibility
ASA Compatibility
- The current version of the Cisco ASA REST API integration is an active BETA release. We’ve tested this on ASAv running version 9.15(1). The BETA designation is due to the fact we’ve have seen some stability issues if the ASA is loaded with a larger policy when system hardware resources are low. For this reason caution should be taken in specifying a max policy size and gradually increased over time.
| Manufacturer | Version | API Version | Supported |
|---|---|---|---|
| Cisco ASAv | 9.15(x) | 1.3(x) | Yes † |
| Cisco ASA | 9.15(x) | 1.3(x) | Yes † |
- † - This is a BETA release
ASA REST API Compatibility Matrix
Please see the official Cisco REST API compatibility matrix to see if your device / firmware supports running the REST API.
- The Maximum Policy Size is the maximum number of ACLs that your device can support. It depends on the hardware and memory available on the device. Please contact your Cisco reseller to find out the capacity of your device, or refer to this independent document .
Install Methods
TSCM CLI Install
Installing via CLI setup wizard on a TSCM virtual machine (VM), which is covered by this document. You will setup a device via our admin portal, then add the device to the TSCM via SSH CLI commands. To change configuration settings such as policy, you will have to change it on the admin portal as well as the TSCM (by running tsadmin configure <device name>).
TSCM Install via Web Automation
Installing your device via Web Automation, which allows you to configure settings on our web interface and have them automatically update on the TSCM / device after initial installation. This method works by initiating a pairing command on the device to link up to our services. From that point forward your device will stay in sync with configuration updates you make on the portal. For more information regarding Web Automation here.
Quick settings
Quick settings are provided below for expert installers who have already read through the documentation and understand what they are doing.
tsadmin add --type=asarest --block_list=[Block List] --allow_list=[Allow List] --device_id=[Device ID] --device=[Device IP Address] --username=[Device REST API username] --password=[REST API Password]
| Setting | Value |
|---|---|
| Device ID | Retrieved from the device settings page |
| Policy (Block List) | Retrieved from the device settings page |
| Policy (Allow List) | Retrieved from the device settings page |
Installation considerations
- If you are looking for time-tested stability, use either our SSH implementation or the firepower build.
- This is a BETA release, please monitor your installations accordingly. See excerpt from Cisco’s website regarding the API instability and recommended recourse below.
- While this build tested fine on several different versions of the ASA platforms, we’ve noticed ASAs with lower resources (2 core/8GB ram) start to return HTTP 500 response codes suddenly even while the rest of the system seems to operate ok. Unfortunately, once you get into this mode it usually requires manual intervention to revert the REST API to good working order. See article for more details.
…“Maximum Supported Configuration Size
The ASA Rest API is an “on-board” application running inside the physical ASA, and as such has a limitation on the memory allocated to it. Maximum supported running configuration size has increased over the release cycle to approximately 2 MB on recent platforms such as the 5555 and 5585.
The ASA Rest API also has memory constraints on the virtual ASA platforms. Total memory on the ASAv5 can be 1.5 GB, while on the ASAv10 it is 2 GB. The Rest API limits are 450 KB and 500 KB for the ASAv5 and ASAv10, respectively.
Therefore, be aware that large running configurations can produce exceptions in various memory-intensive situations such as a large number of concurrent requests, or large request volumes. In these situations, Rest API GET/PUT/POST calls may begin failing with 500 - Internal Server Error messages, and the Rest API Agent will restart automatically each time.
The workarounds to this situation are either move to higher-memory ASA/FPR or ASAV platforms, or reduce the size of the running configuration.”…
no rest-api agent followed by rest-api agent in configuration terminal mode to restart the API and allow policy updates. It is extremely important to ensure the ThreatSTOP policy is not too large for your firewall device.Please read 9.14 release notes for more information.
Prerequisites
TSCM System Specs
The TSCM is delivered as an OVA or VHD image, built using Ubuntu 24.04 as the base Operating System. It is preconfigured with:
- 2 CPUs
- 2 GB of RAM
- 20 GB of disk space
You will need a Hypervisor such as vSphere, ESXi, Virtualbox or Hyper-V to deploy the image.
Cisco ASA Requirements
-
Install and enable the Cisco REST API
.SPAfile. -
REST API account with enough privileges to POST/PUT/DELETE. At the time of this writing that is privilege
15. See Command Authorization section of their doc for more information.- Privilege level 3 or greater is required to invoke monitoring requests.
- Privilege level 5 or greater is required for invoking GET requests.
- Privilege level 15 is necessary for invoking PUT/POST/DELETE operations.
Connectivity
To retrieve its configuration and policy, and to upload log data, the firewall needs the following connectivity:
- HTTPS API (Outbound TCP/443) from TSCM VM to the Cisco ASA REST API
- Outbound TCP port 443
- DNS over TCP
- Hostname: ts-dns.threatstop.com
- IP Address Range: 192.124.129.0/24
- Outbound TCP port 53 or 5353
- HTTPS
- Hostname: logs.threatstop.com
- IP Address Range: 204.68.99.208/28
- Outbound TCP port 443
It must also be able to communicate with the Cisco device:
- HTTPS
- TCP/443
- From the TSCM to the ASA
- Syslog
- TCP/514, TCP/1470 or UDP/514
- From the ASA to the TSCM
Setup
Step 1 - Portal device configuration
During this step, you will create a device entry on the Admin portal to provision your device on the ThreatSTOP side. You will select a device type IP Defense > Cisco > ASA via REST API and enter the configuration settings.
To create a ASA device entry:
- Log into the Admin Portal with your ThreatSTOP account
- Browse to the Device page and click Add Device
- Select the ASA model:
- Type: IP Defense
- Manufacturer: Cisco
- Model: ASA via REST API
- Integration Type: TSCM
The Admin Portal will display a form to enter the device settings described below and the links to retrieve the TSCM image.
- Nickname: this is a mnemonic name used to identify the device. It can be set to any string (A-Z, 0-9, - and _). If you create multiple device entries, each entry must have a unique nickname. The Nickname will be used to identify the device on the TSCM and in the Reporting user interface.
- Policy: select a pre-defined policy or a customized policy. It must be an IP Defense Policy.
- IP Type: Access to the ThreatSTOP services is controlled in part using an ACL allowing the device IP to connect. If your device has a static public IP address (the most common case), select static. If your device has a dynamic public IP address, the ThreatSTOP services can lookup the IP address using a DNS fully-qualified name (FQDN).
- Domain name: If
IP Typewas set to “Dynamic IP”, this is a DNS FQDN which must be kept up-to-date as an A record pointing to the device’s dynamic IP. - Public IP address: In static mode, this is the public IP address of the device. It is possible to configure multiple device entries with the same public IP address.
- Note: An optional field to store a note of your choice about the device - location, identifiers, model…
Upon saving the form, a device entry will be created in ThreatSTOP’s cloud.
Step 2 - Backup ASA configuration
Before we get started making changes to your ASA, although not required, it’s good practice to make a backup of your existing device configuration. In the example below we’ll make an on-device local backup called pre-threatstop-config.backup but you can name it whatever makes sense to you.
copy running-config flash:/pre-threatstop-config.backup
We recommend getting a copy off the device as well but that’s outside the scope of this document.
Step 3 - ASA REST API Account Provisioning
You will need to supply REST API account credentials during the setup. If you haven’t done so already, let’s provision an account below.
- Log into your ASA, then get into global config mode
- Identify the minimum network slice & network interface that should be allowed to access the HTTP interface. In our example below we’ll say 10.0.1.0/24 can access the credentials via the “Management” interface.
ciscoasa(config)# aaa authentication http console LOCAL
ciscoasa(config)# http server enable
ciscoasa(config)# http 10.0.1.0 255.255.255.0 management
ciscoasa(config)# username threatstop password L0nG$3Cre7P@$sW0RdHAsH priv 15
Step 4 - Enabling the REST API
To enable the REST API you will have to have the .SPA file that corresponds to your version of IOS. If you are following along with a cloud instance of the Cisco ASAv, the .SPA file is already loaded on your device. Note the filenames may be newer on your device.
See the following document for detailed steps to enable the REST API.
config term
ciscoasa(config)# rest-api image boot:/asa-restapi-715183-lfbff-k8.SPA
ciscoasa(config)# rest-api agent
Step 5 - Download software
If you’ve just downloaded a fresh .OVA from the site, you can skip this step.
After booting the TSCM and logging in via ssh, let’s verify you have the ts-asarest module installed as shown below (version may be newer).
-
Using ssh, login as threatstop to your TSCM VM and type the following commands
# first we will check to see if ts-awsrest module is installed
tsadmin version --all
threatstop@tsclient$ tsadmin version --all
  [INFO ] : ThreatSTOP Versions:
  Module               Version
  -------------------- ----------
    TSCM-Core          1.51-08
    ts-asa             3.42
    ts-asarest         1.02
If you get an error, or don’t see ts-asarest listed in the output, create a snapshot of your VM and upgrade your ThreatSTOP software as shown below.
threatstop@tsclient$ sudo apt-get update && sudo apt-get dist-upgrade -y && sudo apt-get install -y ts-asarest

# to verify run the previous command and look for the new module name.
Step 6 - Configure the Device settings using the TSCM CLI
This step will link the TSCM VM to the device entry created in step one.
The TSCM has a configuration utility named tsadmin. A reference for the utility is provided here but we will cover the full installation steps below.

-
Obtain the Device ID and Policy zone names from the device configuration or device info pages on the portal
-
Login with the threatstop account using ssh
- Validate that the TSCM can reach the ASA using SSH
ssh admin@<ASA IP address> The authenticity of host '<ip address>' can't be established. ECDSA key fingerprint is SHA256:UW05wRgAblpwjfObj4ZklSYfau8PnoE1GXXuSCO5Zfs. Are you sure you want to continue connecting (yes/no)?- Accept the host key
- Login to validate the password
- Run the following command:
$ tsadmin add --type asarest [device nickname]
-
The tsadmin command will prompt you for the following device settings.
-
Device ID (tdid): A unique identifier for the device. This setting must be correct for the TSCM to operate normally. This setting can be retrieved from the Device settings or Device Info page on the portal.
-
Device Management IP address: This is the internal address of the device. The TSCM will communicate with the ASA via SSH using this IP address.
-
Block list name: the name of the zone associated with the Block list of the policy selected in the portal. This setting can be retrieved from the Device settings or Device Info page on the portal.
-
Allow list name: the name of the zone associated with the Allow list of the policy selected in the portal. This setting can be retrieved from the Device settings or Device Info page on the portal.
-
Prefix: a name we’ll use to label Object Groups that the TSCM will use to store the subnets. The default is
ThreatSTOP, which will create two main object-groups (ThreatSTOP-Block, ThreatSTOP-Allow) you can assign to access-lists, access-groups, etc… -
Token Auth: Defaults to “yes”, which will allow use of REST API Tokens, VS. constantly sending credentials.
-
Allow Self-Signed Certificates: This setting allows your TSCM to connect to the ASA’s API even if the certificate is a self-signed (insecure) certificate. We highly recommend you install a proper SSL certificate on your HTTP endpoints. Allowing this setting in an insecure environment could have security implications.
- Max Policy Size: select the highest number of ACLs supported by your ASA; see this document for guidance. If the policy becomes larger than this setting, the TSCM will truncate it to match the configured setting.
- Send logs to ThreatSTOP?: If enabled, the TSCM will send logs received from the device to the ThreatSTOP reporting system. This is the recommended setting. When disabled, logs for this device will not be available for reporting in the Portal.
- Device username: the username for a Cisco ASA account available via REST API
- Device password: the password for the REST API account
Advanced Settings
The TSCM supports the following advanced settings, which cover uncommon ASA configurations or network environments. To enable the advanced settings, add the –advanced option to the tsadmin command line
$ tsadmin add --type asarest --advanced [device nickname]
...
Advanced settings
DNS port : (53 (standard) or 5353) [default 53]
Please enter all additional syslog source IP(s). Use none for none.
  Separate multiple entries with a space : [default none]
Log rotate size : (in Kb, minimum 50) [default 100]
Enable policy updates? (y or n) [default y]
Enable syslog forward? (y or n) [default n]
Log upload proxy ( e.g. 'http://proxydomain.com:3128', 'none' for none)?
  [default none]
Is this device part of an HA/cluster setup?
  If so, enter the additional IP(s) (space-separated),
  or "none" for no HA : [default none]
Custom REST API URL: (Custom REST API URL if it is non-standard
  https://<device_ip>/api. If unsure leave default value 'auto'.)
  [default auto]
Object-Group Size: (The number of CIDRs in the nested Object-Group(s).)
  [default 10000]
[INFO ] : Object Group size set to [10,000]
...
-
DNS Port: The TSCM uses TCP Port 53 (outbound connections) to retrieve policy data. If this port is blocked or filtered (for example, networks using a DNS Application Layer Gateway), use this setting to switch to TCP Port 5353.
-
Additional syslog source IP(s): Typically, logs will be sent over syslog by the device itself. If logs are sent by another IP address (for example, after being processed by a SIEM, or in High-Availability configurations), that IP address should be configured in this field.
-
Log rotate size: the TSCM will upload logs after 15 minutes and when the log file size is reached. For systems under very heavy network traffic with many blocked connections, lowering this value will cause logs to be uploaded more often.
-
Enable policy updates: this setting can be used to temporarily disabled policy updates by the TSCM. This is not recommended but can be used if device configuration changes needed to be suspended.
-
Syslog Forward: if you want the TSCM to forward the logs to another systems (in addition to uploading them to ThreatSTOP’s cloud for reporting), enter yes. The CLI will prompt for the IP address, Port and protocol (UDP or TCP) that logs should be forwarded to.
-
Log Upload Proxy: If your environment requires using a proxy to reach HTTPs URLs, you can specify the address of a proxy. The proxy must support HTTPs using the CONNECT protocol. The proxy address must be http://address:port, where address is either an IP address or a fully-qualified domain name. HTTPs proxies are not supported. If you provide a proxy URL, the TSCM configuration will also prompt you for an optional user and password. Provide them if the proxy requires authentication.
-
Custom password prompt: if you have customized the ASA configuration to change the ssh password prompt (Password:), you can configure the value that the TSCM should look for when connecting to the ASA.
-
Custom REST API URL: This optional field over-rides the automatically generated URL set by leaving the setting on ‘auto’. Use this setting when you install a proper SSL Certificate and want to connect via the hostname. This should be the root API url. For example, if your device is accessible via https://uswest.asa.acme.co/api/doc , your root API url would be simply https://uswest.asa.acme.co
-
Object-Group Size: This setting sets the maximum amount of addresses in an object-group before a new object-group is created.
At this time, the TSCM has successfully configured the device entry.
You can view a list of devices linked on the TSCM by running:
$ tsadmin list
| Device name | Type | Device ID     | Management IP | Log upload ID | Log  | Log uploads |
| tstest      | asa  | tdid_abcd1234 | 172.21.50.3   | tdid_abcd1234 | 100k | enabled     |
- From this point on, the TSCM will retrieve policy data (IP address subnets) and configure them on the ASA, every hour.
- To force the initial update and proceed with testing, run the following command
$ tsadmin update <device name>
This will create (if not already created) and populate the two Object Groups defined in the device settings.
To verify that the Object Group have been created, open an SSH session to the device and execute the following commands:
enable
configure terminal
show running-config object-group id <Object Group name>
Step 7 - ASA configuration
Applying ACLs
With the Object Groups populated, the last step is to configure the ASA. Open an SSH session and execute the following commands.
enable
configure terminal
(config)# access-list global_access extended permit ip object-group ThreatSTOP-Allow any log
(config)# access-list global_access extended permit ip any object-group ThreatSTOP-Allow log
(config)# access-list global_access extended deny ip object-group ThreatSTOP-Block any log
(config)# access-list global_access extended deny ip any object-group ThreatSTOP-Block log
end
Enabling Log forwarding
To configure the device to send logs to the TSCM, enter the following:
enable
configure terminal
logging enable
logging timestamp
logging host management <TSCM IP address>
end
Step 8 - Testing Configuration
There are several ways of testing the ASA is properly blocking and logging web traffic. A few are listed below as examples.
- Log into a machine behind the Cisco ASA firewall and attempt to visit bad.threatstop.com
- Use packet-tracer to verify the expected policy is being applied to traffic
ASA# packet-tracer input inside tcp 64.87.3.133 80 10.0.0.50 80 detailed
See this excellent guide to identify which policy may be taking affect.
If you are not able to ping, you may have to enable ICMP in your global policy map. See this article for more details.
policy-map global_policy
   class inspection_default
   inspect icmp
Logging and Reporting
If log upload is enabled, the firewall will now upload logs every 15 minutes, as long as there were ASA Actions performed by the policy since the last upload. The logs can be analyzed in the IP Defense Reports 15 minutes after they’ve been uploaded.
- To manually run log send process run
tsadmin logs <device name>.
Logs are stored in /var/log/threatstop/devices/<device name>/syslog
Configuration changes
Changing the policy
- Update the policy assigned to the device in the Admin Portal
- Wait 15 minutes for the changes to propagate to ThreatSTOP’s policy service
- Run
tsadmin configure <device name>commands to set the updated block and allow policy names.
Uninstall steps
- To remove the integration, the first step is to remove any configuration you have setup using the Object-Groups (ThreatSTOP-Block & ThreatSTOP-Allow unless you changed prefix ). Do a
show run | grep ThreatSTOPto see if you have any access-group / access-list directives in your configuration & remove them. Below are some examples of removing access-group(s) / access-list(s).
no access-group inside_access_out in interface inside
enable
configure terminal
(config)#no access-list global_access extended permit ip object-group ThreatSTOP-Allow any log
(config)#no access-list global_access extended permit ip any object-group ThreatSTOP-Allow log
(config)#no access-list global_access extended deny ip object-group ThreatSTOP-Block any log
(config)#no access-list global_access extended deny ip any object-group ThreatSTOP-Block log
end
- Next, we’ll remove the device on the TSCM. This will stop any policy updates or changes to the ASA device.
$ tsadmin remove <devicename>
- If log forwarding was enabled, turn it off with one of the following commands:
- If you have log forwarded to several servers
enable configure terminal no logging host inside <TSCM IP Address> - or, to disable logging entirely:
enable
configure terminal
no logging
- If you have log forwarded to several servers
- The last step is to delete the device entry on the Portal, using the Device List page. This step will caused the log data from the device to be unavailable in the Reporting interface of the Portal. If needed, you can recreate a new device entry for the same device, with the same or different settings. Note that the new entry will have a different Device ID for linking the TSCM.
Additional considerations
Support for multiple devices
High-Availability clusters
If your Cisco ASA is part of a High-Availability cluster, the TSCM can connect to each device in the cluster to keep the Object Groups up-to-date. If your devices share a single IP address and replicate configuration, the TSCM will continue updating the object-groups as expected. If your setup has individual ASAs with their own independent IP address, add another device in the TSCM to have the object-groups updated the same way as the first.
Other operations
Current configuration
To view the current settings on the TSCM, run
$ tsadmin show <device name>
Configuration changes
- To update the configuration of the device, run the tsadmin ‘configure’ command:
$ tsadmin configure <device name>
The configure command also supports the –advanced option enable the advanced settings described in the configuration section of this document.
Software updates
To update the TIP and retrieve new versions of the ThreatSTOP software, login as threatstop and run the following command:
$ sudo apt-get update && sudo apt-get -y dist-upgrade
Troubleshooting
- Failure to retrieve policy: tsadmin add fails with this error: “block or allow list [name] could not be fetched from ThreatSTOP DNS servers.” There are two common causes:
- A network connectivity problem using DNS over TCP (Outbound connection to ts-dns.threatstop.com on Port 53).
- the policy is not available yet. It typically takes 15 minutes for new devices and new policies to be activated in the Policy Service.
-
If the network connectivity is ok, and 15 minutes have elapsed since the device entry was created, please contact ThreatSTOP Support at support@threatstop.com.
- Some versions of the Cisco ASA software include a DNS Application Layer Gateway (ALG) enabled by default, which interferes with ThreatSTOP’s DNS updates, creating failures to retrieve the policy data. The ALG can be disabled with these commands:
no ip nat service alg tcp dns no ip nat service alg udp dns - If tsadmin add fails to connect to the device, check the credentials (username, password and enable password). If they are correct, check if the ssh password prompt has been changed from Cisco’s defaults (Password:).
- If you are unsure where to start, simply turning up debugging output to a SSH session may give you a hint as to what is happening. Look at this article to see how to turn on debugging to the
terminal monitor. - Another great built-in utility is the packet
capturecommand. This is useful when troubleshooting when you are unsure client traffic is hitting your ASA. See how to use it here. - If traffic is not flowing but should be, check the following two settings to see if they may apply to your specific setup.
Please review the following commands and comments to ensure you get the expected behavior. The first pertains to same-security-levels and the second to traffic amongst zones:
-
same-security-traffic permit inter-interface- “PERMIT communication between different interfaces and* zones with the *same security level”
-
same-security-traffic permit intra-interface- “PERMIT communication between peers connected to the same interface and different interfaces in the same zone”
Please note: if you do not*** **enable one, or both, of these settings, the default action will be to DENY all traffic inter- or intra-interface,** **amongst all interfaces of the same security level*.
- Failed to retrieve policy error message
- If you receive this error message while configuring the ThreatSTOP software, check the connectivity to the ThreatSTOP DNS service described above.
- If this is a new policy or device, wait 15 minutes for the configuration to propagate.
- If the issue persists, please contact ThreatSTOP support.
- Failing updates / overloaded REST API returning HTTP 500 responses
- If you have started getting 500 response codes from the REST API, first try to restart the rest API by running
no rest-api agentfollowed byrest-api agent. - If this does not work, you may have loaded too many objects onto your system. You can try setting your maxpolicysize setting lower, then manually deleting some of the object-groups then run
tsadmin update <device name>again.
- If you have started getting 500 response codes from the REST API, first try to restart the rest API by running
conf t
no object-group network ThreatSTOP-Block-10
no object-group network ThreatSTOP-Block-9
...
It is important to run update after doing this to see if you’ve freed enough memory for the REST API. This also ensures the correct object-groups are nested in the master object-groups (ThreatSTOP-Block & ThreatSTOP-Allow).
To get a list of configured settings run:
tsadmin show <device name>
To get a full list of available command line parameters on the command line type:
tsadmin add --type asarest --help
Version Changelog
| Version | Release Date | Notes |
|---|---|---|
| 1.00 | 2021-04-01 | Initial Cisco ASA REST API support |
References and Related Documents
- TSCM reference
- Creating custom policies
- Cisco ASA ICMP enable
- Using Cisco Packet Tracer to identify blocking policies
- Applying access rules
- Number of ACLs for Cisco ASA (independent document)
- Cisco Logging Reference
- Cisco Firepower datasheet
- Getting started with Cisco ASAv in AWS
- Web Automaation version of TSCM for ASA