Overview
This document describes the installation and integration for ThreatSTOP DNS Defense on Microsoft Windows Server 2016 & 2019 via Microsoft’s native DNS Role.
Setup proceedure summary:
- Open a ThreatSTOP account if you have not already done so.
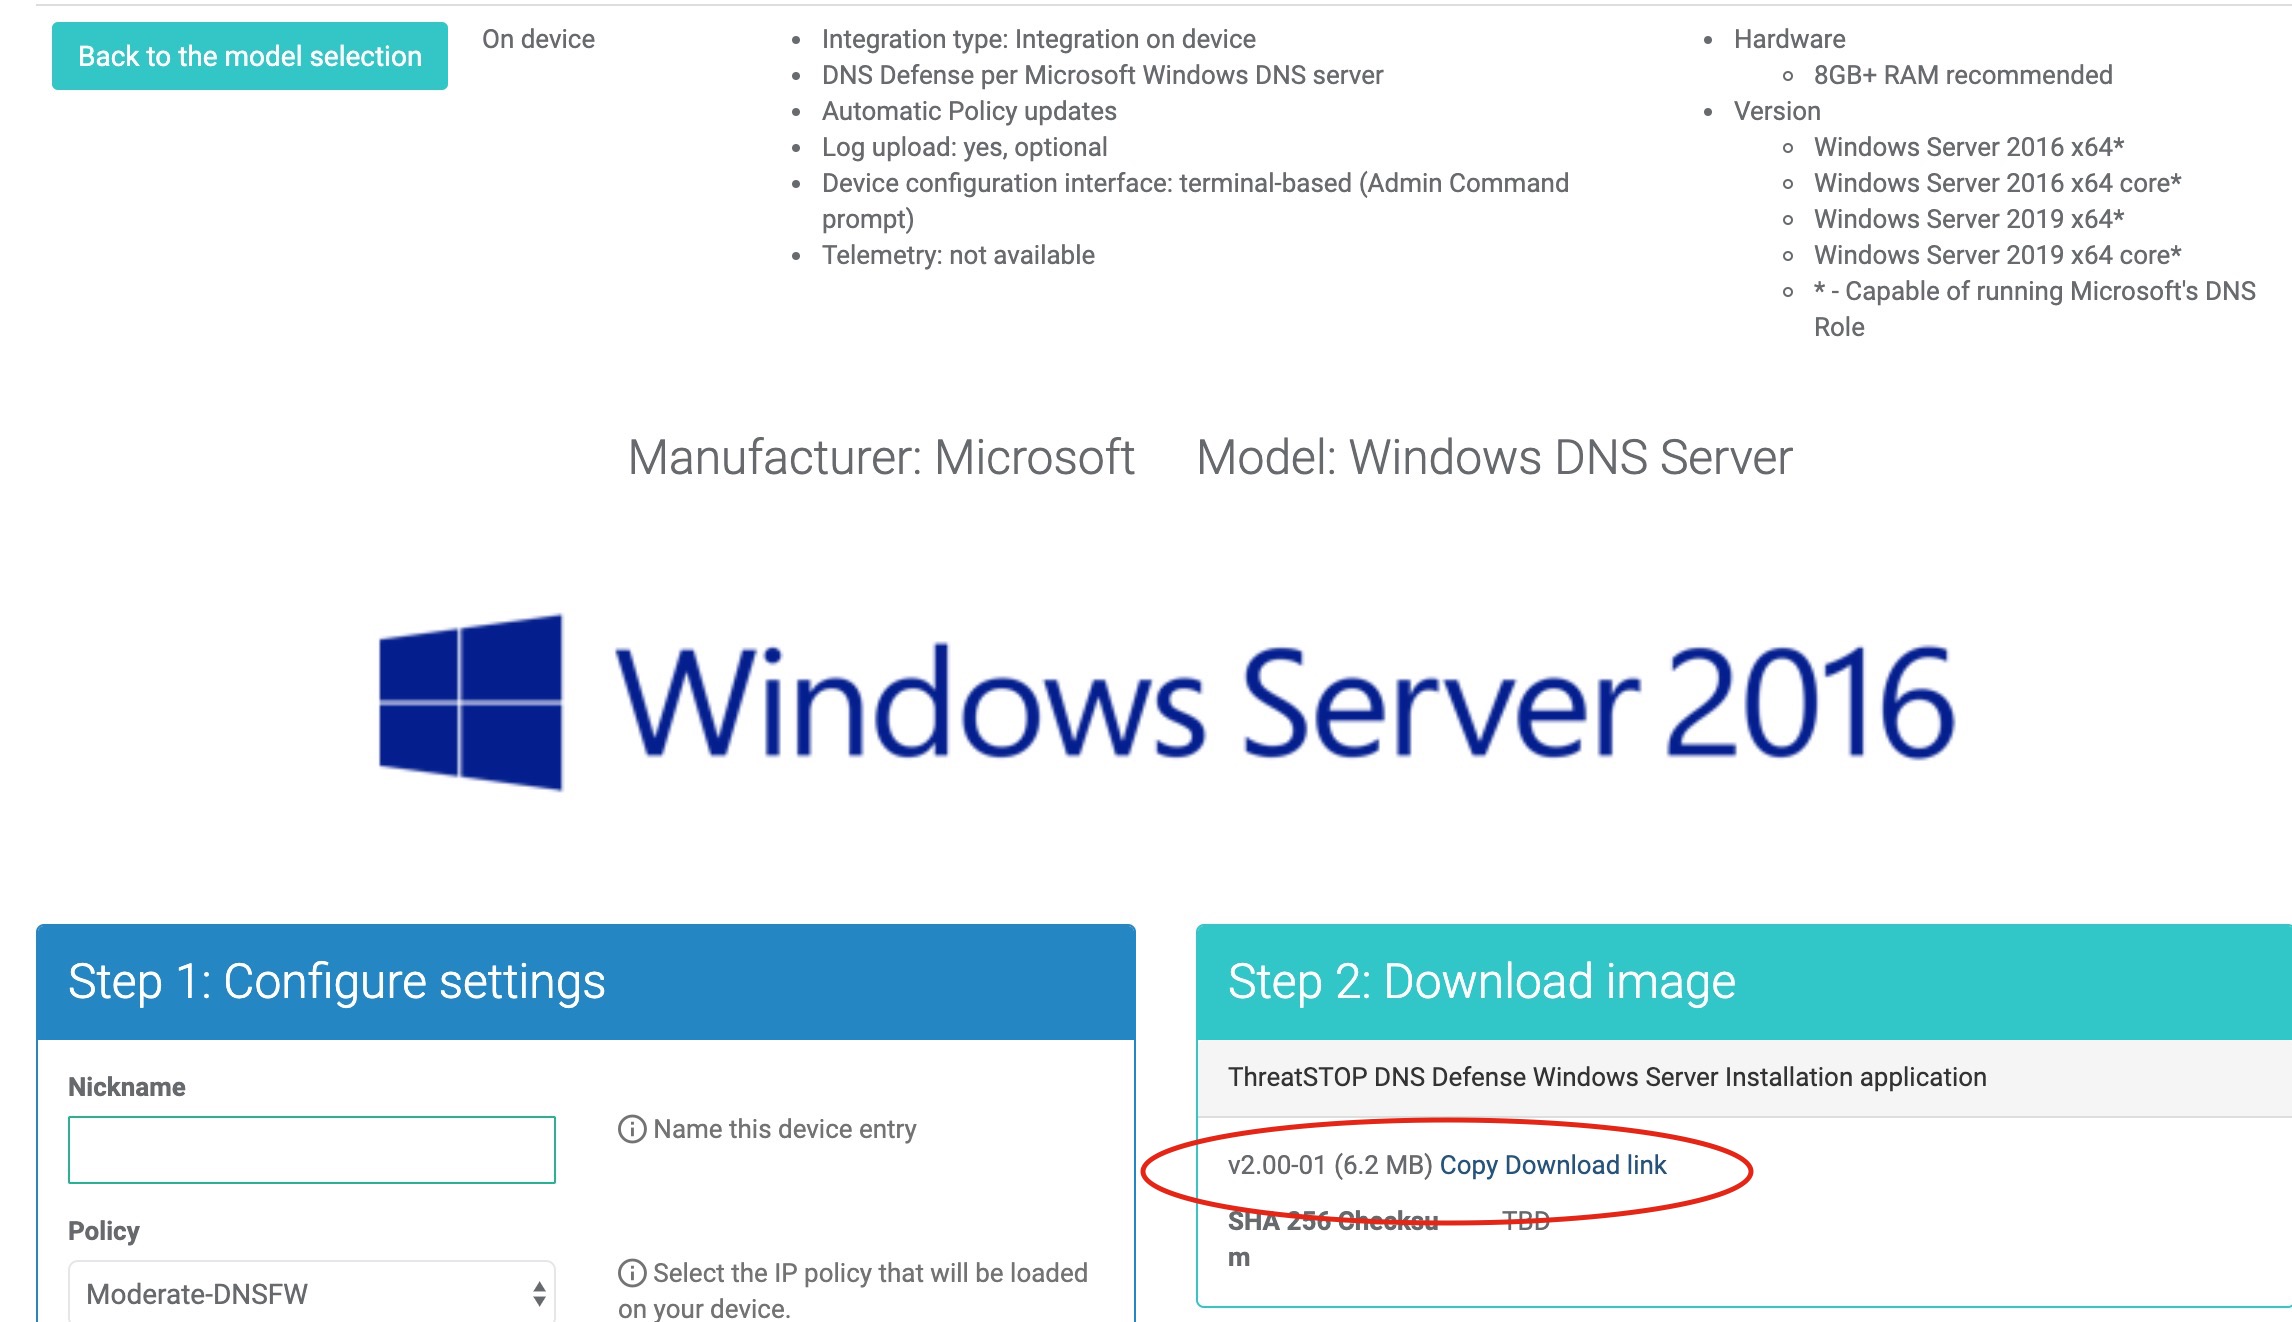
- Using the Portal, configure a new device - Manufacturer: Microsoft and Model: Windows DNS Server
- Download the ThreatSTOP Windows Server Installation application
tsadmin.exe& run the suppliedtsadmin install&tsadmin addcommands to start the installation wizard. The supplied software will automatically install the DNS server role for you (if it isn’t already installed) after supplying the required settings. - Verify the installation was successful & logging correctly
After installation it goes without saying you should configure your clients to use the protected DNS servers. The exact steps for that are outside of the scope of this document.
Section 1 - Specifications
Supported Operating Systems
| Operating System | Version |
|---|---|
| Windows Server † | 2016 x64 |
| Windows Server † | 2019 x64 |
† capable of running Microsoft’s DNS role
System
The ThreatSTOP DNS Defense Firewall requires a system that meets at least these specifications.
- 8 GB of RAM
- Supported Windows OS
Connectivity
To retrieve its configuration and policy, and to upload log data, the machine needs the following connectivity:
- DNS over TCP
- IP Range: 192.124.129.0/24
- Outbound TCP port 53 or 5353
- HTTPS
- Hostname: logs.threatstop.com
- IP range: 204.68.99.208/28
- Outbound TCP port 443
Section 2 - Preparations
Please make note of the following settings either displayed below (if accessing this documentation via the device docs link), or fetched from the admin portal devices page. They will be required to complete the setup.
ThreatSTOP DNS Defense Settings
Please make note of the following settings to complete the setup.
| Setting | Value |
|---|---|
| Device ID | Retrieved from device settings |
| Policy RPZ Zone Name | Retrieved from device settings |
| Policy TSIG Key Name | Retrieved from device settings |
| Policy TSIG Key Secret | Retrieved from device settings |
Downloading the software
When you get to device portal setup, be prepared to download the ThreatSTOP Windows Server Installation application (tsadmin.exe) via the link displayed in portal device setup.
After fetching the executable, verify its integrity by using the sha256sum.exe application, passing it tsadmin.exe as an argument and comparing the generated hash to the posted SHA256 hash located adjacent to the download software link.
C:\Users\Administrator\Downloads> sha256sum.exe tsadmin.exe
d1b3e873fc52daf6a-example-only---not-valid-sha256-ce1e38f *tsadmin.exe
Next we will use the tsadmin.exe to install the ThreatSTOP software on the local filesystem by invoking tsadmin install from an Administrator command prompt. This does not actually install DNS Defense, it installs the supporting software required to run the integration.
C:\Users\Administrator\Downloads> tsadmin.exe install
Please enter the local absolute file path to install ThreatSTOP DNS Defense software [C:\Program Files (x86)\ThreatSTOP]:
After the software is installed you will get more options invoking the tsadmin --help menu.
Section 3 - Installation
The following steps will walk you through adding ThreatSTOP DNS Defense to your Windows Server.
ThreatSTOP Portal setup
In thise step we will register the new device on the ThreatSTOP Admin portal.
- Navigate to your web browser to https://admin.threatstop.com/devices/list.
- If you want to use a custom DNS Firewall policy, please read DNS Firewall Policies
- Create a new Device Entry by hitting the Add Device button.
- The Manufacturer is: Microsoft
- The Model is: Windows DNS Server

- Fill out the new device settings and hit “Create new device” button, followed by “Save”.
The Admin Portal will display a form to enter the device settings.
-
Nickname: This is a mnemonic name used to identify the device. It can be set to any string (A-Z, 0-9, - and _). If you create multiple device entries, each entry must have a unique nickname.
-
Policy: Select a pre-defined policy or a customized policy. It must be a DNS Defense Policy.
-
IP Type: Access to the ThreatSTOP services is controlled in part using an ACL allowing the device IP address to connect. If your device has a static public IP address (the most common case), select static. If your device has a dynamic public IP address, the ThreatSTOP services can lookup the IP address using a DNS fully-qualified name (FQDN).
-
Public IP address: In static mode, this is the public IP address as output here. It is possible to configure multiple device entries with the same public IP address.
- Note: An optional field to store a note of your choice about the device - internal hostname, location, identifiers, model…
On Device setup
Next we will switch back to the Windows Server, to install the software and integrate ThreatSTOP DNS Defense.
- Log into your Windows Server as an Administrator.
- Ensure you have downloaded the ThreatSTOP Windows Server Installation application to the server.
- Open an admin session in a command prompt going to Start > Type
cmd> right-click and selectRun as Administrator.
tsadmin via powershell (indicated by ‘PS’ prefixing the prompt) you must include the path and extension so powershell handles it correctly, see example below.- Copy & Paste the tsadmin command into a command shell running as Admin.
C:\ThreatSTOP> tsadmin add --device_id=[Device ID] --rpz_tsig_name=[TSIG Name] --rpz_tsig_secret=[TSIG Secret] --policy=[Policy]
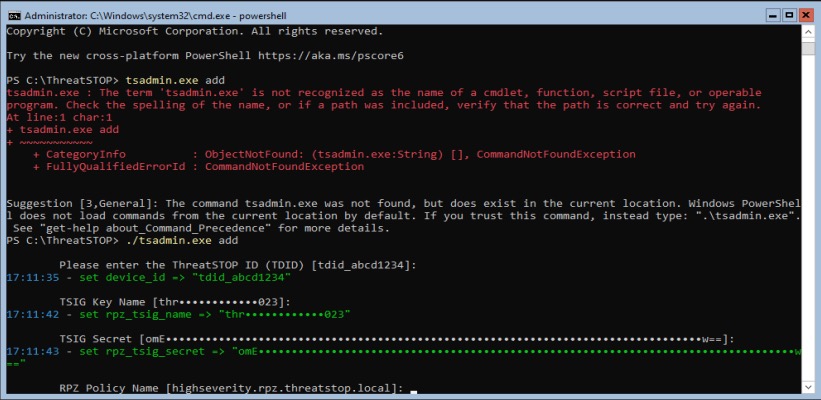
- You will be prompted for all required device settings (listed above) unless they are supplied via command line arguments.
- If necessary, the DNS Server role will be enabled on your server. This step may take a few minutes to complete. A reboot is not required.
- When setup is complete, a message similar to the following will be displayed:
16:44:59 - Successfully installed ThreatSTOP on Nov 19 16:44:59 2019
Client setup
After successful installation it goes without saying you should configure your clients to use the protected DNS servers. The exact steps for that are outside of the scope of this document, however some general recommendations are provided.
Change the Policy
If you have already installed and setup DNS Defense, and want to simply change policies, you can run the tsadmin configure subcommand and add the option outlined below.
--policy=[Zone name retrieved from device settings]
You can test the new setting by running tsadmin update and reviewing the windows event log for errors.
tsadmin command reference
The tsadmin command has several subcommands outlined below. Some of these subcommands such as add have command line options of their own. Run tsadmin --help to get general subcommand help, or tsadmin <sub command> --help to get help on the subcommand specific settings, i.e. tsadmin add --help.
| Sub command | Function |
|---|---|
| add | Add will invoke the setup menu to enter or confirm settings required for integration |
| remove | Removes the DNS Defense integration from the system |
| logs | Invokes the powershell scripts used to export logs |
| show | When installed, displays the settings that were configured |
| configure | Allows you to update configuration settigns, but does not totally reconfigure device. Settings like policy, dns_server, rpz_tsig_name & rpz_tsig_secret. However settings like log_export, log_upload, log_retention are only used during initial installation and would not take effect if updated after initial install & setup. To update these types of settings you must remove then add the device. |
| version | Displays the integration software build version |
| install | Installs the software onto the local filesystem |
| uninstall | Removes the software from the local filesystem. Must be removed prior to un-installing. |
| update | Invokes the update powershell script to fetch a fresh copy of the DNS policy. Otherwise downloaded/refreshed based on the policy_update interval (30min by default). |
Since the add subcommand has several options we will list those below.
| Option | Description |
|---|---|
--device_id TEXT |
ThreatSTOP Device ID (TDID) |
--rpz_tsig_name TEXT |
TSIG name (i.e. threatstop-threa099) |
--rpz_tsig_secret TEXT |
TSIG Key Secret |
--policy TEXT |
Policy zone name (i.e. Basic-DNSFW.rpz.threatstop.local) |
--public_ip TEXT |
Public IP Address |
--dns_action TEXT |
DNS action (ALLOW, DENY, IGNORE†) †† |
--log_export INTEGER |
Log export interval (minutes) |
--log_upload INTEGER |
Log upload interval (minutes) |
--log_retention INTEGER |
Log retention (days) |
--policy_update INTEGER |
Policy update interval (minutes) |
--proxy TEXT |
Proxy Uri (See: Invoke-RestMethod for more details) |
--proxy_credential TEXT |
Proxy Uri Credential (I.e. User01 or Domain01\Joe01) |
--exec_policy TEXT |
Microsoft Execution Policy for invoking powershell scripts (I.e. bypass) *Does not alter local policy |
--dns_server TEXT |
Master DNS Server(s), multiple values allowed by adding more than one --flag value pair. |
--help |
Show help |
IGNORE, a client may resolve a potentially malicious domain name from a subsequent DNS server if any are configured and not secured via the same DNS Defense policy.IGNORE - the DNS server is configured to drop queries with no response at all. This causes the DNS client in the malicious domain to time out.
ALLOW - the DNS server permits the query to run to completion. Useful when setting up a proof of concept or testing policy effects without impacting production. This means you will allow bad traffic as well.
DENY - the DNS server does not permit the DNS query to resolve and responds as such. The result for
nslookup queries will be Query refused.
Section 4 - Validation
In this section we will validate the installation was successful, and verify we have logging is functioning as expected.
Testing Installation
You can test that the RPZ policy is working correctly by verifying a known blocked address like bad.threatstop.com either returns NXDOMAIN or Query refused.
Below is an example using nslookup, found natively on Windows machines.
# substitute localhost with DNS server IP address if not running command directly on configured Windows DNS Server
C:\Users\user>nslookup bad.threatstop.com localhost
*** Unknown can't find bad.threatstop.com: Query refused
Looking up a non-restricted website like google.com should return its current IP. You can repeat this on any client using this device as a DNS server.
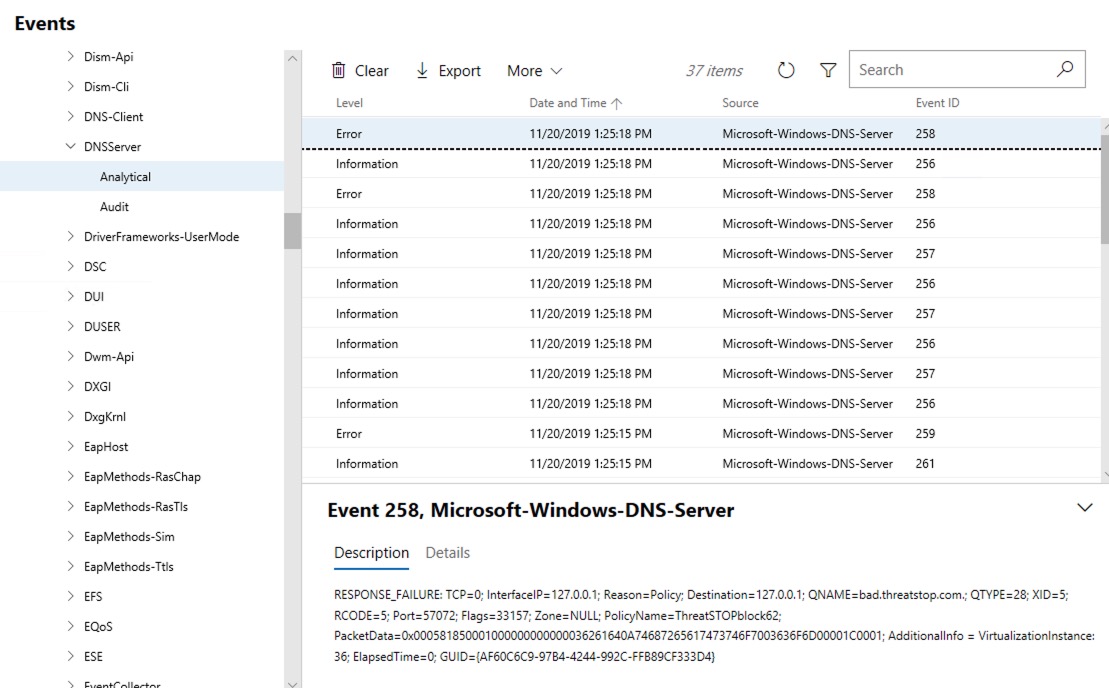
- Check the Windows Event logs at
Applications and Services Logs > Microsoft > Windows > DNSServer > Analytical
Troubleshooting
- You can test connectivity to ThreatSTOP opening a web browser and navigating to
https://logs.threatstop.com/cgi-bin/validip.pl. You should see output like the example below.Your IP address: <ip address> Address is in the list of authorized hosts - Check the Event Log for error messages.
- You may also view C:\Windows\System32\dns to see the ThreatSTOP zone files. The modified date on your current ThreatSTOP policy will update each time your DNS server refreshes its policy.
- Use the Utilities.ps1 script to check the contents of your ThreatSTOP policy blocks
- If you encounter PowerShell permissions restrictions, you may need to change the execution policy using Set-ExecutionPolicy.
Set-ExectionPolicy RemoteSigned
Section 5 - Additional Information
This section provides some additional information useful in troubleshooting and maintaining the installation.
Using ThreatSTOP and Configuring your Clients
Clients and network devices that you wish to protect will need to be configured to use the private IP address of the Windows DNS Server for domain resolution. Alternatively, you can configure your DHCP server to provide this information to clients automatically.
Caution: This is not necessarily the IP address established during the device configuration. It is more than likely that you will need to use the Private IP address of your Windows Server, or configure your Active Directory controller to use the Windows DNS server for domain resolution.
Scheduled Tasks
Open Windows Task Scheduler to see the three tasks created by ThreatSTOP:
- ThreatSTOP_policyrefresh – updates your ThreatSTOP DNS policies with current threats.
- ThreatSTOP_exportDNSlog – exports a log of blocked requests to your export folder (as specified in your ThreatSTOP.ini configuration)
- ThreatSTOP_uploadDNSlog – uploads your ThreatSTOP logs to the ThreatSTOP portal for analysis and reporting.
Event Viewer
ThreatSTOP logs events in the standard Windows Application Log. Use Event Viewer and look in the Source column for ThreatSTOP to view logged events. For example, every time your DNS policies are updated you will see an entry similar to the following:
Policies updated. Last TS pol: ThreatSTOPblock14
ThreatSTOP DNS policies are created in blocks of 1000. So a message of “Last TS pol: ThreatSTOPblock14” indicates that there are approximately 14,000 block rules in effect.
Windows DNS Server logs to several places in Windows Event log, though the actions relavant to ThreatSTOP DNS Defense are logged to Applications and Services Logs > Microsoft > Windows > DNSServer > Analytical . The following screenshot is using Microsoft Admin Center.
Install logs
The tsadmin application produces logs to traceback issues during install / configuration to a log in logs\tsadmin.log located relative to the executable file itself.