Overview
This document describes how to configure Linux to send DNS queries to ThreatSTOP’s DNS Defense Roaming service. This configuration can be used:
- to configure ThreatSTOP’s DNS Firewall on Linux workstations, for users on a network not protected by a corporate DNS Firewall (e.g. roaming users and home offices)
- to configure a DNS proxy to forward DNS queries from devices on a corporate LAN. This is an alternative to using the DNS Defense Cloud service. DNS Defense Cloud requires a static IP address and uses the DNS protocol over UDP/TCP. DNS Defense Roaming doesn’t require a static IP address and uses the DNS-over-HTTPs protocol.
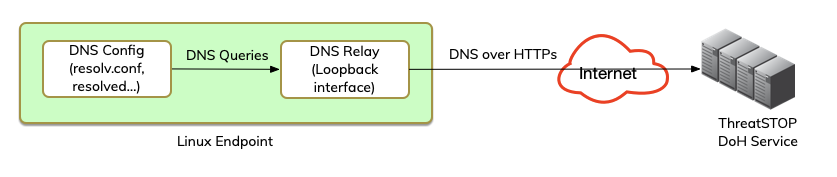
Using on a roaming device
In this configuration, the ThreatSTOP-DDR DNS relay is installed on a Linux workstation/laptop and listens for DNS query on the loopback interface. The OS is configured to use the loopback for DNS service and the relay forwards them over DoH.
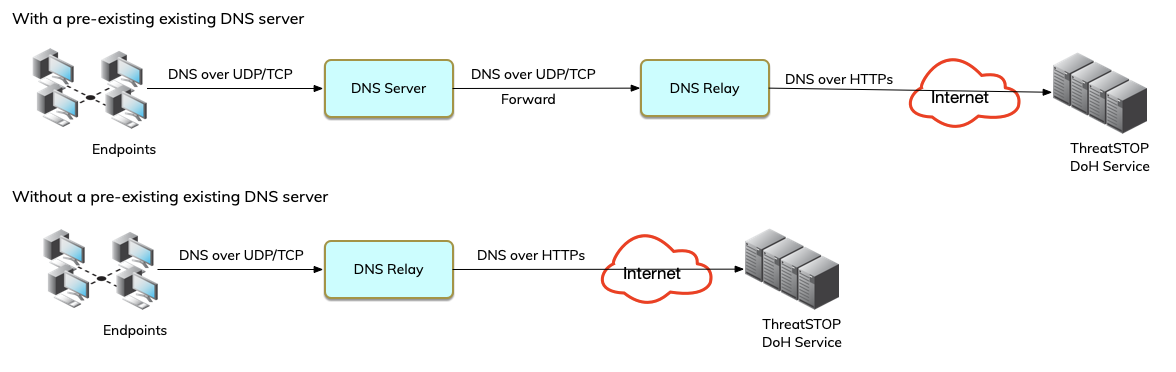
Using as a forwarder
The typical configuration to use ThreatSTOP’s DNS Defense Cloud relies on configuring endpoints to use a local DNS server that forwards DNS traffic to ThreatSTOP’s DNS service. Access to the service requires a static public IP address. If your network doesn’t have a static IP address, you can use a DNS Proxy configured as a relay to forward traffic to the ThreatSTOP DoH service. In this configuration, the DNS relay is installed on a Linux server and listens for DNS queries on UDP/TCP port 53 on a network interface, and forwards them over DoH.
Compatibility
The installation requires two packages:
- dnsdist, a DNS load-balancer written by the fine team at PowerDNS.
- the ThreatSTOP DDR_Relay package, which automates the configuration of dnsdist.
The packages are compatible with RHEL7 and 8, Centos 8 and 9, and Ubuntu 20.04 and 22.04.
Current Version
The current version of the ThreatSTOP package is 1.00 and requires dnsdist 1.8.
Prerequisites
System
dndist consumes low amounts of CPU and memory and should work well on any modern workstation or laptop. If you are using the dnsdist to forward traffic from a LAN with many endpoints, please review dnsdist’s tuning documentation. The dnsdist configuration enables a single DoH endpoint and higher volume of queries will increase RAM requirements (see MaxUDPOutstanding.)
Connectivity
To connect to the ThreatSTOP DoH service, the Linux device will need the following connectivity:
- HTTPs (DNS-over-HTTPs)
- IP addresses: 207.167.126.80 and 207.167.127.80
- Outbound TCP Port 443
Installation
ThreatSTOP DNS Defense Roaming endpoint
- Before proceeding with the Linux configuration, you will need to provision a ThreatSTOP DoH endpoint as documented here.
-
Validate that your Linux system is able to perform DNS lookups using the endpoint, e.g. run this curl command and check it retrieves the web page successfully.
curl -v --doh-url https://<service-url> http://ddc-test.threatstop.com
dnsdist
- Install dnsdist 1.8 by following the instructions for your distribution.
-
Check that it is installed:
  $ dnsdist -V
  dnsdist 1.8.3 (Lua 5.1.4 [LuaJIT 2.1.0-beta3])
ThreatSTOP-DDR is a package to generate the dnsdist configuration for your ThreatSTOP DNS Defense Roaming endpoint.
Installation on Ubuntu 20
echo 'deb https://debian.threatstop.com/ThreatSTOP/ focal main' | sudo tee /etc/apt/sources.list.d/threatstop.list
curl https://debian.threatstop.com/GPG-KEY.asc | sudo apt-key add -
sudo apt update
sudo apt install threatstop-ddr
Installation on Ubuntu 22
echo 'deb https://debian.threatstop.com/ThreatSTOP/ jammy main' | sudo tee /etc/apt/sources.list.d/threatstop.list
curl https://debian.threatstop.com/GPG-KEY.asc | sudo apt-key add -
sudo apt update
sudo apt install threatstop-ddr
Installation on RHEL and CentOS
Run the following commands to add the ThreatSTOP software repository.
echo '[threatstop]
name=ThreatSTOP
baseurl=https://rpm.threatstop.com
gpgcheck=1
enabled=1
gpgkey=https://rpm.threatstop.com/RPM-GPG-KEY-CentOS-7
' | sudo tee /etc/yum.repos.d/threatstop.repo
sudo yum update
sudo yum install threatstop-ddr
Configuration
- threatstop-ddr is installed as /opt/threatstop_ddr/bin/threatstop-ddr-admin.
- It requires the service URL for your ThreatSTOP DoH endpoint, which you can retrieve from the device configuration in the ThreatSTOP Admin Portal.
- Optionally, you can select an IP address to listen on and specify ACLs to restrict access to the dnsdist service.
Roaming endpoint configuration
- In this configuration, dnsdist will only listen for traffic from the workstation itself, on the loopback interface.
/opt/threatstop_ddr/bin/threatstop-ddr-admin --action=install --listen=127.0.0.53:53 --url=<your service URL>
- Confirm that the system is correctly using dnsdist and the ThreatSTOP DoH service by resolving ddc-test.threatstop.com, which will only resolve when using the service.
$ nslookup ddc-test.threatstop.com
Server:		127.0.0.53
Address:	127.0.0.53#53

Non-authoritative answer:
Name:	ddc-test.threatstop.com
Address: 64.87.3.130
DNS Forwarding for LAN
- In this configuration, dnsdist will only listen on the IP address you select, on a network interface accessible from the LAN.
- You can use 0.0.0.0:53 to listen on multiple interfaces. If your are running systemd-resolved, threatstop-ddr will ask if you want to disable it as listening on 0.0.0.0:53 will create a conflict. After systemd-resolved is disabled, DNS queries will be answered by dnsdist and the ThreatSTOP service.
- Use –acl=subnet (IP/mask) add an ACL that limits the IP addresses able to use the service.
/opt/threatstop_ddr/bin/threatstop-ddr-admin --action=install --listen=<IP address of network interface>:53 --url=<your service URL>
- Confirm that remote endpoints are able to use the DNS relay by performing a DNS lookup from a different endpoint:
$ nslookup ddc-test.threatstop.com <server IP>
Server:		<server IP>
Address:	<server IP#53

Non-authoritative answer:
Name:	ddc-test.threatstop.com
Address: 64.87.3.130
Uninstalling
- To remove the configuration files and stop dnsdist, run
/opt/threatstop_ddr/bin/threatstop-ddr-admin --action=uninstall
- If you disabled systemd-resolved, you can restart it with
sudo systemctl enable systemd-resolved && systemctl start systemd-resolved
High-Availability configuration
- To add high-availability to your configuration, for example to perform maintenance of the dnsdist relay, we recommend setting up two servers with the same dnsdist configuration and using both of their IP addresses as the DNS server addresses for the endpoint.
Automated deployment
This configuration can be deployed automatically to Linux systems using a shell script that:
- sets up the dnsdist and ThreatSTOP repositories
- install the dnsdist and threatstop-ddr packages
- runs threatstop-ddr-admin command
Changelog
- v1.01 - Jan 4, 2024 - Initial release