Overview
This document describes how to integrate ThreatSTOP’s IP Defense on OpenBSD using Packet Filter (PF) persistent tables:
- Automated retrieval and updates of IP Defense policies
- Automated collection and upload of log files
The integration uses scripts to download policy updates from ThreatSTOP DNS servers. Policy hits are collected using pflog and automatically uploaded to ThreatSTOP servers for reporting.
Compatibility
| Distro | Version |
|---|---|
| OpenBSD | 6.9 |
ThreatSTOP Data Flow Diagram

If this is a new device, please allow up to 15 minutes for our systems to be updated.
Prerequisites
During the installation you will be prompted to install a few packages if they are not found on the system. The software is required for fetching the policy or for logging. You will be prompted to install them but we will list them below. Some of these software packages / libraries have dependencies of their own that may change over time, so we’ll just list the main packages below.
p5-libwww&p5-LWP-Protocol-https- perl libraries for connecting to the webdig- a dns lookup utility (should be pre-installed on OpenBSD)
# Manual installation of packages
export PKG_PATH=http://ftp5.usa.openbsd.org/pub/OpenBSD/`uname -r`/packages/`machine -a`/
pkg_add p5-libwww p5-LWP-Protocol-https
In addition to enabling pf, you’ll need to make sure you have at least a basic PF configuration file (/etc/pf.conf) to load during boot. Take a look at this guide if you need help getting started.
Connectivity
To retrieve its configuration and policy, and to upload log data, the device needs the following connectivity:
- DNS over TCP - Policy service
- Hostname: ts-dns.threatstop.com
- IP Range: 192.124.129.0/24
- Outbound TCP port 53 or 5353
- HTTPS - Log service
- Hostname: logs.threatstop.com
- IP range: 204.68.99.208/28
- Outbound TCP port 443
- Direct Connection or via Proxy
Quickstart
For users familiar with the installation process, we’ve listed the basic abbreviated installation commands below. If you are a new user, please continue with the detailed steps below.
TS_PF_PKG=https://downloads.threatstop.com/ts-pf.tgz # <-- get this URL from https://admin.threatstop.com/devices info section
wget $TS_PF_PKG -O threatstop-pf.tgz && tar xzvf threatstop-pf.tgz && cd ./threatstop && cp threatstop.conf.example threatstop.conf && ./install.sh
Step 1 - Adding device in Admin Portal
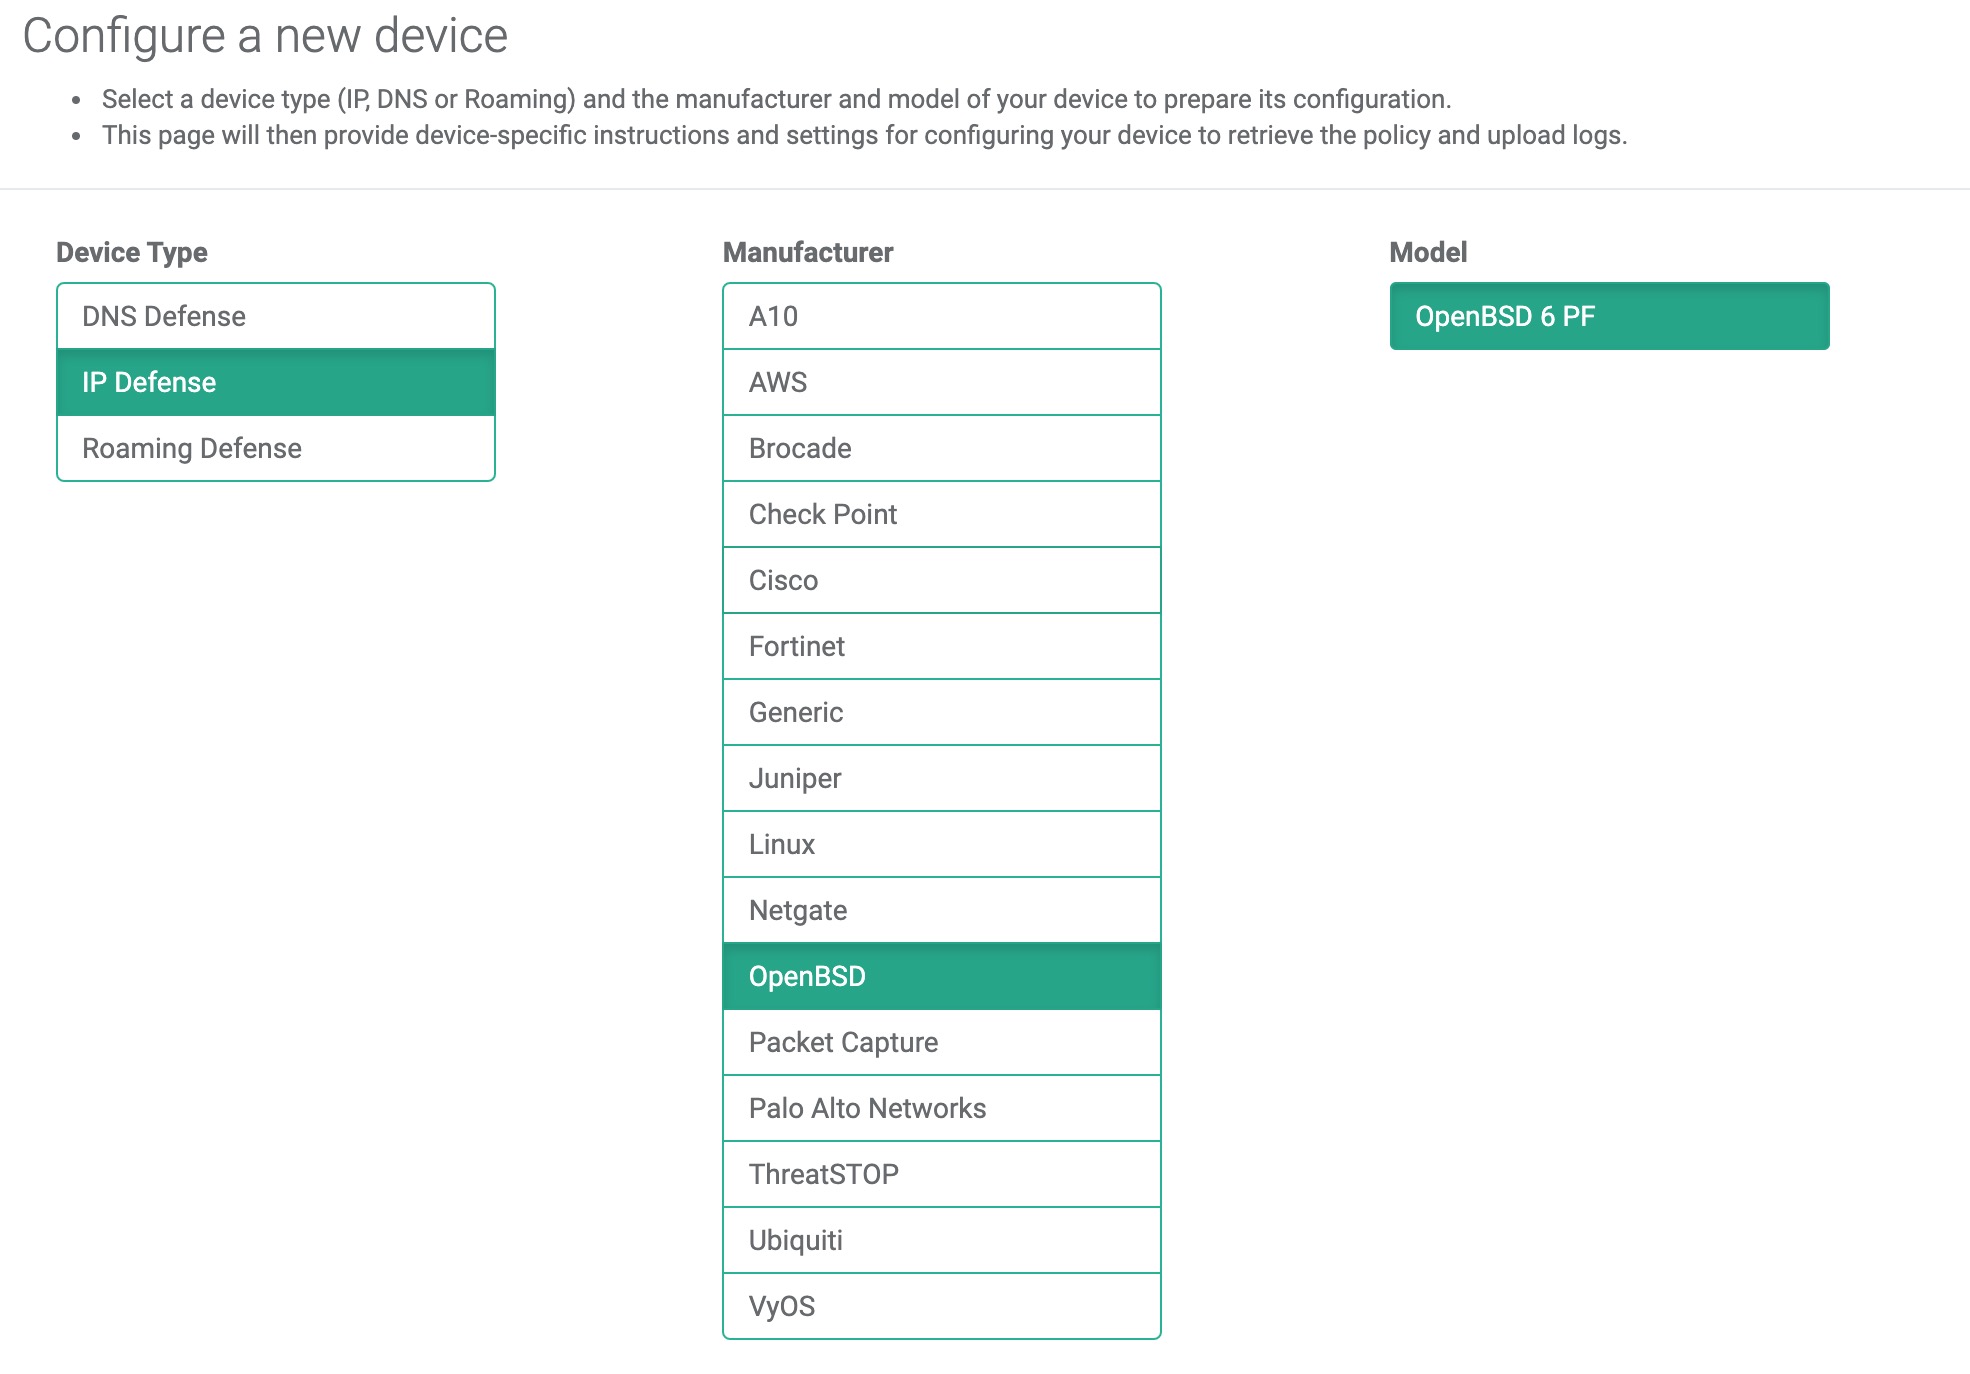
During this step, you will create a device entry on the Admin Portal. You will select a device type (OpenBSD) and enter the configuration settings. A minimum configuration only requires a handful of settings but optional, advanced options are also available.
To create a BSD device entry:
- Log into the Admin Portal with your ThreatSTOP account
- Browse to the Device page and click Add Device
- Type: IP Defense
- Manufacturer: OpenBSD
- Model: OpenBSD 6 PF
- Integration Type: On Device
The Admin Portal will display a form to enter the device settings described below and the links to retrieve the TSCM image.
-
Nickname: this is a mnemonic name used to identify the device. It can be set to any string (A-Z, 0-9, - and _). If you create multiple device entries, each entry must have a unique nickname. The Nickname will be used to identify the device on the TSCM and in the Reporting user interface.
-
Policy: select a pre-defined policy or a customized policy. It must be an IP Defense Policy.
-
IP Type: Access to the ThreatSTOP services is controlled in part using an ACL allowing the device IP to connect. If your device has a static public IP address (the most common case), select static. If your device has a dynamic public IP address, the ThreatSTOP services can lookup the IP address using a DNS fully-qualified name (FQDN).
-
Public IP address: In static mode, this is the public IP address of the device. It is possible to configure multiple device entries with the same public IP address.
-
Domain name: In Dynamic mode, this is a DNS FQDN which must be kept up-to-date as an A record pointing to the device’s dynamic IP.
-
Note: An optional field to store a note of your choice about the device - location, identifiers, model…
Upon saving the form, a device entry will be created in ThreatSTOP’s cloud.
Step 2 - Acquiring software
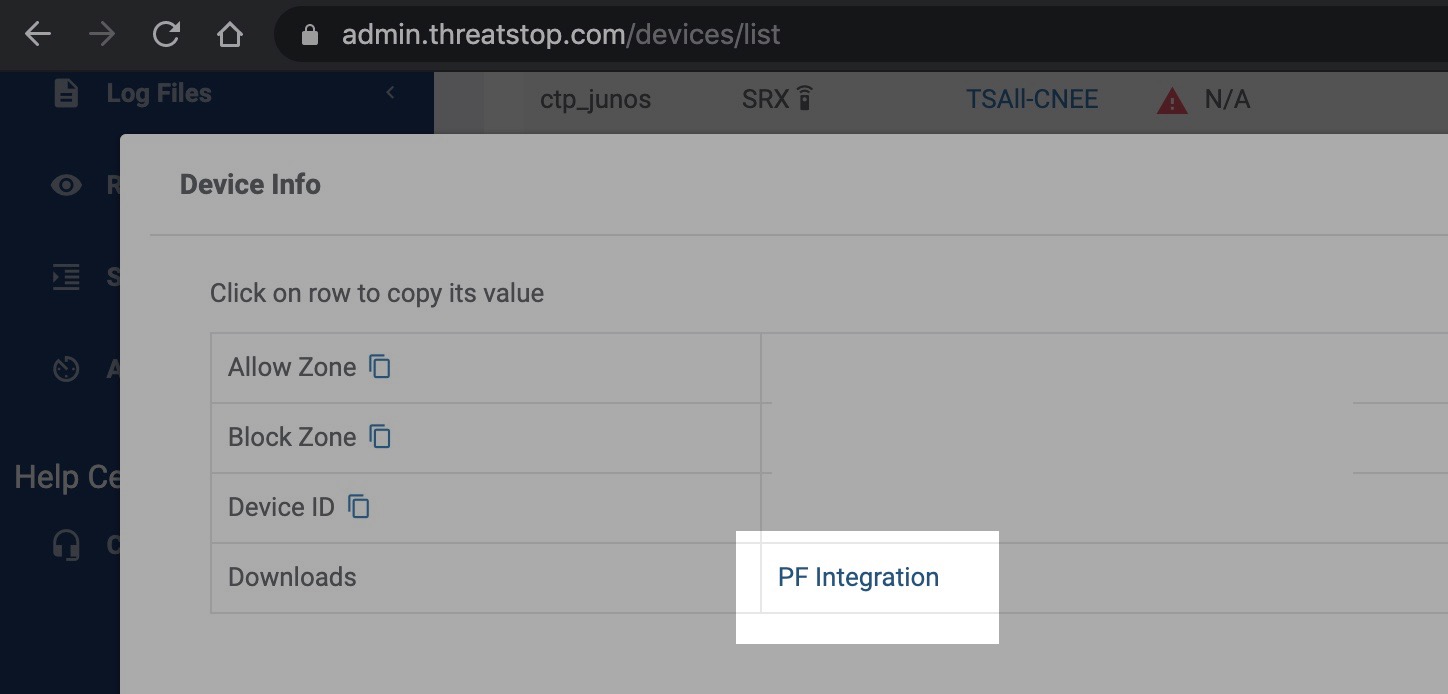
To download the ThreatSTOP integration software tarball, go to the devices admin page and click on the [INFO] button. You will see a link to download the latest software. If you are downloading it directly onto your device via SSH, right-click the link and copy the link URL.
Next, SSH into your OpenBSD device and run the following.
TS_PF_PKG=https://downloads.threatstop.com/ts-pf.tgz # <-- get this URL from https://admin.threatstop.com/devices info section
wget $TS_PF_PKG -O threatstop-pf.tgz && tar xzvf threatstop-pf.tgz && cd ./threatstop
# proceed to Step 2
Software details
The integration software consists of a few perl, sed & shell scripts and configuration files. The details of which are listed below.
- threatstop-pf.sh: The main script. It downloads the block lists and creates the files PF uses to populate a table.
- sendlog.sh: Converts the PF log file to plain text and calls loguploadclient.pl to upload the script.
- install.sh: Installation script. Running the
install.shscript installs the executables to/usr/local/sbinwhile placing the configuration file in/usr/local/etc. - test.sh: Script to run a quick test to make sure the block lists are ready to be downloaded.
- threatstop.conf.example: Example configuration file.
Step 3 - Configuring software
After downloading and extracting the software, copy the configuration file contents show below to a file named threatstop.conf in the same directory where the downloaded software was extracted (alongside install.sh).
# At this point you would open a file with your favorite editor (vi, nano, emacs) and paste in the configuration file as a starting point.
vi threatstop.conf
# hit [i] to get into insert mode, paste in config shown below, hit [esc] to exit insert mode & save and exit by pressing [SHIFT + ZZ]
Configuration file
# Final location of the files PF will use for the tables
OUT_DIR="/var/db"

# ThreatSTOP Device ID (TDID)
device_id="tdid_abcd1234"

# ThreatSTOP DNS Servers
# You can add or remove entries. Each server must be separated by a space
DNS_SERVERS="192.124.129.42"

# The block and/or allow list
ALLOW_LIST="dns.threatstop.local"
BLOCK_LIST="basic.threatstop.local"

# The name of the files pf will use for the tables
BLOCK_FILE="$OUT_DIR/ThreatSTOP-Block.pftable"
ALLOW_FILE="$OUT_DIR/ThreatSTOP-Allow.pftable"

# The name of the table for PF
ALLOW_TABLE="ThreatSTOP-Allow"
BLOCK_TABLE="ThreatSTOP-Block"

# Automatically reload PF after the files are created
RELOAD_PF="YES"

#
# Options for the sendlog.sh script
#

# Location and name of the PF log file
PFLOG="/var/log/pflog.0"

# Name of the log file to upload. File is created
# and deleted by the sendlog.sh script
logfile="/tmp/pflog.txt"

# URL to upload the logs to
url=https://logs.threatstop.com/cgi-bin/logupload.pl
Configuration setting reference
- OUT_DIR: Directory where the files will be saved that PF will use to build the tables.
- device_id: matches the ThreatSTOP Device ID (TDID) listed on the devices admin page.
- BLOCK_FILE: Location and name of the file with IP addresses to block.
- ALLOW_FILE: Location and name of the file with IP addresses to allow.
- BLOCK_TABLE: The name of the PF table that will hold the IP address to block.
- ALLOW_TABLE: The name of the PF table that will hold the IP addresses to allow.
- RELOAD_PF: The script can automatically flush and reload the ThreatSTOP tables.
- logfile: Temporary file used by the sendlog.sh script.
- url: URL to upload the plain text output of the log file.
Step 4 - Installing software
Next we’ll run the install.sh script which will do the following:
- Check if
pf&pflogare enabled, prompt you to do so if they are not. - Check if required software is installed & prompt you to install if they are not.
- Copies the executables to
/usr/local/sbinand the configuration filethreatstop.confto/usr/local/etc - It also modifies the logrotation manager
newsyslogto create a newpflog hourly - Schedules automatic log uploads to our servers & policy updates every hour
newsyslog.conf file modification example:
From:
/var/log/pflog 600 3 250 * ZB "pkill -HUP -u root -U root -t - -x pflogd"
To:
/var/log/pflog 600 10 * 1 ZB "pkill -HUP -u root -U root -t - -x pflogd"
As root, run the the install.sh script:
./install.sh
sysrc: /usr/sbin/sysrc /usr/share/man/man8/sysrc.8.gz
checking if pf is enabled
DiG 9.16.16
Copying scripts to "/usr/local/sbin"

Copying configuration and version file to "/usr/local/etc"

Changing the newsyslog.conf file to rotate pflog every hour
Adding crontab entry to run the "threatstop-pf.sh" script every hour
and upload the log file with the "sendlog.sh" script every 15mins
  Backing up original crontab to "crontab.pre-threatstop"
  Creating backup of /etc/newsyslog.conf => /etc/newsyslog.conf.pre-threatstop
It can take up to an hour for a new device to be fully provisioned on our backend servers, though usually ready in less time. We’ve included a test script (test.sh) to see if your device is ready on our servers.
./test.sh
DNS Server 192.124.129.42 is ready.

The test was successful. You are now ready to run the threatstop-pf.sh script.
Update Script
After making sure the test script works, you can now run the main update script, /usr/local/sbin/threatstop-pf.sh. The script downloads the latest block/allow policies and creates the reference files PF uses to populate persistent tables.
In order for PF to load any updates to the ThreatSTOP lists, PF needs to flush and reload the table. In the configuration file, there is an option to reload PF after the block lists have been downloaded. The commands that are run to do this are:
# threatstop-pf.sh
Starting ThreatSTOP v1.3 update on Fri Aug 12 07:42:05 PDT 2016

Using DNS Server 64.87.26.147
Processing allow list [allow list name].[ThreatSTOP Org ID].threatstop.local
Processing block list [block list name].[ThreatSTOP Org ID].threatstop.local

Completed getting all the lists
Adding 26424 blocked addresses
Adding 3 allowed addresses
Reloading pf...done

Finished ThreatSTOP update at Fri Aug 12 07:42:15 PDT 2016
Run Length: 0 hour(s) 0 minute(s) 10 second(s)
Step 5 - Configuring PF Tables
Once the files containing the addresses to block are created, you will need to configure PF to use the file as a table. In the /etc/pf.conf file, add the table definition:
# Please leave in the '<,>' characters, they are syntactically correct
table <ThreatSTOP-Block> persist file "/var/db/ThreatSTOP-Block.pftable"
table <ThreatSTOP-Allow> persist file "/var/db/ThreatSTOP-Allow.pftable"
With the table defined, you can create the rules to block traffic to and from the addresses in the table. We recommend that the rules to block the ThreatSTOP table be placed before any rules that allow incoming or outgoing traffic. The “quick” directive tells PF to treat the rule as the last matching rule. Any rules after it are not evaluated.
# Please leave in the '<,>' characters, they are syntactically correct
pass in quick from <ThreatSTOP-Allow>
pass out quick to <ThreatSTOP-Allow>
block drop in log quick from <ThreatSTOP-Block>
block drop out log quick to <ThreatSTOP-Block>
After you make the changes to the /etc/pf.conf file, PF will need to be reloaded to read the updated configuration:
/sbin/pfctl -f /etc/pf.conf
To view the addresses in the table, run the command:
# pfctl -T show -t ThreatSTOP-Block
# pfctl -T show -t ThreatSTOP-Allow
To view the updated rules, run the command:
/sbin/pfctl -s rules
Optional Bridge Configuration
OpenBSD PF can be configured to run as either a router or as a bridge, with some minor modifications to the router setup. This step is completely optional and only here as a quick reference. To setup a PF bridge a second network interface will need to be added to the network interfaces. To do this:
- We’ll need to create a bridged pair of network interfaces.
- At the command prompt enter:
vi /etc/hostname.bridge0 - Next we need to add the interfaces, and link them.
add interface em1 add interface em2 up - Save the file using :wq
- At the command prompt enter:
In the /etc/pf.conf file, use the configuration to the left, but append the following to the front of your configuration:
PUBLIC_IF=bridge0
and after the configuration append:
pass out on bridge0 all
pass in on $PUBLIC_IF
Additionally you will need to omit the following line:
pass out quick on em0 inet from 192.168.160.0/24 to any nat-to em0
Now that the bridge configuration is complete, interface em0 will connect to your management device, em1 and em2 will need to each connect to different networks, such as your trusted and untrusted environments.
Step 6 - Testing integration
Testing policy
To finish, we’ll begin by testing if the ThreatSTOP test indicator of compromise (IOC, bad.threatstop.com -> 64.87.3.133) is found in the block table.
# If you have changed the default table name, substitute it below
pfctl -T show -t ThreatSTOP-Block | grep 64.87.3.133
The next test will be to ensure the tables have been loaded by PF by attempting to ping or curl our test indicator of compromise (IOC), bad.threatstop.com -> 64.87.3.133.
OpenBSD$ ping -c 2 64.87.3.133
PING 64.87.3.133 (64.87.3.133): 56 data bytes
ping: sendmsg: Permission denied
ping: wrote 64.87.3.133 64 chars, ret=-1
ping: sendmsg: Permission denied
ping: wrote 64.87.3.133 64 chars, ret=-1
From the output above we can see that the IOC was blocked successfully. Optionally, for a positive test, you could comment out the table entries, reload pf.conf and ensure the test IOC is accessible again.
Testing Logs
Finally, testing logging is similar to testing the policy but we’ll want to first start a tcpdump session in one shell session, and run the ping test in another. You should see hits appear real-time.
# WINDOW 1 (TCPDUMP session)
OpenBSD$ sudo tcpdump -nei pflog0
tcpdump: verbose output suppressed, use -v or -vv for full protocol decode
listening on pflog0, link-type PFLOG (OpenBSD pflog file), capture size 262144 bytes
00:42:16.939373 rule 5/0(match) [uid 0]: block out on em0: 10.0.2.15 > 64.87.3.133: ICMP echo request, id 29961, seq 0, length 64
00:42:17.994412 rule 5/0(match) [uid 0]: block out on em0: 10.0.2.15 > 64.87.3.133: ICMP echo request, id 29961, seq 1, length 64

# WINDOW 2 (PING ATTEMPT TO ThreatSTOP TEST TARGET)
OpenBSD$ ping -c 2 64.87.3.133
PING 64.87.3.133 (64.87.3.133): 56 data bytes
ping: sendmsg: Permission denied
ping: wrote 64.87.3.133 64 chars, ret=-1
ping: sendmsg: Permission denied
ping: wrote 64.87.3.133 64 chars, ret=-1
Once you see this, let’s attempt to see if they were written to disk as expected.
OpenBSD$ sudo tcpdump -ner /var/log/pflog|grep "64.87.3.133"
15:35:09.226823 rule 1/(match) block out on em0: 10.0.2.15 > 64.87.3.133: icmp: echo request
15:35:45.716664 rule 1/(match) block out on em0: 10.0.2.15 > 64.87.3.133: icmp: echo request
15:35:53.036536 rule 1/(match) block out on em0: 10.0.2.15.31470 > 64.87.3.133.80: S 3938496047:3938496047(0) win 16384 <mss 1460,nop,nop,sackOK,nop,wscale 6,nop,nop,timestamp 2835589396[|tcp]> (DF)
Testing sending logs
Next we’ll test sending the logs to our servers for backend analysis.
- First let’s manually rotate the log.
# we can manually force newsyslog to rotate logs by running
sudo newsyslog -F -f /etc/newsyslog.conf
# next we can use zcat to read the contents of that file and ensure it has IOC hits
sudo zcat /var/log/pflog.0.gz | tcpdump -ner -
# finally we'll attempt to send the files using the script /usr/local/sbin/send_files.sh
OpenBSD$ sudo /usr/local/sbin/sendlog.sh
Log file uploaded successfully for tdid_abcd1234
It is important to see the ThreatSTOP Device ID (tdid) match what you see in the device portal.
Restore to Previous State
If you decide to return to your pre-ThreatSTOP configuration, you will need to perform the following actions to disable and remove ThreatSTOP from your system:
- Stop the VM from updating the firewall by deleting the user crontab:
# remove the following lines from roots crontab # ThreatSTOP update 22 * * * * /usr/local/sbin/threatstop-pf.sh */15 * * * * /usr/local/sbin/sendlog.sh - Remove the ThreatSTOP allow/block tables from the
/etc/pf.confpf configuration file & reloadpfby runningsudo pfctl -f /etc/pf.conf - Delete the files from
/usr/local/sbinand/usr/local/etcwe listed above.
Additional information
Troubleshooting
- If you are not able to download the policy, run the following:
@:~$ wget -qO - http://logs.threatstop.com/cgi-bin/validip.pl
Your IP address: 1.2.3.4
Address is in the list of authorized hosts